


36
Chapter 4: Commissioning
COM
DC
COM
DC
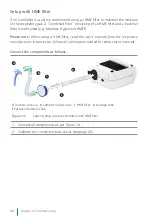
D
E
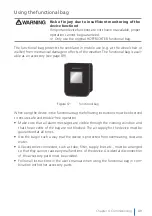
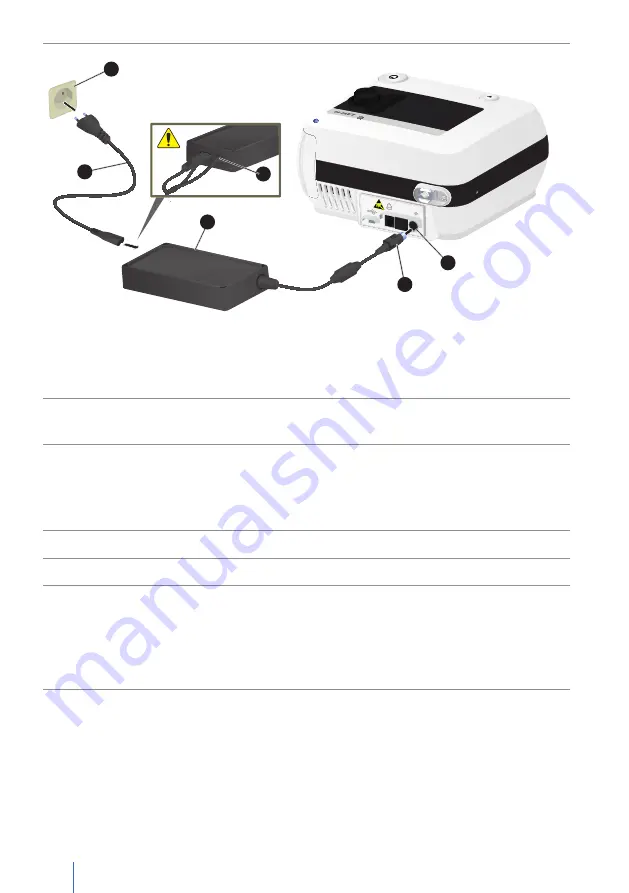
B
A
C
F
A
Socket
B
Mains cable
C
Power supply unit
D
DC plug with snap lock
E
DC connector socket
F
Strain relief
Figure 9:
Mains connection via power supply unit
3. Connect the mains cable to the power supply and hook the mains cable behind
the strain relief to secure it against accidental unplugging.
4. Insert the DC plug into the DC connector socket.
Please note:
The DC plug is a POWER-DIN plug with snap lock. Do not pull on
the cable to disconnect the cable from the device—instead, grasp the plug and
disconnect it by pulling it in a straight line away from the device.
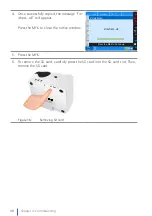
5. Insert the mains cable plug into the power socket (100 - 240 V, 50/60 Hz).
6. Press the on/off button for more than 4 s to switch on the LAVI.
7. The device boots while performing a self-test:
•
Testing the primary and secondary alarm sounds:
Both alarm sounds give a short beep one-by-one.
•
Verifying alarm LED: the alarm LED lights up white.
•
Checking of other hardware components
Summary of Contents for LAVI
Page 2: ......
Page 18: ...18 Chapter 1 Introduction ...
Page 26: ...26 Chapter 2 Safety warnings ...
Page 27: ...Chapter 3 Description of device 27 Chapter 3 Description of Device ...
Page 33: ...Chapter 3 Description of device 33 Chapter 4 Commissioning ...
Page 51: ...Chapter 5 Device operation 51 Chapter 5 Operating the Device ...
Page 75: ...Chapter 6 Alarms and messages 75 Chapter 7 Cleaning and Exchange of Components ...
Page 81: ...Chapter 8 Routine checks and maintenance work 81 Chapter 8 Routine Tests and Maintenance Work ...
Page 84: ...84 Chapter 8 Routine checks and maintenance work ...
Page 85: ...Chapter 9 Appendix 85 Chapter 9 Annex ...
Page 98: ...98 Chapter 9 Appendix ...
Page 99: ...Chapter 9 Appendix 99 ...
Page 100: ...100 Chapter 9 Appendix ...
Page 101: ...Chapter 9 Appendix 101 ...
Page 102: ...102 Chapter 9 Appendix ...


