background image

4

geodyna optima 

Operator’s Manual

Safety & function

1.2-1

1

1.3 General safety rules

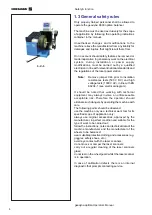
Only properly trained personnel shall be allowed to
operate the geodyna 6800 optima balancer.

The machine must be used exclusively for the scope
of application by following the operating indications
container in the manual.

Unauthorised changes and modifications to the
machine relieve the manufacturer from any liability for
damages and injuries that might result there from.

On no account should safety features be removed or
made inoperative. In general any work on the electrical
system, during installation or power supply
modifications, must be carried out by a qualified
electrician in line with relevant national standards and
the regulations of the local power station.

Note:

Remove jumper X46 prior to insulation
resistances tests (500 V DC) and high
voltage tests (1000 V AC), in line with EN
60204-1 (see electrical diagram).

It should be noted that working with technical
equipment may always involve an unforeseeable
acceptable risk. Therefore the operator should
eliminate such dangers by operating the machine with
care.
The following points should be observed:
use the machine only as a technical work tool for its
specified scope of application only;
always use original accessories, approved by the
manufacturer, in perfect condition and suitable for the
type of work to be carried out;
follow the instructions, notes and technical data of the
machine manufacturer and the manufacturer of the
wheels to be balanced;
wear suitable protective clothing and accessories (e.g.
goggles, safety shoes, etc.);
avoid eye contact with the laser scanners;
do not knock or camper the laser scanners;
carry out a regular cleaning of the laser scanners
glass;
do not rest on the wheel guard whilst the laser scanner
is in operation.

In case of calibration defects there is an internal
diagnostic that prompts contacting service.

Summary of Contents for geodyna optima

Page 1: ...geodyna optima Additional instructions Wheel balancer ...

Page 2: ......

Page 3: ...he purchase lease or rental agreement under the terms of which the equipment to which this manual relates was acquired increases in any way the liability to the customer or to third parties TO THE READER While every effort has been made to ensure that the information contained in this manual is correct complete and up to date the right to change any part of this document at any time without prior ...

Page 4: ... 18 9 5 Rim Only Diagnosis 18 9 6 Behind the spokes placement 19 9 7 Advanced Spoke Detection 19 9 8 Optima Parameters 20 9 9 Print Report 21 10 0 Changing modes of operation 22 11 0 Optional functions 23 11 1 OPTI LINE mode 24 11 1 1 PULL calibration 30 12 0 Error codes 31 13 0 Optimisation Weight minimisation 47 14 0 Readjustment by the operator 47 15 0 Maintenance 48 15 1 Laser scanners seating...

Page 5: ...O THE UNIT OR TO OBJECTS CONNECTED TO IT WARNING NON OBSERVANCE CAN CAUSE INJURY ALSO SERIOUS TO THE OPERATOR OR OTHER PEOPLE Dotted list Indicates an action or sequence of actions that the operator must carry out in the order set out 1 2 Scope of application The geodyna 6800 optima balancer is identical to the geodyna 6800 basic model apart from three laser scanners for the automatic detection of...

Page 6: ...age tests 1000 V AC in line with EN 60204 1 see electrical diagram It should be noted that working with technical equipment may always involve an unforeseeable acceptable risk Therefore the operator should eliminate such dangers by operating the machine with care The following points should be observed use the machine only as a technical work tool for its specified scope of application only always...

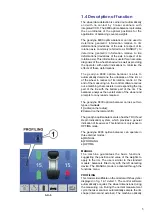
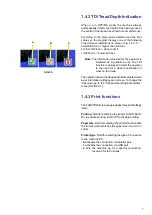
Page 7: ...es out a matching that consists in corresponding the top part of the tire with the bottom part of the rim The balancer analyses the overall state of the wheel and prompts for any repairs required The geodyna 6800 optima balancer carries out two types of runout 1 radial on the radius 2 lateral on the lateral shift The geodyna optima balancer also has the TDI Tread Depth Indication system which prov...

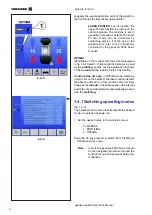
Page 8: ...filing carries out the automatic diagnosis of the runout and the reading for the TDI function Control of the rim only in OPTIMA mode clamping only the rim on the balancer the laser scanner detects the absence of the tire In this condition the rear laser analyses the runout on the bead recess in the internal part of the rim and will prompt to automatically proceed with the matching 1 4 1 Switching ...

Page 9: ... to the need for a closer examination of wear on the tread The operator can set the tread depth limit value for which wear information will appear on screen To change the limit value go to the Optima Operating Parameters menu Section 9 7 1 4 3 Print functions The FUNCTION screen page includes three print settings items Printing Field for switching the printer On Off Set to On to enable printing Se...

Page 10: ...basic model instructions 5 0 Starting the machine See geodyna 6800 basic model instructions 6 0 Clamping the wheel See geodyna 6800 basic model instructions and the supplement for wheel balancers with Power Clamp device 7 0 Entry of wheel type balancing mode and wheel size In Profiling and Optima mode the wheel data entry is automatic see later instructions For Manual mode functioning see geodyna ...

Page 11: ...ulates the distance and diameter of the rim c detects the left outer radial and lateral runout d detects the number and position of any spokes The laser scanner integrated on the wheel protection guard detail 2 carries out the following measurements a automatically calculates the best point for the application of the weight on the external part of the rim b detects the right lateral and radial run...

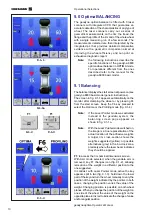
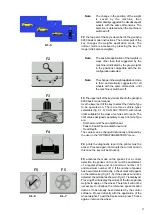
Page 12: ... after clamping the wheel or by pressing F4 from the start screen Keep the F6 key pressed to select the Optima or the Profiling mode fig 9 1 4 Note If the Laser Pointer mode was activated instead of the geodata system the balancing screen page appears as shown in fig 9 1 1a Note With the Laser Pointer mode switched on the image is a true representation of the actual location of the adhesive weight...

Page 13: ...e types selectable fig 9 1 5 CAR SUV TRUCK with runout limits suitable for the class of vehicle set for each The limit values assigned separately to each Vehicle Type are First harmonic Wheel radial Runout Peak to Peak Wheel radial Runout and Tread Depth The values can be changed individually and saved by the user in the OPTIMA PARAMETERS menu F4 prints the diagnostic report the printer must be ac...

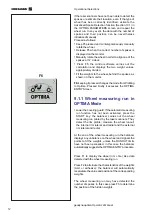
Page 14: ...e mode from Profiling to Optima Pressed briefly it accesses the OPTIMA ENTRY Screen 9 1 1 Wheel measuring run in OPTIMA Mode Lower the covering guard If the automatic measuring run function has not been activated press the START key the balancer carries out the wheel measuring run piloted by the laser scanners They detect the rim profile measure the wheel runout the internal rim lateral and radial...

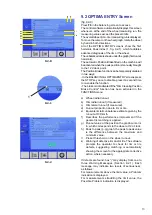
Page 15: ...s not activated if the Rim Cleaning Position Brake Control function has been activated in the FUNCTIONS menu a Wheel radial runout b Rim radial runout if measured c Rim lateral runout if measured d Runout proportion due to rim or tire e Equivalent static unbalance estimate given by the runout at 100 km h f Describes the performance improvement if the geometric matching is applied g Runout value at...

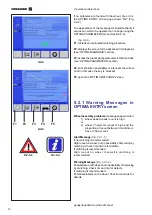
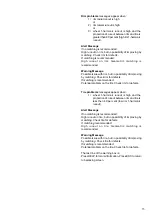
Page 16: ...ble or interrupts the current print in this case the key is blocked F5 opens the OPTIMA MATCHING screen 9 2 1 Warning Messages in OPTIMA ENTRY screen Wheel assembly problems messages appear when 1 wheel peak to peak runout is high or 2 wheel 1 harmonic runout is high and the proportion of runout between rim and tire is close to 50 per cent Alert Message Fig 9 2 1 1 If no matching is recommended Hi...

Page 17: ...s If matching is recommended Potential problem on the rim Check rim for defects Tire problems messages appear when 1 wheel 1 harmonic runout is high and the proportion of runout between rim and tire is less then 40 per cent low rim 1 harmonic runout Alert Message If no matching is recommended High runout on tire but no possibility of improving by matching Check tire for defects If matching recomme...

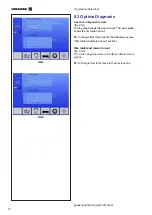
Page 18: ...1 The top graph shows the wheel runout The lower graph shows the rim radial runout F3 to change from this screen to the following one see Rim radial and lateral runout section Rim radial and lateral runout fig 9 3 2 The screen page shows the rim radial and lateral runout graphs F3 to change from this screen to the previous one ...

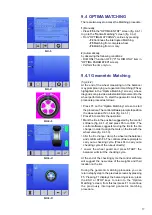
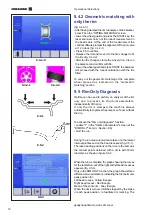
Page 19: ...rocedure The control software prompts to position the wheel valve at 12 o clock fig 9 4 1 1 Press F6 to confirm the operation Mark the tire in the position suggested by the control software fig 9 4 1 2 and press F6 to confirm The control software suggests moving the tire to the tire changer in order to align the mark on the tire with the wheel valve fig 9 4 1 3 After the tire changer clamp the whe...

Page 20: ... Only Diagnosis Optima can be used to perform an analysis of the rim only and to process its structural parameters independently of the tire If only the rim is clamped the machine always automatically recognises the presence of a rim without the tire To activate the Rim only diagnosis function enable 1 in the Optima Parameters screen at the RIM ONLY item m Section 9 6 start the run During the run ...

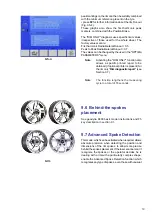
Page 21: ...ion also allows a specific printed report to be obtained if optional printer is present for the rim only Rim diagnostic report see Section 9 7 Note The function lengthens the measuring cycle to a total of 55 seconds 9 6 Behind the spokes placement See geodyna 6800 basic model instructions and F5 key description in section 9 1 9 7 Advanced Spoke Detection This mode which can be activated when requi...

Page 22: ...ars on screen Preset value 1 7 mm 0 068 ince e The wheel data detection scan occurs always during the first measuring run This function allows the exclusion of the activation of the laser scanner in the following measuring runs in order to optimise the operating times whenever it is necessary to carry out more than one measuring run for the same wheel By assigning value 0 the scan occurs automatic...

Page 23: ...ph of right bead recess runout blue curve f1 Graph of right bead recess first harmonic red curve g Rim lateral runout peak to peak values left and right h Graph of rim left lateral runout blue curve i Graph of rim right lateral runout dashed green curve k Rim 12 o clock position indicator at moment of printing green line Select 0 Enables automatic switching to the MATCHING procedure if the machine...

Page 24: ...balance measured right and left q Static Unbalance calculated from dynamic components measured r Suggested position for application of weights s Complete wheel radial runout peak to peak value t Graph of complete wheel radial runout blue curve u Graph of wheel total first harmonic red curve v Rim left and right radial runout peak to peak values w Graph of rim left radial runout blue curve x Graph ...

Page 25: ...it enables is complete You can plug in the key at any moment The program recognises the key immediately and the Optional Function is instantly made available without the operator having to perform any other procedures The key can also be removed at any moment disabling any Optional Functions THE OPTIONAL FUNCTIONS ARE ONLY ACTIVE WHEN THE USB KEY IS PLUGGED INTO THE MACHINE S USB PORT AS SOON AS T...

Page 26: ... using the Set of Wheels procedure Start the Set of Wheels procedure and the run then complete compensation of the unbalance remove the wheel from the balancer and finally assign the wheel to the Set saving its data When the procedure is complete repeat these operations for up to five wheels When the fourth wheel is assigned to the Set a suggestion for mounting on the vehicle is provided allowing ...

Page 27: ...orrections suggested by optima Remove the wheel from the balancer When you remove the wheel the screen shows a number and a colour assigned to the wheel useful for identifying it until the procedure is complete Fig 11 1 3 From this moment the keys in the control bar have the following functions Fig 11 1 4 Key F1 EXIT the Set of Wheels program the data acquired up to this point is definitively dele...

Page 28: ... as wheel number 1 of the new Set Note Starting with wheel No 2 the key will be available for wheel removal as an alternative to entry keys F3 F4 F5 Key F4 RETURN to the previous step so that you can assign the wheel a different use in the Set The wheels definitively acquired in the memory are represented by icons grouped in the Wheels Currently in the Set box These icons also show any specific ma...

Page 29: ...key F5 twice in the procedure the program does not allow you to select this key again You cannot assign more than two wheels to the same side of the vehicle WHEEL No 3 Perform the procedure as described for wheel No 2 WHEEL No 4 Perform the procedure as described for wheel No 2 At this point of the procedure the machine already has a first mounting suggestion The box on the right shows the number ...

Page 30: ...ey F6 again to view the mounting recommendation for PULL optimisation seen before Fig 11 1 13 Note Key F6 allows you to toggle between the different mounting options The icon on the top left of the screen indicates the type of optimisation referred to by the mounting order shown at that time Enter fifth wheel Fig 11 1 14 The Set of Wheels procedure in the OPTI LINE mode allows the entry of a fifth...

Page 31: ...without exiting the Set of Wheels mode Proceed as follows Mount the wheel on the balancer shaft Perform the run Complete any normal correction and balancing operations required Remove the wheel from the balancer Wheel number 5 is shown on the screen page Fig 11 1 14 Press key F2 Fig 11 1 6 The machine deletes the data relative to the previous wheels and shows the last wheel as wheel number 1 start...

Page 32: ...th To perform the PULL calibration proceed as follows Open the OPTIMA screen page F6 Select key F3 to open the OPTIMA PARAMETERS screen page Select key F1 Fig 11 1 1 2 Install the Calibration Tool so that the blind hole used as a reference faces the outside of the machine as illustrated H Fig 11 1 1 3 Turn the front surface of the Tool towards the back of the balancer angle the plate towards the s...

Page 33: ...ionality are described below E1 Rim dimensions incorrect or incomplete Repeat rim data input If the problem persists you can have a manual data entry by pressing F1 in the balancing screen E30 No runout detection Repeat the measuring run to determine the runout detection If the problem persists call service E31 If the operator following a rim profile reading chooses to proceed with a complete whee...

Page 34: ...rective actions check the connections calibration procedure C122 is required to calibrate the actual position of the laser scanners with respect to the balancer reference plane E361 Wheel profiler not present or not responding during self test The balancer controller board was not able to communicate with the camera controller board during power on self test Possible causes the camera controller b...

Page 35: ...e connections check the supply voltage with service code C110 E363 Left scanner self test failed CCD not reset or zero point mark not detected The balancing is not possible as the laser scanners cannot detect the wheel data Problems have occurred at power on Switch off and power on again If the problem persists call service E364 Right scanner self test failed CCD not reset or zero point mark not d...

Page 36: ...ower supply missing or out of range Possible causes the cable connecting the camera controller board and the motor power supply is unplugged damaged or missing the motor power supply is not configured properly there is a fault in the motor power supply board the cable connecting the mains supply and the motor power supply board is unplugged damaged or missing Corrective actions check all items abo...

Page 37: ...ff and on again should the problem not go away please call service E371 Inner scanner memory not responding Possible causes the flat cable connecting the camera controller board and the inner scanner CCD board is unplugged missing or damaged there is a fault in the inner scanner CCD board there is a fault in the camera controller board Corrective actions check the connections check the inner scann...

Page 38: ...ns supply and the motor power supply board is unplugged damaged or missing there is a fault in the inner scanner motor there is a fault in the camera controller board motor drivers Corrective actions check all items above E375 Inner scanner zero mark not detected Possible causes the flat cable connecting the camera controller board and the inner scanner CCD board is unplugged missing or damaged th...

Page 39: ...e Possible causes the flat cable connecting the camera controller board and the inner scanner CCD board is unplugged missing or damaged the cable of the laser module of the inner scanner is damaged or there is a fault in the laser module itself there is a fault in the camera controller board laser drivers Corrective actions check all items above E378 Inner laser modulation failure Possible causes ...

Page 40: ...cable connecting the camera controller board and the outer scanner CCD board is unplugged missing or damaged there is a fault in the outer scanner CCD board there is a fault in the camera controller board Corrective actions check the connections check the outer scanner CCD board check the camera controller board switch power off and on again should the problem not go away please call service E382 ...

Page 41: ... is a fault in the outer scanner motor there is a fault in the camera controller board motor drivers Corrective actions check all items above E385 Outer scanner zero mark not detected Possible causes the flat cable connecting the camera controller board and the outer scanner CCD board is unplugged missing or damaged there is a fault in the outer scanner CCD board the outer scanner is locked the ou...

Page 42: ... or power supply failure Possible causes the flat cable connecting the camera controller board and the outer scanner CCD board is unplugged missing or damaged the cable of the laser module of the outer scanner is damaged or there is a fault in the laser module itself there is a fault in the camera controller board laser drivers Corrective actions check all items above E388 Outer laser modulation f...

Page 43: ...camera controller board and the rear scanner CCD board is unplugged missing or damaged there is a fault in the rear scanner CCD board there is a fault in the camera controller board Corrective actions check the connections check the rear scanner CCD board check the camera controller board switch power off and on again should the problem not go away please call service E392 Rear scanner memory not ...

Page 44: ...damaged or missing there is a fault in the rear scanner motor there is a fault in the camera controller board motor drivers Corrective actions check all items above E395 Rear scanner zero mark not detected Possible causes the flat cable connecting the camera controller board and the rear scanner CCD board is unplugged missing or damaged there is a fault in the rear scanner CCD board the rear scann...

Page 45: ...e Possible causes the flat cable connecting the camera controller board and the rear scanner CCD board is unplugged missing or damaged the cable of the laser module of the rear scanner is damaged or there is a fault in the laser module itself there is a fault in the camera controller board laser drivers Corrective actions check all items above E398 Rear laser modulation failure Possible causes the...

Page 46: ...g the most recent factory service calibrated pull index This might result in a slight inaccuracy of the conicity measurement Corrective actions press F6 to repeat the procedure press ESC or STOP to release the brake and exit the procedure E404 Rear shift motor current sink or power supply failure Possible causes the cable connecting the camera controller board and the rear shift scanner motor is u...

Page 47: ...n the motor power supply board there is a fault in the rear shift scanner motor there is a fault in the camera controller board motor drivers Corrective actions check all items above E406 Rear shift motor missing steps Possible causes the rear shift scanner movement is not smooth or it is striking the frame the motor power supply is not configured properly there is a fault in the motor power suppl...

Page 48: ...n virtual dimensions calculation The distance of the left virtual compensation plane from the reference plane in the measuring system is incorrect One of the unbalance sensors may have been mounted with inverted polarity Check and correct if connection is wrong ...

Page 49: ... 13 0 Optimisation Weight minimisation See geodyna 6800 basic model instructions function can only be carried out in Manual mode 14 0 Readjustment by the operator See geodyna 6800 basic model instructions ...

Page 50: ...r to the geodyna 6800 basic model instructions for all the maintenance and cleaning operations 15 1 Laser scanners seating glass cleaning The laser scanners seats fig 16 1 1 details 1 2 and 3 are fitted with a protection glass which must be regularly dusted Only use a clean dry and soft cloth as shown in figure 16 1 2 so as not to make scratches to the glass surface In case of oil or grease stains...

Page 51: ...diameter 8 30 Overall wheel width 21 530 mm Overall wheel diameter 37 950 mm Maximum wheel weight 154 lbs 70 kg Maximum cycle time 30 sec Type of data input for the DISTANCE Automatic no contact with the wheel Type of data input for the DIAMETER Automatic no contact with the wheel Type of data input for the WIDTH Automatic no contact with the wheel Dimensions of the package mm H x L x D 1640 x 142...

Page 52: ...ehicles Four flanges designed for North American vehicles Including bolts Special flanges for BMW and OPELavailable Special flange for custom built vehicles 17 5 SCA Flange Adaptor for wheels with closed center hole also known as UniLug adaptor When the SCA adaptor is attached to the geodyna optima the power clamp system needs to be switched off in the FUNCTION screen The operation of the geodyna ...

Page 53: ...e a higher degree of wheel centring precision when fitting the wheel on the balancer 17 7 Wheel weight removal tool Special tool in wear resistant plastic material essential for the removal of adhesive weights from alloy wheels Ensures that the rim surfaces are not damaged ...

Page 54: ...a Operator s Manual Manuel d Utilisation 4 VELCRO 2x 6 5 1 8x20 6x Ø 8 6x 2 6x20 2x Ø 6 2x 3 5 6 USB EPC MONITOR 7 2x 18 0 Mise en place de la Imprimante disponible en option Printer Installation Instructions optional ...

Page 55: ...53 geodyna optima Operator s Manual Manuel d Utilisation Note Note page La página de la nota ...

Page 56: ...54 Electrical diagram ...

Page 57: ...55 Electrical diagram ...

Page 58: ...56 Electrical diagram ...

Page 59: ...57 Electrical diagram ...

Page 60: ...egarding Revision 02 05 B List of new chapter from this revision At page 16 17 1 4 2 TDI Tread Dept Indication At page 16 17 1 4 3 Print functions At page 28 29 9 2 1 Warning Messages in Optima Entry Screen List of the changes introduced beginning from the revision 01 06 E Additional instruction regarding software version 3 1 page 32 Chapter 9 3 replace the previous release chapters 9 5 and 9 6 pa...

Page 61: ...Note page ...
Page 62: ... relevant basic safety and health requirements as set forth in the relevant EC guide lines for machines and electromagnetic compatibility as specified hereafter in their latest versions Applied harmonized and national standards This declaration becomes null and void if the machine is not used as set forth under Scope of application of this operation manual or if any modifications or changes whatso...

Reviews: