82
Component Repair
Step 5
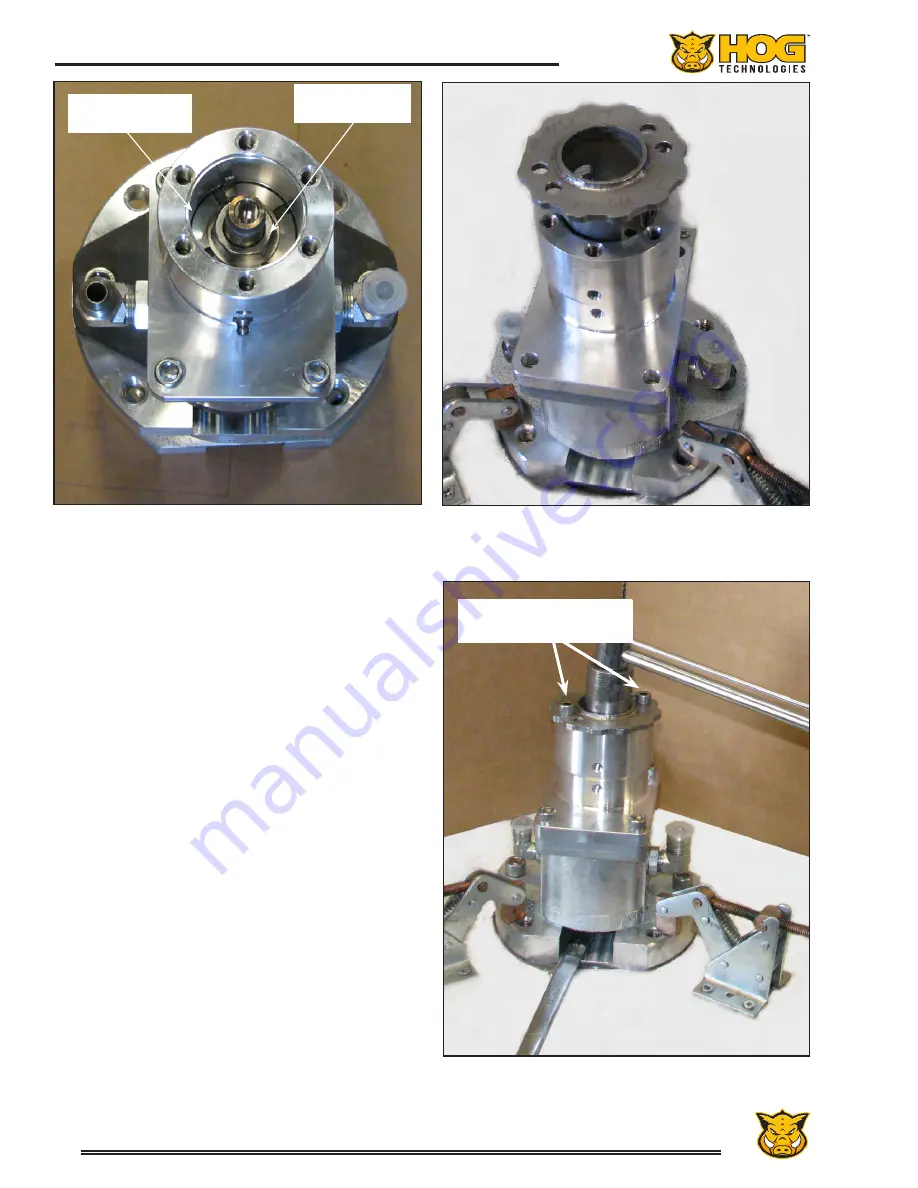
Loosen Jam Nut and Set the Bearing Preload
While holding the thru-shaft with the 3/4” (19mm)
open end wrench through the slot in the motor base,
use a 1 1/8” (28mm) deep well socket to loosen the
jam nut by turning it counterclockwise. Loosen the
jam nut 4 full turns and stop. Figure 8 and 9.
While holding the thru-shaft with 3/4” (19mm) open
end wrench, use the spanner socket (weldment) tool
to Loosen the seal nut 2 full turns. Then put a rag on
the spanner socket for padding and tighten the seal
nut as tight as you can by hand to set the bearing.
Figure 8 and 10.
Once the bearing is set, loosen the seal nut 2 full turns.
Hold the thru-shaft firmly with the 3/4” (19mm)
open end wrench and use the spanner socket to hand
tighten the seal nut until it is “snug.” Do not over-
tighten!! Figure 8 and 10.
Then hold the thru-shaft firmly with 3/4” open
end wrench so it doesn’t move at all
and set
the bearing preload by carefully loosening the span-
ner socket and seal nut one bolt hole. Then thread
2 - 3/8” thrust housing cap bolts through the holes
in the spanner socket and into the threaded holes in
the thrust housing to hold the spanner socket in that
position. Figure 11.
Jam Nut
Seal Nut
Figure 9: Jam nut and seal nut. Make sure to loosen Jam
nut 4 full turns first.
Figure 10: Use spanner socket (weldment tool) to turn seal
nut.
Figure 11: Spanner socket secured with thrust housing
cap bolts.
Thrust Housing Cap Bolts
Summary of Contents for Stripe Hog SH5000
Page 1: ...Operations Manual...
Page 2: ...2...
Page 4: ...4 THIS PAGE WAS LEFT BLANK INTENTIONALLY...
Page 6: ...6 THIS PAGE WAS LEFT BLANK INTENTIONALLY...
Page 8: ...8 THIS PAGE WAS LEFT BLANK INTENTIONALLY...
Page 14: ...14 THIS PAGE WAS LEFT BLANK INTENTIONALLY...
Page 20: ...20 THIS PAGE WAS LEFT BLANK INTENTIONALLY...
Page 50: ...50 THIS PAGE WAS LEFT BLANK INTENTIONALLY...
Page 58: ...58 THIS PAGE WAS LEFT BLANK INTENTIONALLY...
Page 92: ...92 Component Repair THIS PAGE WAS LEFT BLANK INTENTIONALLY...
Page 94: ...94 Component Repair...
Page 96: ...96 Component Repair...
Page 98: ...98 Component Repair...
Page 99: ...99 Fluid End Replacement Parts Appendix A Drawings and Supplies...
Page 100: ...100 THIS PAGE WAS LEFT BLANK INTENTIONALLY...
Page 104: ...104 THIS PAGE WAS LEFT BLANK INTENTIONALLY...
Page 106: ...106 THIS PAGE WAS LEFT BLANK INTENTIONALLY...
Page 110: ...110 THIS PAGE WAS LEFT BLANK INTENTIONALLY...
Page 118: ...118 THIS PAGE WAS LEFT BLANK INTENTIONALLY...
Page 121: ......


