BA_PH_245-20_EN_15-22.docx
39
13.3
Height Adjustment
The positioning of the milling spindle height is done either in manual resp. inching mode or continuously by prior
entry of target values via the number entry field
“
N
”
.
The height can be positioned either in absolute mode or in incremental mode. Note: The two display windows
for absolute and incremental measurement can indicate different values.
13.3.1
Absolute Positioning
•
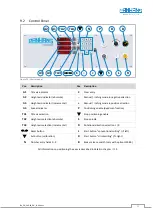
The height axis is selected in absolute mode via the
“
TA2
” button
.
•
The absolute height (measured from absolute zero) is indicated by the display
“
A2
”
.
The absolute zero point is fixed by an end stop and cannot be changed.
•
When the spindle is tilted, the display “
A2
” indicates the adjustment in the longitudinal axis of the spindle
.
13.3.2
Incremental Positioning
•
The height axis is selected in
absolute mode via the “
TA3
” button
.
•
The incremental height, from a zero point set by the operator, is indicated by the display “
A3
”
. Depending
on the position of the selected zero point, the value can be positive or negative.
•
Even when the milling spindle
is tilted, the incremental display “
A3
” calculates and indicates the vertical
height adjustment.
13.3.3
Height Adjustment in Manual or Inching Mode
•
When adjusting the height, both indications (“
A2
” and “
A3
”) always count accordingly
.
•
Activate the entry field for the height axis via the
“
TA2
” (absolute) or
“
TA3
”
(incremental)
→
The corresponding LED next to “
TA2
” resp. “
TA3
” lights up
.
•
If
“
TA3
”
(incremental mode) is activated,
the display “
A3
” can be reset to zero with the
“
0
”
button.
From this new zero point, the desired position can be approached by pressing the positioning key
“
P
”
in
combination with the button
“
–
“ or ”
+
”
(see tables below).
Any previously set zero point is deleted by pressing the
0
button!
-
In manual mode, the height can be positioned continuously, directly to the desired angle.
-
In inching mode, the height can be adjusted in single steps of 0.1°.
For both modes, press the positioning button “
P
” together with the “
+
” or “
–
“ button and read the position
simultaneously in the display
“
A2
” (absolute) resp. “
A3
” (incremental)
.
Continuously position to desired angle (manual mode):
a)
Press the buttons “
P
” and “
+
” simultaneously
→
positive adjustment until the “
+
” button is released
b)
Press the buttons “
P
” and “
–
” simultaneously
→
positive adjustment until the “
–
” button is released
Position in 0.1 mm steps (inching mode):
a)
Keep button “
P
” pressed and tap button “
+
” step by step
→
positive adjustment by 0.1 mm
b)
Keep button “
P
” pressed and tap button “
–
” step by step
→
positive adjustment by 0.1 mm


