20
C
ha
ss
is
-
1
0
2012 Trip
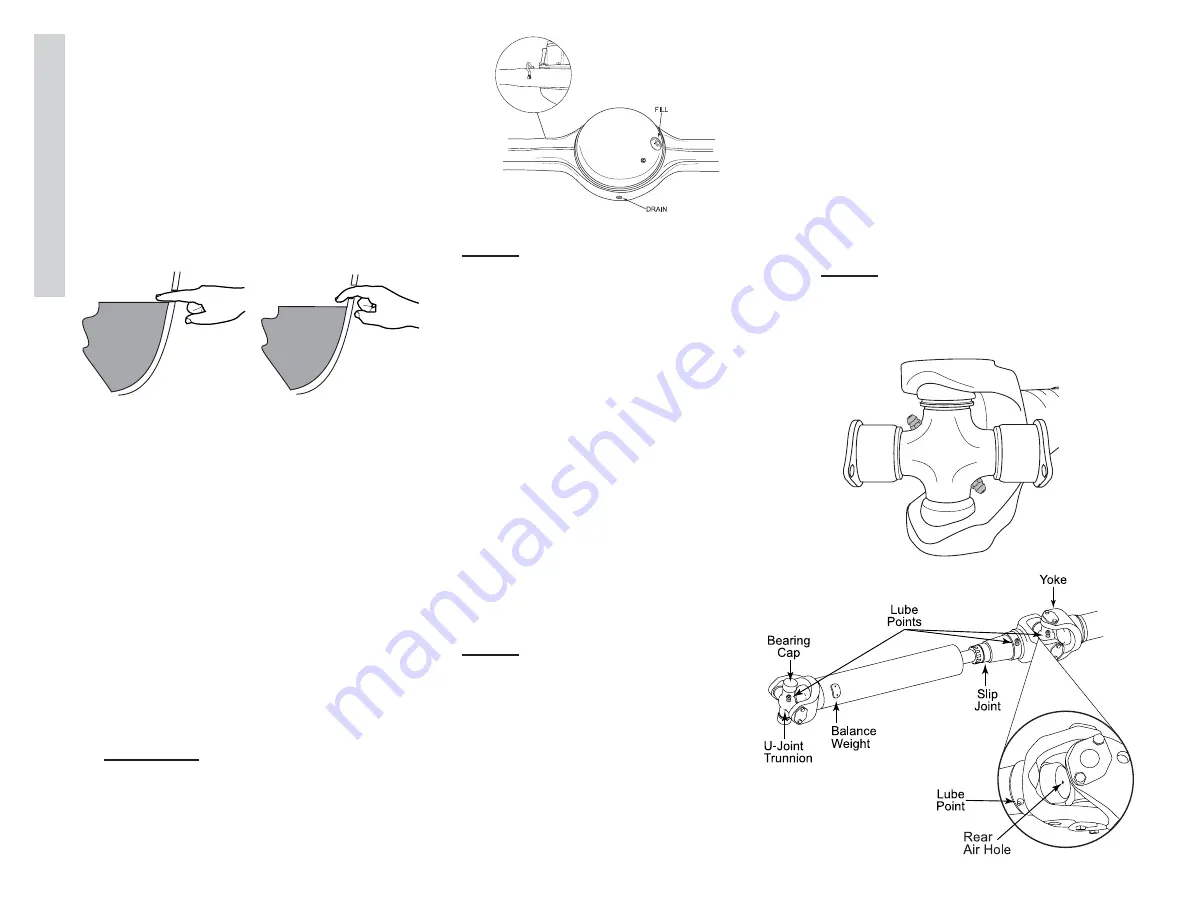
Remove the fill plug and observe the
lubricant level.
The lubricant should be level with
bottom of the hole.
Important: The lube level close enough
to the hole to be seen or touched is not
sufficient. The lube must be level with
the hole.
Correct the level as necessary.
Re-install the fill plug and tighten to 35
to 50 ft. lbs.
To Drain and Replace Lubricant:
1. Place a large container under the axle.
2. Remove drain plug and allow axle to
completely drain.
3. Properly dispose of oil.
4. Clean the drain plug and test (replace
the drain plug if needed).
5. Install and tighten drain plug to 35 to
50 ft. lbs.
6. Clean the area around the fill plug
from the axle-housing bowl.
7. Fill the axle with approved lubricant
until the level is even with the bottom
of the fill plug hole.
WARNING:
When checking or changing the
lubricant, always ensure that the axle
is not hot. Oil temperature 90º F or
hotter can cause severe burns.
NOTE:
When checking the lube level also
check the housing breathers on top of
axle housing. Clean the breathers if
dirty or replace them if damaged.
Drive Shaft
The drive shaft transfers the power produced
by the engine to the drive axle. A worn or out
of balance drive shaft causes chassis vibration
that generally increases in intensity with road
speed.
Lubrication Maintenance:
The drive shaft requires periodic lubrication
maintenance. Lubricate the slip joint and
universal joints every 15,000 miles or 6
months, whichever occurs first. Use NLGI #2
chassis lubricant.
NOTE:
It will be necessary to move the
motorhome forward or backward to
access all fittings on the drive shaft.
Greasing the Drive Shaft Universal Joints:
Check the drive shaft for looseness.
Repair if loose or worn.
Apply the specified grease at the grease
fitting on the universal joint. Apply
until new grease purges from all the
seals.
If new grease does not purge at the
seals, loosen the bearing cap bolts and
re-grease until all four caps purge.
If new grease still does not purge,
disassemble and clean or replace the
universal joint.
NOTE:
The universal joints may have two
grease fittings each. It is necessary to
apply grease to each fitting to properly
lube the universal joint.
Incorrect Oil
Level
Correct Oil
Level
090264
090467d
090417b
Dual zerk U-Joint
090417d
Summary of Contents for Trip 2012
Page 1: ...2 0 1 2 B YHOL I D A YR A MB L E R O w n e r s Ma n u a l...
Page 13: ...Notes...
Page 45: ...40 Driv ing Safety 2 2012 Trip Weight Record Sheet...
Page 51: ...46 Driv ing Safety 2 2012 Trip Notes...
Page 138: ...133 W ater Sy stems 6 2012 Trip Water System Diagram 040487va...
Page 139: ...134 Wat er Sy stems 6 2012 Trip Notes...
Page 151: ...146 Pro p ane Sy tems 7 2012 Trip Notes...
Page 173: ...168 Ho us e Electr ical 8 2012 Trip Notes...
Page 190: ...185 Chassis Electrical 9 2012 Trip Engine No Start Flow Chart...
Page 191: ...186 Ch as s is Electr ical 9 2012 Trip Notes...
Page 237: ...232 Ch assis 10 2012 Trip Notes...


