background image

3  MAINTENANCE PROCEDURES

3.1  As needed lubrication 

NOTE:  Maintain adequate lubrication on the following surfaces by inspecting and 

  re-lubricating at regular intervals.  Use a water-resistant, lithium grease.

LOCKING PLUNGER
SLIDING AND
ENGAGEMENT
AREAS

GREASE THE TRAILER

CONTACT SURFACE

GREASE 

BRACKET

 SUPPORTS

THROUGH

FITTINGS (x 2)

LOCK PIN
GREASE 
FITTINGS

SLIDING
HANDLE
BAR
and
SPRING

LOCK JAWS

(kingpin

 contact areas)

1

1

6

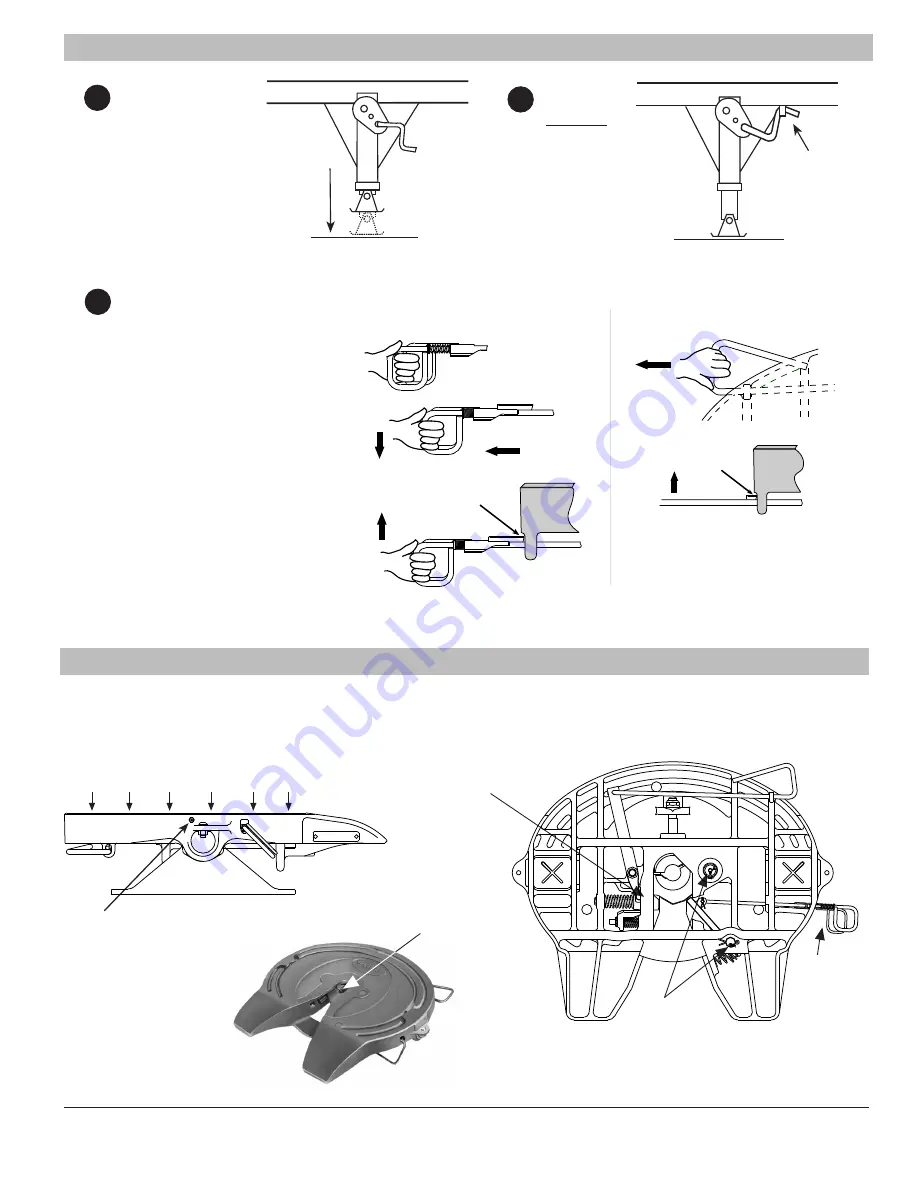
Extend landing
gear until pads
just touch 
the ground

Switch to 
low gear
and crank an
additional
4 - 8 turns

7

USE 
LOW
GEAR!

Secure
handle

Unlock fifth wheel.

First open secondary lock:

8                 

2.3  Trailer uncoupling procedure (continued)

USE 
HIGH
GEAR

1

  grasp and pull inner

    handle

2

  move handle down

3

  pull handle out

4

  lift handle up and hook

    handle "tab" on outer
    edge of casting  

1

1

2

))))))))))))))

2

3

))))))))))))))

HOOK HANDLE

"TAB" ON CASTING

))))))))))))))

HOOK "TAB"
ON CASTING

4

To Open

Secondary Lock

To Open

Primary Lock

Second, open primary lock:

1

  pull handle straight out

2

  lift handle up and hook

    handle "tab" on outer
    edge of casting  

XD-71-D-E

XL-FW1083-01

    6                  

Summary of Contents for FW0E70-02

Page 1: ...ection 3 2 2 Inspection of locking mechanism 3 2 3 Lock adjustment procedure XL FW1083 01 1 WARNING You must read and understand the instructions in this manual before operating your fifth wheel Failure to follow all of the important operating procedures contained in these instructions may result in a dangerous condition or cause a dangerous condition to develop These instructions apply to the pro...

Page 2: ...iling in Europe For alternative conditions please consult Holland WARNING Mounting must be carried out in accordance with Holland instructions 1 2A XA 1117 H 1 Release handle primary 3 XA FW 104 D 1 4 5 XB H 38 A 1 6 XB 09153 1 7 1 Lock pin secondary 8 XA 08783 1 9 RK 65025 1 Secondary lock arm replacement kit 10 XB 16 1 Cotter pin 11 XA 1016 C 1 Locknut 12 XB 0769 1 Socket Head Cap Screw 13 XB 5 ...

Page 3: ... 3 4 FIRST make sure SECONDARY lock is open 5 Pull handle straight out 6 lift up and hook handle tab on edge of casting 7 Insert long bar into lock jaw opening and pry open lock jaws 2 1 Pre service inspection OK LOCKS CLOSED TILT DOWN LOCKS OPEN 1 5 SECOND make sure PRIMARY lock is open 6 2 3 HOOK HANDLE TAB ON CASTING HOOK TAB ON CASTING 4 XL FW1083 01 3 To Open SECONDARY Lock To Open PRIMARY Lo...

Page 4: ...behind fifth wheel bracket pin FIFTH WHEEL WILLNOTLIFT TRAILER Chock trailer wheels Connect brake lines and light cord Support slack in lines to prevent interference Set trailer brakes 3 4 5 6 XL FW1083 01 4 Center kingpin with fifth wheel center Back tractor close to trailer and STOP TRAILER top KINGPIN 1 1 2 The coupling procedure is not complete without a visual inspection You must get out of t...

Page 5: ... tractor tightly against trailer Set tractor brakes Chock trailer wheels 5 3 2 1 1 10 Visual inspection Get out of tractor Visually check that the fifth wheel is locked 1 2 3 Failure to properly couple and inspect this fifth wheel could result in tractor and trailer separation causing death or serious injury to others If you do not obtain a proper couple repeat the coupling procedure 1 2 DO NOT US...

Page 6: ... 1 1 6 Extend landing gear until pads just touch the ground Switch to low gear and crank an additional 4 8 turns 7 USE LOW GEAR Secure handle Unlock fifth wheel First open secondary lock 8 2 3 Trailer uncoupling procedure continued USE HIGH GEAR 1 grasp and pull inner handle 2 move handle down 3 pull handle out 4 lift handle up and hook handle tab on outer edge of casting 1 1 2 2 3 HOOK HANDLE TAB...

Page 7: ...rotate handle Push down and rotate the J hook under the fifth wheel then pull handle back 1 2 3 4 3 2 Required Inspections and Adjustments NOTE Perform the following every three 3 months or 50 000 km whichever comes first Thoroughly steam clean all components before inspecting or adjusting 3 2 1 General Fifth Wheel Inspection Inspect the fifth wheel mounting and fifth wheel assembly Tighten loose ...

Page 8: ... FW1083 01 8 WARNING At this point the fifth wheel is OVER ADJUSTED and NOT usable The remaining adjustment procedures must be completed WARNING Improper adjustment can cause improper locking of the fifth wheel If the fifth wheel does not operate properly DO NOT USE IT Repeat the adjustment procedures or contact Holland Copyright June 2004 The Holland Group Inc Holland Europe GmbH Altenkamp 9 D 33...

Reviews: