background image

DEUTSCH 

- 2

Inhalt

1.1 - TECHNISCHE EIGENSCHAFTEN .............................................................DE-3

1.2 - EINLEITUNG ...............................................................................................DE-3

1.3 - VORGESEHENER GEBRAUCH DER MASCHINE ...................................DE-3

1.4 - NICHT VORGESEHENER GEBRAUCH DER MASCHINE .......................DE-3

2.1 - ENTFERNEN DER VERPACKUNG ...........................................................DE-4

2.2 - ZUSAMMENBAU DER TEILE ....................................................................DE-4

2.2.a - Montage Halterungen der Kabelaufwicklung............................................DE-4

2.2.b - Montage Pad ............................................................................................DE-4

2.2.c - Montage elektrisches Sprühzubehör  .......................................................DE-4

2.2.d - Auffüllen des Tanks  .................................................................................DE-4

2.2.e - Montage des Staubbeutels aus Papier  ...................................................DE-4

2.2.f  - Stromanschluss ........................................................................................DE-5

3.1 KENNENLERNEN DER MASCHINE ............................................................DE-5

4.1 NEIGUNGSEINSTELLUNG DER HANDSTANGE .......................................DE-5

5.1 FÜHRUNGSSTANGE ...................................................................................DE-6

6.1 BETRIEBSWEISE


 ........................................................................................DE-6

6.1.a - Prüfungen vor dem Gebrauch ..................................................................DE-6

6.1.b - Einschalten der Maschine  .......................................................................DE-6

6.1.c - Pad Druckregulierung ..............................................................................DE-6

6.1.d - Gebrauch der Maschine ...........................................................................DE-7

6.1.e - Arbeitsende und Ausschalten  ..................................................................DE-7

6.1.f  - Transport ..................................................................................................DE-7

6.1.g - Positionieren der Maschine nach dem Gebrauch ....................................DE-7

7.1 WARTUNG UND REINIGUNGA


 ..................................................................DE-8

7.1.a - Reinigung der Maschine...........................................................................DE-8

7.1.b - Reinigung der Düse des Sprühzubehörs (Optional) ................................DE-8

7.1.b - Austausch der Pad ...................................................................................DE-8

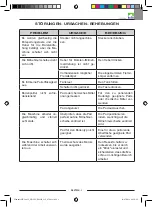
STÖRUNGEN- URSACHEN- BEHEBUNGEN ...................................................DE-9

Manuale HU30-925_HOLLU_PM150_1ed_07-2019.indd   2

16/07/2019   08:29:36

Summary of Contents for PM 150

Page 1: ...U30 925 ed 12 2019 www hollu com hollu Systemhygiene GmbH DE Gebrauch und Wartung EN Use and Maintenance IT Uso e Manutenzione PM 150 Copertina HU30 925_HOLLU_PM150_1d_07 2019 indd 1 16 07 2019 08 24 44 ...

Page 2: ...d CE marking are located on the plate on the machine body It is advisable to note the machine model and serial number on the table on the next page IT DATI IDENTIFICATIVI I dati identificativi e la marcatura CE della macchina sono posizionati sulla targhetta posta sul corpo macchina Si consiglia di trascrivere il modello della macchina e il relativo numero di matricola nella ta bella riportata nel...

Page 3: ...ufacturer Model Article code Working Ø IT Produttore Modello Codice articolo Ø di lavoro 5 6 7 DE Drehgeschwindigkeit Serien Nr Elektrische Eigenschaften EN Rotation speed Serial number Electrical characteristics IT Velocità di rotazione N Matricola Caratteristiche elettriche Copertina HU30 925_HOLLU_PM150_1d_07 2019 indd 3 16 07 2019 08 25 11 ...

Page 4: ...4 Copertina HU30 925_HOLLU_PM150_1d_07 2019 indd 4 16 07 2019 08 25 12 ...

Page 5: ...5 Copertina HU30 925_HOLLU_PM150_1d_07 2019 indd 5 16 07 2019 08 25 13 ...

Page 6: ...6 Copertina HU30 925_HOLLU_PM150_1d_07 2019 indd 6 16 07 2019 08 25 14 ...

Page 7: ...7 Copertina HU30 925_HOLLU_PM150_1d_07 2019 indd 7 16 07 2019 08 25 15 ...

Page 8: ...8 Copertina HU30 925_HOLLU_PM150_1d_07 2019 indd 8 16 07 2019 08 25 15 ...

Page 9: ...G Konformitätserklärung 10 EN English ENGLISH 1 Translation of original instructions Declaration of EC conformity 10 IT Italiano ITALIANO 1 Istruzioni originali Dichiarazione di conformità 10 Copertina HU30 925_HOLLU_PM150_1d_07 2019 indd 9 16 07 2019 08 25 15 ...

Page 10: ...Copertina HU30 925_HOLLU_PM150_1d_07 2019 indd 10 16 07 2019 08 25 15 ...

Page 11: ...ass ein gutes Produkt das seine Qualität erhalten möchte eine ständige Aktualisierung erfordert um den Erwartungen der täglichen Benutzer gerecht werden zu können In diesem Sinne hoffen wir in Ihnen nicht nur einen zufriedenen Kunden sondern auch einen Partner gefunden zu haben der nicht zögert uns seine Ideen und Meinungen zuzusenden die aus der täglichen Erfahrung im Umgang mit dem Gerät entsteh...

Page 12: ...luss DE 5 3 1 KENNENLERNEN DER MASCHINE DE 5 4 1 NEIGUNGSEINSTELLUNG DER HANDSTANGE DE 5 5 1 FÜHRUNGSSTANGE DE 6 6 1 BETRIEBSWEISE DE 6 6 1 a Prüfungen vor dem Gebrauch DE 6 6 1 b Einschalten der Maschine DE 6 6 1 c Pad Druckregulierung DE 6 6 1 d Gebrauch der Maschine DE 7 6 1 e Arbeitsende und Ausschalten DE 7 6 1 f Transport DE 7 6 1 g Positionieren der Maschine nach dem Gebrauch DE 7 7 1 WARTU...

Page 13: ...iner Haftung für Personen oder Sachschäden und führt zum Verfall jeglicher Garantiebedingungen Dieses Gerät ist zur gewerblichen Nutzung z B in Hotels Schulen Krankenhäusern Fabriken Geschäften Büros und Verleihtätigkeiten bestimmt Die Maschine wurde für folgenden Zweck geplant und hergestellt zum Polieren von gereinigten und gesaug ten Böden beispielsweise Parkett Marmor Keramik Linoleum usw 1 4 ...

Page 14: ...nderer Padtypen kann die Sicherheit der Maschine beeinträchti gen 2 2 c Montage elektrisches Sprühzubehör Abb 10 16 Den Knauf 16 an der oberen Halterung 17 der Handstange lockern Abb 10 Sicherstellen dass die untere Halterung 18 auf der Platte sitzt 19 die sich am Stiel der Handstange befindet Abb 11 Das Zubehör 20 auf die untere Halte rung 18 positionieren dabei darauf ach ten dass die Klemmzunge...

Page 15: ...f 43 Neigungshebel Handstange 44 Entsperrungstaste Hebel Pad Drehung 45 Maschinengehäuse 46 Antriebsräder 47 Lenkrolle vorne 48 Stromspeisekabel 49 Arbeitssteckdose 50 Handrad zur Einstellung des Pad Drucks 51 Zugangsklappe Staubbeutel 52 Taste zum Einschalten der Wachs Sprühfunktion 53 Rote Led Wenn sich diese Led ein schaltet und eingeschaltet bleibt weist das System auf einen Überdruck hin der ...

Page 16: ...t und dass die Düse korrekt montiert und eingestellt ist Den Pad Zustand prüfen Bei Verschleiß austauschen Prüfen Sie dass das Gerät insbeson dere das Netzkabel keine Schäden auf weist die den korrekten Betrieb der Ma schine oder die Sicherheit des Benutzers beeinträchtigen könnten 6 1 b Einschalten der Maschine Abb 21 HINWEIS Die Maschine nicht einschalten wenn sie sich in Kippstellung befindet D...

Page 17: ...hten dass keine Stellen ausgelassen werden GEFAHR Auf keinen Fall darf die Maschine wäh rend der Arbeit über das Stromkabel fah ren es könnten schwere Schäden und gefährliche Situationen verursacht wer den Die Maschine verfügt außerdem über ein passives Saugsystem dass den Staub der beim Polieren entsteht in einen prak tischen Einweg Papierfilter leitet der sich im vorderen Teil der Maschine befin...

Page 18: ...eigefügt ist TÄGLICH DURCHZUFÜHRENDE MASSNAHMEN 7 1 a Reinigung der Maschine Die Maschine mit einem feuchten Tuch reini gen und anschließend mit einem trockenen und sauberen Tuch abreiben um Verkrus tungen durch die chemischen Produkte zu vermeiden HINWEIS Keine Lösungsmittel Säuren oder ätzen de Substanzen für die Reinigung der Ma schine verwenden Wenn die Pad verschmutzt ist diese bei max 60 was...

Page 19: ...tellend Pad oder chemisches Mittel unangemessen Für den zu polierenden Bodentyp geeignete Pads oder chemische Mittel ver wenden Pad abgenutzt Die Pad austauschen Die Maschine arbeitet un gleichmäßig und vibriert sehr stark Überprüfen dass die Pad perfekt auf die Mitnehmer scheibe zentriert ist Die Pad positionieren indem sie richtig auf die Mitnehmerscheibe zentriert wird Pad für den Bodentyp nich...

Page 20: ... Produkt EINZELBÜRSTE MODELL KENN NR PM 150 00 198EL HU Einschlägige EG Richtlinien 2006 42 CE 2009 127 CE 2014 30 UE 2011 65 UE Angewandte harmonisierte Normen EN 60335 1 EN 60335 2 67 Angewandte nationale Normen Name und Beruf der autorisierten Person welche die Erklärung unterzeichnet Giuseppe Riello Vorstandsvorsitzender Ghibli Wirbel S p A Unterschrift ________________ Giuseppe Riello Name un...

Page 21: ... in order to remain so over time a good product requires continu ous updates aimed at satisfying the expectations of those who use it daily To this end we hope that you will be not only a satisfied customer but also a partner who does not hesitate to let us know your views and ideas resulting from personal experience on a day to day basis Manuale HU30 925_HOLLU_PM150_1ed_07 2019 indd 1 16 07 2019 ...

Page 22: ...E OF THE MACHINE EN 5 4 1 HANDLE TILT ADJUSTMENT EN 5 5 1 GUIDE HANDLE EN 6 6 1 OPERATION EN 6 6 1 a Checks to be performed before use EN 6 6 1 b Starting up the machine EN 6 6 1 c Pad pressure adjustment EN 6 6 1 d Using the machine EN 7 6 1 e End of use and shutdown EN 7 6 1 f Transport EN 7 6 1 g Positioning the machine after use EN 7 7 1 MAINTENANCE AND CLEANING EN 8 7 1 a Cleaning the machine...

Page 23: ... use only DANGER Any other use releases the manufacturer from liability for harm to persons and or property and invalidates any warranty condition This machine is intended for commercial use for example in hotels schools hospitals fac tories shops offices and rental businesses The machine has been designed and built for polishing floors that have been cleaned and vacuumed beforehand i e parquet ma...

Page 24: ...cessory assembly Optional Figs 10 16 Loosen the knob 16 of the handle s up per support 17 Fig 10 Make sure that the lower support 18 rests on the plate 19 located on the han dle rod Fig 11 Place the accessory 20 on the lower support 18 taking care to align the cou pling tab 21 with its housing 22 Fig 12 Lower the upper coupling 23 and attach it to the coupling tab 24 on the top of the accessory 20...

Page 25: ...er release button 45 Machine body 46 Wheels 47 Pivoting front wheel 48 Power cable 49 Auxiliary socket 50 Pad pressure adjustment knob 51 Bag access flap 52 Polishing wax spray start button 53 Red LED when it lights up and stays lit there is an excessive pad pressure on the floor Risk of floor overheating with conse quent floor burning 54 Green LED when lit the pad pressure on the floor is correct...

Page 26: ...damaged in any way that might compromise correct machine operation or the operator s safety 6 1 b Starting the machine Fig 21 WARNING Do not start the machine if it is tilted Do not start the machine if the pad is not correctly mounted NOTE The machine will not start if the handle shaft is upright DANGER Ensure your hands are dry before using the appliance Pull the lever up 43 and lower the han dl...

Page 27: ...vey the fine dust generated during pol ishing to a convenient disposable paper filter in front of the same Use of the Spray accessory optional with a suitable chemical product will al low for removing any marks on the wax NOTE Using the machine in a fixed position with the pad rotation enabled for a prolonged period of time can cause damage to the floor NOTE When the levers 42 are released pad rot...

Page 28: ...ne with a damp cloth and then wipe it with a clean dry cloth to prevent the formation of scale due to the effect of chemicals WARNING Do not use solvents acids or corrosive substances for cleaning the machine If the pad is dirty wash it at a maximum temperature of 60 7 1 b Cleaning the nozzle of the spray accessory Optional Figs 21 and 17 WARNING Once you have finished polishing you must drain and...

Page 29: ...ed Press the button Insufficient floor polishing Pad or chemical product not suitable Use a pad or chemical prod uct that is appropriate to the type of floor to be polished Pad worn Replace the pad The machine operates er ratically or vibrates heavily Check that the pad is perfectly centred in the pad holder Replace the pad centring it correctly in the pad holder Pad not suited to floor type Use a...

Page 30: ... Product SINGLE DISC MODEL CODE PM 150 00 198EL HU Relevant EU Directives 2006 42 CE 2009 127 CE 2014 30 UE 2011 65 UE Applied harmonized standards EN 60335 1 EN 60335 2 67 Applied national standards Name and position of the person authorised to sign the Declaration Giuseppe Riello Chief Executive Officer of Ghibli Wirbel S p A Signature ________________ Giuseppe Riello Name and address of the per...

Page 31: ...à nel tempo Noi siamo coscienti che un buon prodotto per restare tale nel tempo necessita di con tinui aggiornamenti mirati a soddisfare le aspettative di chi quotidianamente ne fa uso In tal senso noi ci auguriamo di avere in lei non solo un cliente soddisfatto ma anche un partner che non esita a trasmetterci opinioni e idee derivanti dalla personale quotidiana esperienza Manuale HU30 925_HOLLU_P...

Page 32: ... I 5 3 1 CONOSCENZA DELLA MACCHINA I 5 4 1 REGOLAZIONE INCLINAZIONE MANIGLIONE I 5 5 1 MANIGLIONE GUIDA I 6 6 1 FUNZIONAMENTO I 6 6 1 a Controlli prima dell uso I 6 6 1 b Avviamento macchina I 6 6 1 c Regolazione pressione pad I 6 6 1 d Uso della macchina I 7 6 1 e Fine uso e spegnimento I 7 6 1 f Trasporto I 7 6 1 g Posizionamento macchina dopo l uso I 7 7 1 MANUTENZIONE E PULIZIA I 8 7 1 a Puliz...

Page 33: ...ta per il solo uso interno PERICOLO Qualsiasi altro utilizzo solleva il costrut tore da responsabilità per danni a perso ne e o cose e fa decadere qualsiasi condi zione di garanzia Questa macchina è destinata all uso com merciale per esempio in alberghi scuole ospedali fabbriche negozi uffici e attività di noleggio La macchina è stata progettata e costruita per la lucidatura di pavimenti preventiv...

Page 34: ...ri tipi di pad può compro mettere la sicurezza della macchina 2 2 c Montaggio accessorio Spray elettrico Optional Figg 10 16 Allentare il pomello 16 del supporto su periore 17 del maniglione Fig 10 Assicurarsi che il supporto inferiore 18 appoggi sulla piastrina 19 posizionata sull asta del maniglione Fig 11 Posizionare l accessorio 20 sul suppor to inferiore 18 facendo attenzione a far combaciare...

Page 35: ...ile accesso Assicurarsi che il cavo elettrico non sia danneggiato 3 1 CONOSCENZA DELLA MACCHINA Figg 20 21 40 Maniglione guida 41 Scatola comandi elettrici 42 Leve avviamento rotazione pad on off 43 Leva inclinazione maniglione 44 Pulsante sblocco leve rotazione pad 45 Corpo macchina 46 Ruote 47 Ruota anteriore pivottante 48 Cavo alimentazione elettrica 49 Presa ausiliaria 50 Manopola regolazione ...

Page 36: ... e regolato Controllare le condizioni del pad Se usurato sostituirlo Controllare che l apparecchio in parti colare il cavo di rete non presenti danni che possano compromettere il corretto funzionamento della macchina o la sicu rezza dell operatore 6 1 b Avviamento macchina Fig 21 AVVERTENZA Non avviare la macchina in posizione ri baltata non avviare la macchina senza il pad cor rettamente montato ...

Page 37: ...un sistema passivo di aspirazione atto a convogliare il pulviscolo che si genera durante la lu cidatura in un pratico filtro in carta a per dere inserito nella parte anteriore della stessa L uso dell accessorio Spray opzionale con prodotto chimico adatto permetterà anche di eliminare gli eventuali segni sul la cera NOTA Utilizzare la macchina ferma con rotazione pad inserita per un tempo prolungat...

Page 38: ...umido e strofinare successivamente con un panno asciutto e pulito onde evitare la formazione di incrostazioni dovute all effetto dei prodotti chimici AVVERTENZA Non utilizzare solventi acidi o sostanze corrosive per la pulizia della macchina Se il pad risulta sporco lavarlo ad una temperatura massima di 60 7 1 b Pulizia ugello accessorio Spray Optional Figg 21 e 17 AVVERTENZA Alla fine delle opera...

Page 39: ...to insuf ficiente Pad o prodotto chimico ina deguati Usare pad o prodotto chimi co adatti al tipo di pavimen to da lucidare Pad consumato Sostituire il pad La macchina funziona in modo irregolare o vibra for temente Controllare che il pad sia perfettamente centrato al disco trascinatore Riposizionare il pad cen trandolo correttamente al disco trascinatore Pad non idoneo al tipo di pavimento Utiliz...

Page 40: ...perde ogni validità Prodotto MONOSPAZZOLA MODELLO CODICE PM 150 00 198EL HU Direttive CE pertinenti 2006 42 CE 2009 127 CE 2014 30 UE 2011 65 UE Norme armonizzate applicate EN 60335 1 EN 60335 2 67 Norme nazionali applicate Nome e posizione della persona autorizzata a fir mare la Dichiarazione Giuseppe Riello Amministratore Delegato Ghibli Wirbel S p A Firma ________________ Giuseppe Riello Nome e...

Page 41: ...Copertina HU30 925_HOLLU_PM150_1d_07 2019 indd 11 16 07 2019 08 25 15 ...

Page 42: ...Copertina HU30 925_HOLLU_PM150_1d_07 2019 indd 12 16 07 2019 08 25 15 ...

Page 43: ...Copertina HU30 925_HOLLU_PM150_1d_07 2019 indd 13 16 07 2019 08 25 15 ...

Page 44: ... ed 12 2019 Copertina HU30 925_HOLLU_PM150_1d_07 2019 indd 14 16 07 2019 08 25 28 hollu Systemhygiene GmbH A 6170 Zirl Salzstraße 6 Tel 43 5238 52800 Fax 43 5238 52800 990 E Mail info hollu com Website www hollu com ...

Reviews: