background image


Use Function Introduction 

1.


Pairing Function 

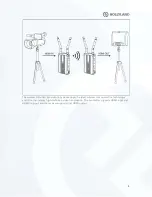
Press and hold the pairing button between the transmitter and the receiver at the 
same time. The Link light flashes red rapidly, and the transmitter and receiver enter 
the pairing mode. After the pairing is successful, the Link light is steady green, as 
shown in Figure 5. 

2.


Function Description 

Double-click the FM button to switch the frequency value. 

3.


OSD Function 

Press and hold the Receiver Channel/OSD button to call up the OSD to display the 
wireless  parameters  and  version  information  of  the  device.  After  clicking  or  no 
operation for 10s, the OSD is blanked. 


Summary of Contents for MARS 300

Page 1: ...the maximum resolution is 1080P60Hz enabling full HD HDMI video transmission Features Latest image coding and decoding technology 5G wireless transmission technology Ultra low latency video transmission Transmission Range 650ft HDMI IN HDMI LOOP OUT Dual HDMI OUT Both the transmitter and the receiver can mount the battery 6 16V DC Wide Voltage Input Support USB Interface Software Upgrade Industria...

Page 2: ...2 Packing List 1 Receiver x1 2 Transmitter x1 3 5GHz Antenna x5 4 User Manual x1 5 Cold Shoe x1 6 Expansion Accessory x1 7 DC Adapter x1 8 OTG converter x1 Typical Connection Diagram ...

Page 3: ...transmission system adopts the latest wireless communication technology and ultra low latency high definition video transmission The transmitter supports HDMI input and HDMI loop out and the receiver supports dual HDMI output ...

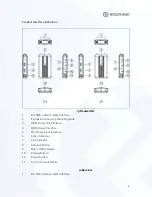
Page 4: ...pansion Accessory Mounting Hole 3 HDMI Loop Out Interface 4 HDMI Input Interface 5 DC Power Input Interface 6 Video Indicator 7 Link Indicator 8 Channel Button 9 Micro USB Interface 10 Pairing Button 11 Power Switch 12 1 4 20 Threaded Hole Receiver 1 RP SMA Antenna Male Interface ...

Page 5: ...e 5 DC Power Input Interface 6 Video Indicator 7 Link Indicator 8 Channel Button 9 Micro USB Interface 10 Pairing Button 11 Power Switch 12 1 4 20 Threaded Hole Product Installation 1 Install the antenna as shown 2 Fixed transmitter receiver 3 Install battery 4 Power on open to ON state ...

Page 6: ...iver enter the pairing mode After the pairing is successful the Link light is steady green as shown in Figure 5 2 Function Description Double click the FM button to switch the frequency value 3 OSD Function Press and hold the Receiver Channel OSD button to call up the OSD to display the wireless parameters and version information of the device After clicking or no operation for 10s the OSD is blan...

Page 7: ...tatus Slow Flash Quick Flash Stays On Slow Flash Video Indicator Whether there is a video source Have No Display Light Yellow Light Status Stays On Stays Off Product Parameter List Transmitter Receiver Interface HDMI Input Type A Female HDMI Loop Out Type A Female 2 Antenna RP SMA Male DC Input Micro USB HDMI Output1 Type A Female HDMI Output2 Type A Female 2 Antenna RP SMA Male DC Input Micro USB...

Page 8: ...80i50 60 1080P30 50 60 Frequency Band 5GHz 5GHz Modulation Mode OFDM OFDM Transmission Power maximum17dBm Receiving Sensitivity 80dBm Transmission Latency 0 1s Bandwidth 20 40MHz 20 40MHz Common Troubleshooting No output on the display side 1 Please check the power of the transmitter and receiver If it is powered by battery or external power supply please make sure that the battery or external pow...

Page 9: ...th this product 5 Please check if the battery level is too low Poor Video Quality 1 Please check the HDMI input and output cable connections are reliable 2 Please ensure that the transmitter and receiver are placed at least 1 5 meters above the ground 3 Please check the status of the Link light If the status is slow yellow the wireless signal strength is too weak In this case please switch the wir...

Reviews: