background image

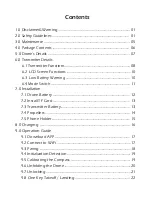
1.0 Disclaimer&Warning ....................................................................................
2.0 Safety Guidelines .......................................................................................... 
3.0 Maintenance ....................................................................................................
4.0 Package Contents ..........................................................................................
5.0 Drone’s Details ................................................................................................
6.0 Transmitter Details 
       6.1 Transmitter Functions ............................................................................
       6.2  LCD Screen Functions ...........................................................................
       6.3  Low Battery Warning ...........................................................................
       6.4 Mode Switch .............................................................................................
7.0 Installation
      7.1 Drone Battery .......................................................................................... 
      7.2 Install TF Card ..........................................................................................
      7.3 Transmitter Battery.................................................................................
      7.4 Propellers ...................................................................................................
      7.5 Phone Holder............................................................................................  
8.0 Charging  ......................................................................................................... 
9.0 Operation Guide 
      9.1 Download APP ........................................................................................
      9.2 Connect to Wi-Fi ...................................................................................... 
      9.3 Paring ........................................................................................................... 
      9.4 Initialization Detection ..........................................................................
      9.5 Calibrating the Compass ......................................................................
      9.6 Unfolding the Drone .............................................................................
      9.7 Unlocking ...................................................................................................
      9.8 One Key Takeoff / Landing ................................................................

01
01
05
06
07

08
10
10
11

12
13
13
14
15
16

17
17
18
19
19
20
21
22

Contents

Summary of Contents for HS720

Page 1: ...HS720 Instructions For Use www holystone com 1 855 888 6699 usa holystone com USA ca holystone com CA eu holystone com EU jp holystone com JP V 1 0 6 Gebrauchsanweisung...

Page 2: ...English 01 43 44 83 Deutsch...

Page 3: ...Mode Switch 7 0 Installation 7 1 Drone Battery 7 2 Install TF Card 7 3 Transmitter Battery 7 4 Propellers 7 5 Phone Holder 8 0 Charging 9 0 Operation Guide 9 1 Download APP 9 2 Connect to Wi Fi 9 3 Pa...

Page 4: ...1 0 APP Operation Instruction 11 1 Operation Interface 11 2 Setting Parameter 11 3 Follow Me 11 4 TapFly 11 5 Point of Interest 11 6 Take Photo Video 12 0 Drone Status Indicator 13 0 Specifications 14...

Page 5: ...oduct please be sure to strictly abide by the specifica tion requirements and safety guidelines stated in this document Any personal injury property damage legal disputes and all other adverse events...

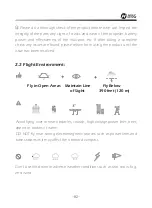
Page 6: ...efrain from using the product until the issue has been resolved 2 2 Flight Environment Fly in Open Areas Maintain Line of Sight Fly Below 390 feet 120 m Avoid flying over or near obstacles crowds high...

Page 7: ...of Battery Please ensure batteries are fitted in the correct orientation as shown in the instruction manual Avoid short circuits by fitting the batteries incorrectly and do not crush or squeeze the ba...

Page 8: ...t open with a hammer or step on it Always charge the batteries in a fireproof container and away from combustible materials Don t charge on surfaces that can catch fire This includes wood cloth carpet...

Page 9: ...e drone This device is not waterproof and must not be submerged in water under any circumstance Failure to maintain the device completely dry will result in the failure of the unit Check the charging...

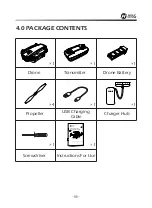
Page 10: ...ne com 1 855 888 6699 usa holystone com USA ca holystone com CA eu holystone com EU jp holystone com JP V 1 0 6 Gebrauchsanweisung Drone Transmitter Drone Battery Propeller Screwdriver USB Charging Ca...

Page 11: ...07 5 0 DRONE S DETAILS Lights Vision Positioning Lens Battery Propeller B Propeller B Propeller A Propeller A HD Camera Battery Indicator Short press Turn on Long press Turn off...

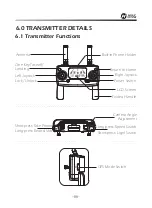
Page 12: ...ock Unlock LCD Screen Return to Home Power Switch Right Joystick One Key Takeoff Landing GPS Mode Switch Antenna Folded Handle Built in Phone Holder Camera Angle Adjustment Long press Speed Switch Sho...

Page 13: ...two beeps which means the drone is at the high speed GPS Mode Switch Emergency Stop Short press the button and the camera icon on the LCD screen flashes once the camera takes one photo Long press the...

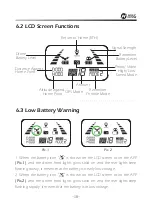
Page 14: ...ns 6 3 Low Battery Warning 1 When the battery icon is shown on the LCD screen or on the APP Pic 1 and the drone front lights glow solid on and the rear lights keep flashing slowly it means that the ba...

Page 15: ...eft Right Up Down Down Left Right Left Joystick Right Joystick 6 4 2 MODE 1 Ascend Descend Forward Backward Up Down Up Down Left Joystick Right Joystick Hold down the and then turn on the power switch...

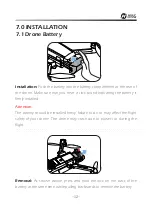
Page 16: ...g the battery is firmly installed Attention The battery should be installed firmly failure to do so may affect the flight safety of your drone The drone may crash due to power cut during the flight Re...

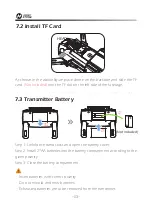
Page 17: ...3 Close the battery compartment Insert batteries with correct polarity Do not mix old and new batteries Exhausted batteries are to be removed from the transmitter 7 2 Install TF Card As shown in the a...

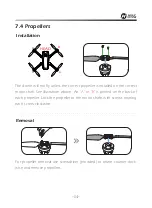
Page 18: ...correct motor shaft See illustration above An A or B is printed on the back of each propeller Lock the propeller to the motor shafts with screws rotating each screw clockwise Installation HEAD Removal...

Page 19: ...Pic 3 2 Tilt the holder 30 degrees towards you and then you will hear a click sound Pic 4 Pic 5 Pic 6 3 Rotate and fix the support board in place Pic 5 4 Adjust the mobile phone holder upward or downw...

Page 20: ...The charging time of a single battery is about 5 7 hours Before charging please check the contents of the Use of Battery section of the Safety Guidelines carefully This product is only equipped with...

Page 21: ...he Wi Fi network created by the drone Check the drone s status in the Ophelia GPS App Your smartphone will launch a search of the available Wi Fi networks Select the Wi Fi network HolyStoneFPV Wait fo...

Page 22: ...wer on the transmitter It will beep 2 times and the indicator light will keep flashing Short press the Power Switch to turn on the drone and place it on a level surface with the head forward Once the...

Page 23: ...d the transmitter will sends out Di Di and the front and back yellow lights will flicker 9 5 Calibrating the Compass When the icon appears on the LCD screen in the state of slow flashing and the indic...

Page 24: ...To unfold the drone follow the steps below Step 1 Unfold the rear arms Step2 Unfold the front arms and place drone on a flat level surface Head should face forward 9 6 Unfolding the Drone Attention If...

Page 25: ...top rotating immediately and the drone locks Pic 7 Method 2 After drone lands pull the throttle stick to the bottom position and hold for 3 seconds The motor will stop rotating and the drone will be l...

Page 26: ...n the drone is flying short press the button the drone will automatically land on the ground Landing Take off Tips Before flying make sure the GPS Mode is turned on in case the drone gets lost 10 1 Ca...

Page 27: ...t will fly back to the last recorded Home Point You can exit Failsafe RTH mode by pressing the Return to Home button or pushing the Throttle Joystick if the transmitter signal is recovered During the...

Page 28: ...eight no more than 98 feet and the distance no more than 328 feet H 98 feet b When the filght altitude is lower than 98 feet the drone will elevate automatically to 98 feet high then fly back above th...

Page 29: ...e filght altitude is lower than 50 feet the drone will elevate automatically to 50 feet high then fly back above the Home Point and desend vertically Home Point 50 feet Flight Altitude 50 feet Flight...

Page 30: ...he upper right corner of the transmitter to facilitate the image positioning function 10 3 Image Positioning System The Image Positioning System consists of a camera module which acquires the position...

Page 31: ...ith highly repeating textures small grid brick in the same color 10 Fly over surfaces that are tilting over 30 degrees could not receive the echo of the ultrasonic wave 11 Flying speed should be contr...

Page 32: ...t Distance Altitude Drone Battery Level Transmitter Battery Level Signal Strength Transmitter Signal Strength Return Shutter Button Photo Video Switch RTH Switch Point of Interest Follow me Switch Tap...

Page 33: ...t 15 120 m The default flight altitude is 390 feet 2 Maximum flight distance 160 1600 feet 50 500 m 3 Maximum flight radius 16 320 feet 5 100 m The Point of Interest s flight radius is set at 16 feet...

Page 34: ...follow the phone s coordinates 3 To exit Follow Me Mode simply click the icon on the app interface again Common Issues The Follow Me function can only be used if the flight range is within 15 95 feet...

Page 35: ...on the screen click icon to submit the route then click YES The drone will now fly along the path according to the points connected on the map 2 Exit the TapFly mode by clicking the icon again 3 If th...

Page 36: ...rone will record it s flight position the moment you enter this function as the point of interest The drone will now continuously circle clockwise around the preset point The default radius is 16 feet...

Page 37: ...nter the photo album for viewing 11 6 Take Photo Video When the TF card is not installed the photos or videos will be stored directly in the APP photo album Pic 9 and smartphone Pic 9 Pic 10 When the...

Page 38: ...t and rear lights alternate flashing green Front and rear lights alternate flashing yellow Front light turns solid red rear light flashes red slowly Entering the First Low Voltage RTH Front light turn...

Page 39: ...mm Unfolded TRANSMITTER Operating Frequency 2 4 GHz MAX Transmission Distance 2624 3277 feet outdoor and unobstructed Battery 2 1 5V AA batteries Not included Operating Temperature Range 32 to 104 F D...

Page 40: ...era frequency 5 GHz Video Photo Resolution 2K 2048 1152p Lens FOV 110 FPV Distance 656 1312 feet outdoor and unobstructed Photo JPEG Video AVI MP4 MAX Supported TF Cards 32 GB Not included Controllabl...

Page 41: ...el surface and repeat the gyro calibration The drone vibrated in flight The propeller are damaged Please replace the new propeller 1 2 3 4 The drone could not be unlocked and the rear light flashed Th...

Page 42: ...inst harmful interference in a residential installation This equipment generates uses and can radiate radio frequency energy and if not installed and used in accordance with the instructions may cause...

Page 43: ...sure requirment The device can be used in portable exposure condition without restriction This part belongs to the transmitter IC Notice This device complies with Canada Industry licence exempt RSS st...

Page 44: ...tion aux radiations Cet quipement est conforme aux limites d exposition aux rayonnements IC tablies pour un environnement non contr l Cet quipement doit tre install et utilis avec un minimum de 20 cm...

Page 45: ...ammable and nonconductive container 7 Never leave the battery unattended during the charging process Never disassemble or modify the housing s wiring or puncture the cells Always ensure that the charg...

Page 46: ...g has to be kept since it contains important information 16 The toy is only to be connected to Class II equipment bearing the symbol EU RF Power EIRP 10dBm 2413MHz 2461 MHz Caution 1 The max operating...

Page 47: ...egistration number on the Drone by any means such as permanent marker lable engraving This number must be readily accessible and maintained in a condition that is readable and legible upon close visua...

Page 48: ......

Reviews: