background image

 12


Summary of Contents for TKS 315 Pro

Page 1: ...For your safety Read all instructions carefully Instruction Manual Holzstar TKS 315 Pro Circular saw bench ...

Page 2: ... missing do not attempt to assemble the machine do not plug in the power cord do not turn the switch on until the missing parts are obtained and installed correctly CONTENTS SPECIFICATION Page 01 SAFETY Page 02 Specified conditions of use Page 02 General safety instructions Page 02 Safety devices Page 03 ASSEMBLY Page 04 OPERATION Page 07 Setting the depth of cut Page 07 Setting the saw blade tilt...

Page 3: ...l while under the influence of drugs alcohol or medication 3 Consider environmental effects Provide proper lighting Prevent adverse body positions Ensure firm footing and keep you balance at all times Use suitable work piece supports when cutting long stock Do not operate tool near inflammable liquids or gases 4 The saw shall only be started and operated by persons familiar with circular saws and ...

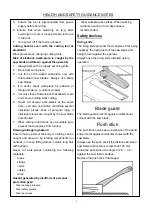
Page 4: ...nd stock use a suitable jig to prevent the work piece from turning Drawing in trapping hazard Ensure that no parts of the body or clothing can be caught and drawn in by rotating components no neckties no loose fitting clothes contain long hair with hairnet Never cut work pieces containing the following materials ropes strings cords cables wires Hazard generated by insuffi cient personal protection...

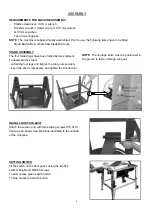
Page 5: ...ed before shipment To assemble the stand unfold the four legs and tighten the wing nuts securely insert the short crossbeams and tighten the Knurled nut INSTALL DUST COLLECT Attach the suction port with three taping screws ST3 5x13 and two pan head screw M4X8 as illustrated to the outside of the chipcase SETTING SWITCH Fit the switch on the front panel using the two M4 self Locking Nut M4X60 screw...

Page 6: ...n the nuts so that the blade guide can be made to slide according to safety norms in force NOTE The distance between the blade and the riving Knife must be 3mm Once this measurement is correct tighten the clamp screws of the blade guard 4 Position the insert table into the Table top and pull the Insert table as show 5 Install the blade guard on the riving knife using the M5 self locking nut M5X50 ...

Page 7: ... the fastening brackets with the motor unit chipcase assembly attached to it as required until the alignment is correct INSTALL RIP FENCE W GUIDE EXTRUSION Description Q ty Fence extrusion Rip fence carrier Knurled nut M6 Carriage bolt M6X20 1 1 2 2 1 For use as rip fence the long fence extrusion must be installed It is mounted on the guide extrusion at the front of the table 2 Slide the head of t...

Page 8: ...the workpiece 3 Set saw blade tilt and lock 4 Start motor 5 Cut workpiece in a single pass 6 Switch machine off if no further cutting is to be done immediately afterwards SAWING WITH THE MITRE FENCE 1 Swing mitre fence on the table top 2 Set to desired mitre angle and lock in that position For mitre cuts the fence extrusion is adjustable to 45 3 Set the cutting height of the saw blade 4 Set saw bl...

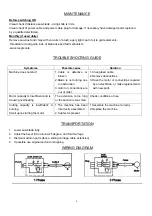
Page 9: ...obstruction 3 motor or connections are out of order 1 Chang feed cable 2 Remove obstructions 3 Have the motor or connections repaired by an electrician or make replacements with new parts Motor capacity is insufficient and is Causing overheating The extension is too long or the section is too small Check conditions of use Cutting capacity is insufficient A burning Smell upon starting the motor 1 T...

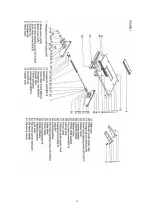
Page 10: ...g Extension table Description Q ty Extension table Support Long Support Short Knob M6 Carriage bolts M6X12 1 2 2 2 2 The extension table attaching to either rear or side Sliding carriage Description Q ty Carriage A ssy Guide bar Mitre fence Guide bar support Knob M6 Washer 6mm Hexagonal bolt M6X16 Hexagonal nut self locking M6 Washer 6mm Hexagonal bolt M6X16 Washer 6mm 1 1 1 2 1 1 1 1 1 4 4 Slidin...

Page 11: ...10 ...

Page 12: ...11 ...

Page 13: ...12 ...

Reviews: