
Christmas Tree
Model: TG76M5416X02
Sku # 1003 151 931
Package Contents
Pre-Assembly
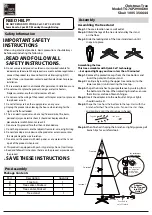
Assembling the tree stand
Assembly
Part
D
A
B
C
Description
Tree stand
Tree top
Tree center, Sticker 2
Tree center, Sticker 1
Quantity
1
1
1
1
Step 1. Choose a location near a wall outlet.
Step 2. Assemble the tree stand and place on a level surface.
Step 3. Unfold the legs of the tree stand and lay the stand
on the floor.
Step 4. Slide the locking disk of the tree stand down until
it snaps into place.
Maintenance
Care and Cleaning
Spare parts
Repairing Loose Hinges
This tree package includes hinge pins and washers for any replace-
ment or repair that you need to perform on your tree. If extra parts
are needed, contact the Customer Service Team at 1-877-527-0313
between the hours of 8 am and 5 pm EST, Monday through Friday.
1. Remove all ornaments and decorations.
2. Disassemble the tree from the top to the bottom. Start with the
tree top and gently lift straight up to remove from section below
and fold all branches toward the pole.
3. In case of difficulty separating the tree pole (trunk), apply a small
amount of lubricant at the joint and rotate the upper pole in both
directions. Lift up the upper pole again.
4. Continue by gently lifting straight up each section(s) from the
section below and fold all branches toward the pole until the
bottom section is removed from the tree stand.
5. Carefully place all tree sections into shipping box and tape it shut.
6. When not in use, please store your tree in a cool, dry place away
from sunlight. Exposing your tree to excessive heat or humidity
may damage your tree.
Step 1. Extra hinge pins are included for repairing the hinges. Place
the branch into the slot of the bracket.
Step 2. Insert a new hinge pin through the holes of the bracket and
secure with a washer.
Tree top
Section 2
Section 1
Each tree section is numbered with a tag. Please identify all
sections before assembling.
Step 1. Assemble the tree from the bottom to the top. Start with
the bottom section and remove protective cap before
inserting into the assembled stand. Make sure the pole
is firmly inserted and secured into the stand.
Step 2. Please remove protective cap from middle section and
continue inserting into the bottom section.
Step 3. Insert the tree top into the tree center.
Step 4. Allow branches to fall into place or gently pull up and out.
Step 5. Begin to shape the branches and tips working from the
bottom to the top. Start with tips farthest from the pole
and fan out one to the right, one to the left and one at
the center of the main stem.
Step 6.
Shape the tree from the bottom to the top. Start with the
branches farthest from the pole – fan out in a star shape,
and continue until the entire tree is shaped.
Step7. After shaping the entire tree following the previous step,
slightly upsweep all branch tips for a uniform look. Shift
branches to fill any gaps. Your Christmas tree is now
complete and ready to be decorated.
Assembling the tree
Top view
Side view
TM
NEED HELP?
DO NOT RETURN TO STORE. Call: 1-877-527-0313
Form 8am to 5pm EST, Monday through Friday.