background image

¿Preguntas, problemas o piezas faltantes? Antes de devolver a la tienda,

llama al servicio al cliente de Home Decorators Collection, de lunes a viernes, 

entre 8:00 a.m. y 6:00 p.m. (Hora Estándar del Este).

1-800-986-3460

HOMEDEPOT.COM/HOMEDECORATORS

GRACIAS POR TU COMPRA

Apreciamos la confianza que has depositado en Home Decorators Collection al comprar este ventilador de techo. Nos esforzamos en crear 

continuamente productos de calidad diseñados para mejorar tu hogar. Visítanos por Internet para ver nuestra línea completa de productos disponibles 

a fin de satisfacer tus necesidades de mejoras del hogar. ¡Gracias por elegir Home Decorators Collection!


Artículo núm. 1002 175 130, 1002 175 072

Modelo núm. 51746, 51747

Modelo núm. 48-ATR aprobado por UL

GUÍA DE USO Y MANTENIMIENTO

VENTILADOR DE TECHO ALTURA, DE 122 CM

Summary of Contents for 1002 175 072

Page 1: ...nfidence you have placed in Home Decorators Collection through the purchase of this ceiling fan We strive to continually create quality products designed to enhance your home Visit us online to see ou...

Page 2: ...d pushed carefully up into the outlet box The wires should be spread apart with the grounded conductor and the equipment grounding conductor on one side of the outlet box 8 All set screws must be chec...

Page 3: ...no other express warranty Home Decorators Collection hereby disclaims any and all warranties including but not limited to those of merchantability and fitness for a particular purpose to the extent p...

Page 4: ...iption Quantity AA Blade attachment screws 15 BB Plastic wire connecting nut 3 CC Decorative nut 15 DD Pull chain 1 Pre Installation continued HARDWARE INCLUDED NOTE Hardware not shown to actual size...

Page 5: ...1 C Canopy 1 D Decorative motor collar cover 1 Part Description Quantity E Fan motor assembly 1 F Blade 5 G Switch cup adaptor 1 H Switch cup 1 IMPORTANT This product and or components are governed by...

Page 6: ...se the appropriate fasteners and materials The outlet box and its bracing must be able to fully support the weight of the moving fan at least 35 lbs 15 9 kg Do not use a plastic outlet box The illustr...

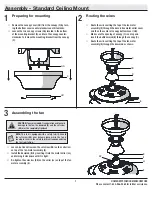
Page 7: ...the opening of canopy C is on top and insert the ball downrod B through the canopy C Route the wires exiting the top of the fan motor assembly E through the downrod as shown 2 3 1 Loosen but do not re...

Page 8: ...M Note that the flat side of the mounting bracket A is toward the outlet box MM Securely tighten the two mounting screws LL Carefully lift the fan motor assembly E up to the mounting bracket A Seat th...

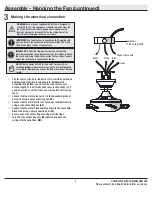
Page 9: ...n the canopy C if you do not wish to cut the wires you will need to neatly wrap them Connect the fan motor green wires to the household green or bare wire using a wire connecting nut BB Connect the fa...

Page 10: ...ver HH by aligning the covers slots with screws in the bottom of the canopy C Rotate the bottom cover clockwise to lock in place WARNING When using the standard ball downrod mounting the tab in the ri...

Page 11: ...are situated in the narrow end of the keyholes Re install the one screw QQ that was removed in first step Tighten all three screws firmly Assembly Hanging the Fan continued Attaching the switch cup 2...

Page 12: ...switch YY controls the direction of the blades forward switch left or reverse switch right Warm weather Forward A downward airflow creates a cooling effect This allows you to set your air conditioner...

Page 13: ...obble problems are caused when blade levels are unequal Check this level by selecting a point on the ceiling above the tip of one of the blades Measure from a point on the center of the blade to the p...

Page 14: ...estions problems missing parts Before returning to the store call Home Depot Customer Service 8 a m 6 p m EST Monday Friday 1 800 986 3460 HOMEDEPOT COM HOMEDECORATORS Retain this manual for future us...

Page 15: ...do en Home Decorators Collection al comprar este ventilador de techo Nos esforzamos en crear continuamente productos de calidad dise ados para mejorar tu hogar Vis tanos por Internet para ver nuestra...

Page 16: ...l ctrica Los cables deben estar separados con el cable a tierra y el conductor a tierra del equipo a un lado de la caja el ctrica 8 Todos los tornillos colocados tienen que comprobarse y ajustarse don...

Page 17: ...Home Decorators Collection queda exento de todas y cada una de las garant as incluyendo pero sin limitarse a aquellas de comercializaci n e idoneidad para determinado prop sito en el alcance permitid...

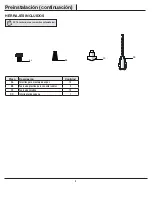
Page 18: ...nillos para montaje de aspas 15 BB Tuerca de pl stico para conectar cables 3 CC Tuerca decorativa 15 DD Interruptor de cadena 1 Preinstalaci n continuaci n HERRAJES INCLUIDOS NOTA Los herrajes no se m...

Page 19: ...va del collar n del motor 1 Pieza Descripci n Cantidad E Conjunto del motor y el ventilador 1 F Aspa 5 G Adaptador de la caja del interruptor 1 H Caja del interruptor 1 IMPORTANTE Este producto y o su...

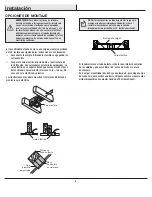
Page 20: ...res y materiales apropiados La caja el ctrica y su soporte tienen que sostener todo el peso del ventilador en movimiento al menos 35 lb 15 9 kg No uses una caja el ctrica de pl stico Las ilustraciones...

Page 21: ...a trav s de ella C Inserta los cables que salen por la parte superior del conjunto del motor y el ventilador E a trav s del tubo bajante como se muestra 2 3 1 Afloja sin quitar el tornillo de fijaci...

Page 22: ...rte de montaje A est apuntando hacia la caja el ctrica MM Ajusta firmemente los dos tornillos de montaje LL Levanta con cuidado el conjunto del motor del ventilador E hasta el soporte de montaje A Col...

Page 23: ...ta C Si no quieres cortar los cables deber s enrollarlos cuidadosamente Conecta los cables verdes del motor del ventilador a los cables verde o pelado del hogar usando una tuerca de conexi n de cables...

Page 24: ...la la tapa inferior decorativa HH alineando las ranuras de la tapa con los tornillos en la parte inferior de la cubierta C Gira la tapa inferior hacia la derecha para fijarla en su lugar ADVERTENCIA C...

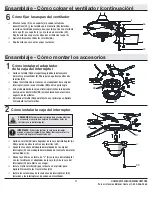
Page 25: ...gosto de los orificios Reinstala el tornillo QQ que retiraste en el primer paso Aprieta firmemente los tres tornillos Ensamblaje C mo colgar el ventilador continuaci n C mo instalar la caja del interr...

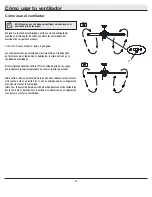
Page 26: ...tor deslizante controla YY el sentido de giro de las aspas hacia adelante hacia la izquierda o en reversa hacia la derecha Clima c lido Hacia adelante Un flujo de aire descendente surte un efecto refr...

Page 27: ...los de los brazos de aspas est n asegurados La mayor a de los problemas de oscilaci n del ventilador se deben a que las aspas no est n al mismo nivel Verifica este nivel seleccionando un punto en el c...

Page 28: ...altantes Antes de devolver a la tienda llama al servicio al cliente de Home Depot de lunes a viernes entre 8 00 a m y 6 00 p m Hora Est ndar del Este 1 800 986 3460 HOMEDEPOT COM HOMEDECORATORS Conser...

Reviews: