background image

3

Preinstalación

PLANIFICAR LA INSTALACIÓN

Lee todas las instrucciones antes de ensamblar e instalar. Para evitar daños al artículo, ensámblalo sobre una 

daños durante el envío. Conserva el recibo y estas instrucciones como comprobante de compra.

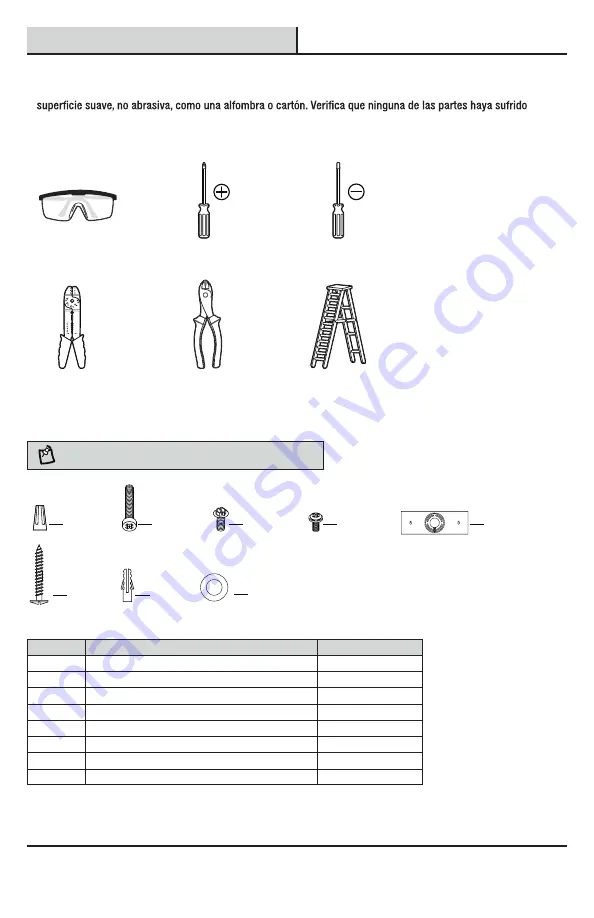
Partes

 Descripción

Cantidad

AA

 Tuerca para cable 

3

BB

 Tornillo de la caja eléctrica 

2

CC

 Tornillo a tierra 

1

DD

 Tornillo de montaje 

4

EE

 Placa posterior

1

FF

 Tornillos autoenroscante  

2

GG

 Anclaje

2

HH

 Junta de silicona 

4

HERRAJES INCLUIDOS

Gafas de seguridad

Pelacables

Destornillador Phillips

Escalera

Cortacables

Destornillador de cabeza plana

NOTA:

 No se muestra el tamaño real de los herrajes.

HERRAMIENTAS NECESARIAS

GG

DD

EE

CC

AA

FF

BB

WWW.HOMEDEPOT.COM/HOMEDECORATORS

Para obtener asistencia, llama al 1-800-986-3460.

HH

Summary of Contents for 1002 352 692

Page 1: ...986 3460 WWW HOMEDEPOT COM HOMEDECORATORS 4 LIGHT UP AND DOWN LED VANITY We appreciate the trust and confidence you have placed in Home Decorators Collection through the purchase of this 4 light up and down LED vanity We strive to continually create quality products designed to enhance your home Visit us online to see our full line of products available for your home improvement needs Thank you fo...

Page 2: ...t or not relating to faulty material or workmanship This warranty shall not apply to the finish on any portion of the warrant and specially disclaims any warranty whether express or implied of fitness for a particular purpose other than the warranty contained herein The manufacturer specifically disclaims any liability and shall not be liable for Before starting installation of this fixture or rem...

Page 3: ... and these instructions for proof of purchase TOOLS REQUIRED HARDWARE INCLUDED Safety goggles Wire strippers Phillips screwdriver Ladder Wire cutters Flathead screwdriver NOTE Hardware not shown to actual size GG DD EE CC AA FF BB Part Description Quantity AA Wire nut 3 BB Outlet box screw 2 CC Ground screw 1 DD Mounting screw 4 EE Backplate 1 FF Tapping screw 2 GG Anchor 2 WWW HOMEDEPOT COM HOMED...

Page 4: ...4 Pre Installation continued PACKAGE CONTENTS Part Description Quantity A Large crystal 12 D B A C B Small crystal 16 C 4 D Glass tube 1 Fixture body Part Description Quantity ...

Page 5: ... then insert anchors GG Secure the backplate EE to the outlet box with the outlet box screws BB Align the keyholes in the backplate EE with the anchors GG and insert the tapping screws FF on a clean surface WARNING Turn off power at the main fuse box backplate EE Then tighten the mounting screws DD by using a phillips screwdriver not included WHITE WIRE WHITE WIRE FROM FIXTURE FROM FIXTURE FROM CA...

Page 6: ... stick the glass tube C on the fixture body D as figure Tear off the paper from the tape on glass cover B A 5 4 7 6 B A WARNING Please wear a glove provided before installation Do not remove the paper covering the adhesive until step 4 has been finished Remove the glass cover from the glass tube C Place the large crystal A and small crystal B as below figures 9 8 B A 3 2 1 B A C A B C ...

Page 7: ...e is a bad connection Check and reconnect the wires The power is off Ensure that the power supply is turned on Ensure that the circuit breaker is set to the ON position Unplug the other items on the circuit call the Customer Service Team at 1 800 986 3460 The circuit breaker is off There are too many items on one circuit The product will not light The fuse blows or the circuit breaker trips when t...

Page 8: ...ing parts Before returning to the store call Home Decorators Collection Customer Service 8 a m 7 p m EST Monday Friday 9 a m 6 p m EST Saturday 1 800 986 3460 WWW HOMEDEPOT COM HOMEDECORATORS Retain this manual for future use ...

Page 9: ...ándar del Este 1 800 986 3460 WWW HOMEDEPOT COM HOMEDECORATORS TOCADOR CON 4 LUCES LED ASCENDENTES Y DESCENDENTES Apreciamos la confianza que has depositado en Home Decorators Collection al comprar esta instalación fija de tocador con 4 luces LED ascendentes y descendentes Nos esforzamos para continuamente crear productos de calidad diseñados para mejorar tu hogar Visítanos por Internet para ver n...

Page 10: ...ntía no cubre fallas del producto a consecuencia de un accidente mal uso abuso materiales o de fabricación Esta garantía no se aplica al acabado de ninguna parte del producto como el de la no garantiza y rechaza especialmente cualquier garantía expresa o implícita de idoneidad para un propósito en y no es responsable de daños o pérdida directa o indirecta incluidos cualquier costo de mano de obra ...

Page 11: ...ra cable 3 BB Tornillo de la caja eléctrica 2 CC Tornillo a tierra 1 DD Tornillo de montaje 4 EE Placa posterior 1 FF Tornillos autoenroscante 2 GG Anclaje 2 HH Junta de silicona 4 HERRAJES INCLUIDOS Gafas de seguridad Pelacables Destornillador Phillips Escalera Cortacables Destornillador de cabeza plana NOTA No se muestra el tamaño real de los herrajes HERRAMIENTAS NECESARIAS GG DD EE CC AA FF BB...

Page 12: ...4 A 12 B 16 C 4 D 1 D B A C Preinstalación continuación CONTENIDO DEL PAQUETE Partes Descripción Cantidad Cristal grande Cristal pequeño Tubo de vidrio Cuerpo de la lámpara ...

Page 13: ...es FF 2Cómo hacer las conexiones eléctricas Sujeta el extremo libre del cable a tierra cable de cobre pelado o verde al cable a tierra de la caja eléctrica o al tornillo a tierra CC de la placa posterior EE Conecta el cable negro de la fuente de corriente al cable negro de la instalación y el cable blanco de la propia fuente al cable blanco de la NOTA Usa siempre las tuercas para cables AA para co...

Page 14: ...papel de la cinta en la cubierta de vidrio Coloca y pega el tubo de vidrio C sobre el cuerpo de la lámpara D como se muestra B A 5 4 7 6 B A 9 8 B A 3 2 1 B A C A B C ADVERTENCIA Usa un guante incluido antes de instalar No quitar el papel que cubre al adhesivo antes de completar el paso 4 Retira la cubierta de vidrio del tubo de vidrio C Coloca el cristal grande A y el pequeño B como se muestra a ...

Page 15: ...ctados o la conexión es mala Revisar y volver a conectar los cables La electricidad está apagada Asegúrate de que el suministro de electricidad esté encendido posición de ON encendido Desconecta otros artículos del circuito llama al equipo de servicio al cliente 1 800 986 3460 El cortacircuitos está apagado Hay demasiados artículos en un solo circuito El producto no iluminará El fusible se funde o...

Page 16: ...lama al servicio al cliente de Home Decorators Collection de lunes a viernes de 8 00 a m a 7 00 p m hora estándar del Este y los sábados de 9 00 a m a 6 00 p m hora estándar del Este 1 800 986 3460 WWW HOMEDEPOT COM HOMEDECORATORS Conserva este manual para uso en el futuro ...

Reviews: