background image

PACKAGE CONTENTS

PACKAGE CONTENTS

Pre-Installation (continued)

6

K

H

L

A

F

G

M

N

Part

Part

H

I

J

K

L

M

N

Description

Description

Fan rotation motor assembly

Fan motor assembly

Decorative cover

Blade arm

Blade

Remote control

Receiver

Quantity

Quantity

1

1

1

6

6

1

1


Part

Part

A

B

C

D

E

F

G

Quantity

Quantity

1

1

1

1

1

1

1

Description

Description

Mounting bracket (preassembled)

Filter (preassembled)

Canopy ring (preassembled)

Canopy

Canopy bottom cover

Hanger ball/downrod assembly

Coupling cover

I

J

C

D

E

B

Summary of Contents for 1003 236 524

Page 1: ...Before returning to the store call Home Decorators Collection Customer Service 8 a m 7 p m EST Monday Friday 9 a m 6 p m EST Saturday 1 800 986 3460 HOMEDEPOT COM HOMEDECORATORS Visual instruction of how to install this fan Visit www homedepot com and enter either the Item or Model number to find this fan and click the link of visual instruction in the product overview section ...

Page 2: ...7 18 19 20 Table of Contents 2 READ AND SAVE THESE INSTRUCTIONS Table of Contents Safety Information Warranty Pre Installation Tools Required Hardware Included Package Contents Dual Mounting Instructions Installation Assembly Standard Ceiling Mounting Close to Ceiling Mounting Hanging the Fan 2 3 4 4 4 4 5 6 7 8 9 9 10 11 12 Attaching the Fan Blades ...

Page 3: ...cal connections spliced conductors should be turned upward and pushed carefully up into the outlet box The wires should be spread apart with the grounded conductor and the equipment grounding conductor on one side of the outlet box and ungrounded conductor on the other side of the outlet box 9 All setscrews must be checked and retightened where necessary before installation 10 Suitable for use wit...

Page 4: ...es including but not limited to those of merchantability and fitness for a particular purpose to the extent permitted by law The duration of any implied warranty which cannot be disclaimed is limited to the time period as specified in the express warranty Some states do not allow limitation on how long an implied warranty lasts so the above limitation may not apply to you The retailer shall not be...

Page 5: ... washer Blade attachment screw and fiber washer Clevis pin preassembled Cotter pin preassembled Cross pin preassembled Setscrew preassembled Collar setscrew preassembled Collar mounting screw with lock washer preassembled 1 5V AAA battery not to scale Hex wrench not to scale 18 Extension cord not to scale Part Part Description Description 3 4 2 13 19 1 1 1 1 2 6 2 1 1 Quantity Quantity 5 HOMEDEPOT...

Page 6: ...embly Fan motor assembly Decorative cover Blade arm Blade Remote control Receiver Quantity Quantity 1 1 1 6 6 1 1 Part Part A B C D E F G Quantity Quantity 1 1 1 1 1 1 1 Description Description Mounting bracket preassembled Filter preassembled Canopy ring preassembled Canopy Canopy bottom cover Hanger ball downrod assembly Coupling cover I J C D E B ...

Page 7: ...oms with less than 8 ft ceilings or in areas where additional space is desired from the floor to the fan blades Once you have decided which ceiling installation you will use refer to the corresponding sections and procedures during the assembly period Where necessary each section of the instructions will note the different procedures to follow for the two types of installation Standard Ceiling Mou...

Page 8: ...hree different ways to mount the outlet box OO not included OO OO PP OO OO A Installation MOUNTING OPTIONS MOUNTING OPTIONS WARNING To reduce the risk of fire electric shock or personal injury mount the fan to an outlet box marked acceptable for fan support using the screws provided with the outlet box An outlet box commonly used for the support of lighting fixtures may not be acceptable for fan s...

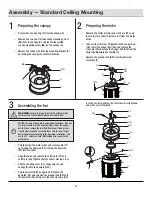
Page 9: ...urely starting with the center screw Make sure the blade L is straight Repeat these steps for the remaining blades L Remove the decorative cover J from the fan motor I by remove the two decorative cover screws CC on the motor I K EE L J CC I 3 Fastening the blade assemblies to the motor Align the holes from the blade arm K to the holes from the motor assembly I and secure the blade arm in place wi...

Page 10: ...fan loosening and possibly falling Carefully feed the motor wires and safety cable TT up through the downrod SS Thread the downrod SS into the collar Align the holes and replace the clevis pin FF and cotter pin GG Tighten the two collar setscrews JJ Slip the coupling cover G canopy ring C and canopy D onto the downrod SS Carefully reinstall the hanger ball QQ onto the downrod SS and reinstall the ...

Page 11: ...BB on the top of the canopy D Remove the two non slotted canopy mounting screws BB and loosen the slotted canopy mounting screws BB Remove the canopy bottom cover E from the canopy D Make sure the slot openings of the canopy ring C are on top and then proceed to place the canopy ring C and canopy D over the collar at the top of the fan rotation motor assembly H Align the mounting holes on the bott...

Page 12: ...supporting system marked acceptable for fan support and use the mounting screws provided with the outlet box WARNING The tab in the ring must rest in the groove of the hanger ball downrod assembly F Failure to properly seat the tab in the groove could cause damage to the wiring WARNING The hook is only to hold the fan while attaching wiring Failure to hang as instructed may result in the tab break...

Page 13: ...e Fan continued 6 Installing the safety cable Secure the safety cable TT to the building structure using a wood screw not included TT TT 13 HOMEDEPOT COM HOMEDECORATORS Please contact 1 800 986 3460 for further assistance ...

Page 14: ...ections Connect the black hot wire from the ceiling to the black wire marked AC in L from the filter B Connect the white neutral wire from the ceiling to the white wire marked AC in N from the from the filter B Secure each wire connection with a plastic wire nut provided with the electrical hardware After connecting the wires spread them apart so that the green and white wires are on one side of t...

Page 15: ... Do not leave the fan assembly unattended until all four canopy mounting screw BB are engaged and firmly tightened Slide the canopy D up to the ceiling Make sure you have placed the wires and resister VV safely into the outlet box OO Secure the canopy D to the mounting bracket A with the four canopy mounting screws with lock washers BB included with your fan Slide the canopy ring C over the canopy...

Page 16: ...ry compartment to enter the learning function Once the fan has detected the remote controls s frequency the down light of your fan if applicable will blink and the fan blades will start to spin The fan will now accept commands from the added remote To clear all other remotes from your fan s memory use the steps below Ensure AC power to the fan is OFF to begin the learning process Slide the dip swi...

Page 17: ...omfort BreezeTM mode will automatically cancel the Comfort BreezeTM mode and resume normal fan operation 3 Comfort BreezeTM There are three Comfort BreezeTM settings Pressing the button will activate the Comfort BreezeTM mode and the LED bar will illuminate slowly from bottom to top to display the current setting Setting 1 Alternates through speeds 1 3 the LED bar should fill approximately 33 Sett...

Page 18: ...blade attachments twice a year Make sure they are secure Because of the fan s natural movement some connections may become loose over time It is not necessary to remove the fan from the ceiling Clean your fan periodically Use only a soft brush or lint free cloth to avoid scratching the finish The plating is sealed with a lacquer to minimize discoloration or tarnishing Optional Apply a light coat o...

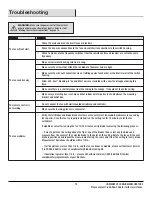
Page 19: ... will not start The fan sounds noisy WARNING Make sure the power is off at the electrical panel box before you attempt any repairs Refer to step 7 Making the electrical connections on page 14 Verify that all blades and blade bracket screws are secure most fan wobble problems are caused by loose parts Once the fan is properly installed run the ceiling fan for 10 minutes to let the fan self adjust I...

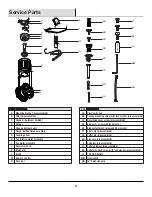
Page 20: ...ssembled Collar setscrew preassembled Collar mounting screw with lock washer preassembled 1 5V AAA battery Hex wrench 18 Extension cord Service Parts A F G H AA BB CC DD EE FF GG HH KK II JJ LL MM NN C B D E J I Part Part A B C D E F G H I J K L M N Description Description Mounting bracket preassembled Filter preassembled Canopy ring preassembled Canopy Canopy bottom cover Hanger ball downrod asse...

Page 21: ...parts Before returning to the store call Home Decorators Collection Customer Service 8 a m 7 p m EST Monday Friday 9 a m 6 p m EST Saturday 1 800 986 3460 HOMEDEPOT COM HOMEDECORATORS Retain this manual for future use YG658001 A ...

Reviews: