14
Installing the shade
3
□
Place the shade (I) into the light kit pan (G) aligning the three
flat areas on the top flange of the shade (I) with the three
raised dimples in the light kit pan (G).
□
Turn the shade (I) clockwise until it stops.
Assembly - Attaching the Accessories
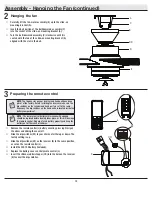
Mounting the remote control holder
□
Slide the screw cover plate up to remove it from the wall
cradle.
□
Position the wall cradle in the desired position and attach it to
the wall using the included wall cradle screws.
□
Slide the screw cover plate back onto the wall cradle to
conceal the screws.
Screw cover
plate
NOTE:
Screw wall anchors are included for extra support. The
included screws are designed to screw easily into the wall. If
you would like a more permanent or secure hold, install the wall
anchors prior to attaching the wall cradle to the wall.
Assembly - Attaching the Light Kit (continued)
WARNING:
Allow the shade to cool completely before
removing.
CAUTION:
Make sure the power is off before attaching or
removing the shade.
G
I


