background image

8

Assembly - Hanging the Fan

Attaching the fan to the electrical 
box


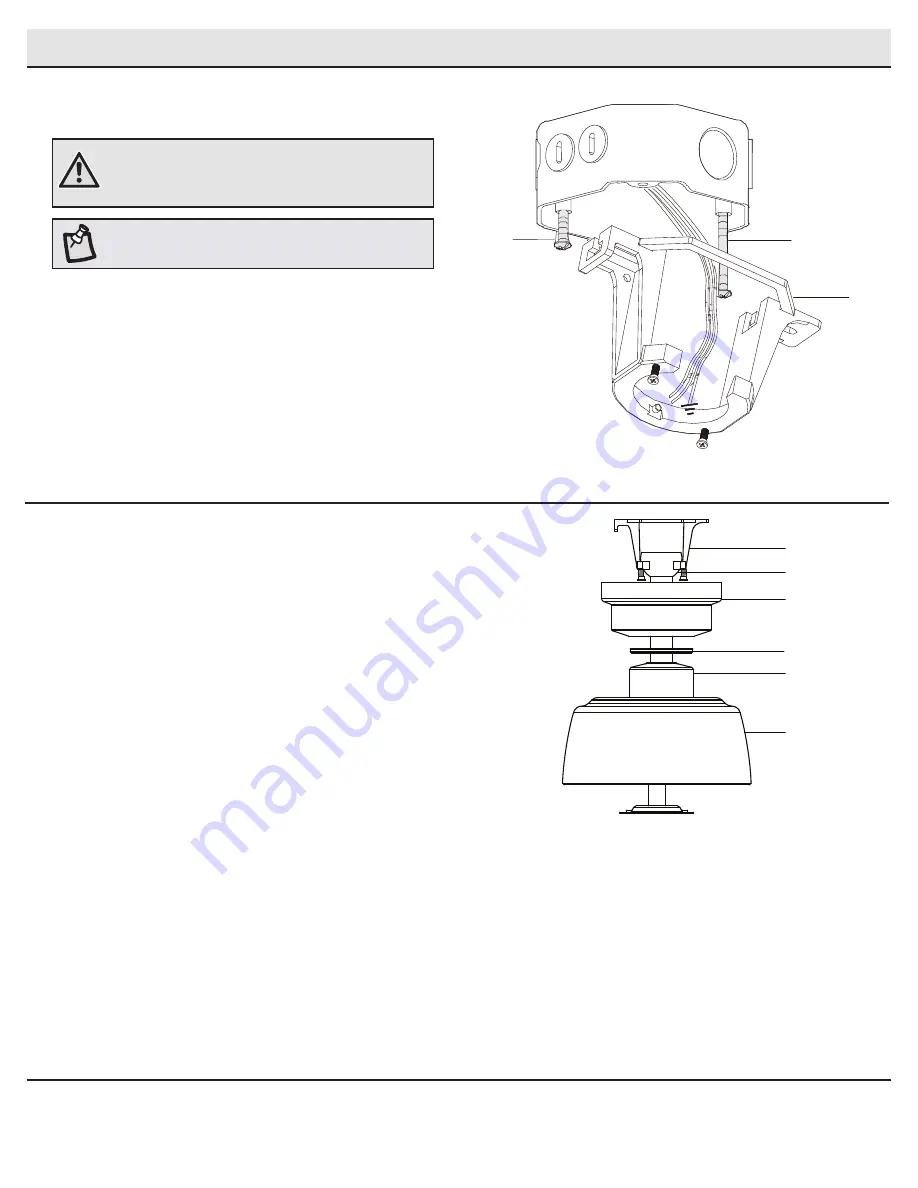
Pass the 120-Volt supply wires through the center hole in the 
slide-on mounting bracket (A).


Install the slide-on mounting bracket (A) on the outlet box by 
sliding the slide-on mounting bracket (A) over the two screws 
(MM) provided with the outlet box. If necessary, use leveling 
washers (not included) between the slide-on mounting bracket 
(A) and the outlet box. The flat side of the slide-on mounting 
bracket (A) should face toward the outlet box, as shown.


Securely tighten the two mounting screws (MM).

1

WARNING:

 To reduce the risk of fire, electric shock or 

personal injury, mount to an outlet box marked “Acceptable 

for fan support of 35 lbs (15.9 kg) or less,” and use the 

screws provided with the outlet box.

Hanging the fan

2


Carefully lift the fan-motor assembly (E) up to the slide-on 
mounting bracket (A).


Insert the ball portion of the ball/downrod assembly (B) into 
the socket of the slide-on mounting bracket (A).


Turn the ball/downrod assembly clockwise until it is seated 
with the tab of the slide-on mounting bracket (A) aligned with 
the slot in the ball.

NOTE:

 The mounting bracket (A) is designed to slide into 

place on an outlet box with the outlet box screws (MM).

A

MM

MM

A
B

E

C

D

JJ

Summary of Contents for 315 077 551

Page 1: ...ce at 1 800 283 7048 Monday Friday 8 a m 6 p m EST THANK YOU We appreciate the trust and confidence you have placed in Home Depot Pro through the purchase of this ceiling fan We strive to continually create quality products designed to enhance your customers homes Visit us online to see our full line of products for your customers home improvement needs Thank you for choosing Home Depot Pro ...

Page 2: ...ling the blades or testing the motor WARNING To reduce the risk of fire or electric shock do not use this fan with any solid state speed control device WARNING To avoid possible electrical shock turn the electricity off at the main fuse box before wiring If you feel you do not have enough electrical wiring knowledge or experience contact a licensed electrician WARNING Electrical diagrams are for r...

Page 3: ...product are your responsibility Damage to any part such as by accident misuse improper installation or by affixing any accessories is not covered by this warranty Because of varying climatic conditions this warranty does not cover any changes in brass finish including rusting pitting corroding tarnishing or peeling Brass finishes of this type give their longest useful life when protected from vary...

Page 4: ...in 2 BB Hanger pin 1 CC Locking pin 1 Part Description Quantity DD Blade screws 16 EE Wire connecting nut 3 FF Extra blade bracket screw 1 Pre Installation continued HARDWARE INCLUDED NOTE Hardware not shown to actual size AA BB CC DD EE FF ...

Page 5: ...tor assembly 1 Part Description Quantity F Blade bracket with pre installed screws 5 G Blade 5 H Light kit pan 1 I Light kit fitter assembly 1 J Glass shade 1 IMPORTANT This product and or components are governed by one or more of the following U S Patents 5 947 436 5 988 580 6 010 110 6 046 416 6 210 117 and other patents pending Pre Installation continued PACKAGE CONTENTS E A B C D G F H J I ...

Page 6: ... appropriate fasteners and materials The outlet box and its bracing must be able to fully support the weight of the moving fan at least 35 lbs Do not use a plastic outlet box The illustrations below show three different ways to mount the outlet box If the canopy C touches the ball downrod assembly B then remove the decorative canopy bottom cover and turn the canopy C 180 before attaching the canop...

Page 7: ...sition Re tighten the setscrews LL on the collar on top of the fan motor assembly E Remove the canopy bottom cover JJ from the canopy C by turning the bottom cover counterclockwise until it unlocks Loosen the two canopy screws HH located in the bottom of the mounting bracket A and turn the canopy counterclockwise to remove the mounting bracket A from the canopy C Route the wires exiting the top of...

Page 8: ...rely tighten the two mounting screws MM 1 WARNING To reduce the risk of fire electric shock or personal injury mount to an outlet box marked Acceptable for fan support of 35 lbs 15 9 kg or less and use the screws provided with the outlet box Hanging the fan 2 Carefully lift the fan motor assembly E up to the slide on mounting bracket A Insert the ball portion of the ball downrod assembly B into th...

Page 9: ...n cut the lead wires to your desired length no shorter than 12 in This will make extra room in the canopy C If you do not wish to cut the wires you will need to neatly wrap them Connect the fan motor green wires to the household green or bare wire using a wire connecting nut EE Connect the fan motor white wire to the household white wire using a wire connecting nut EE Connect the fan motor black a...

Page 10: ...ts Firmly tighten the two mounting screws HH Install the decorative bottom cover JJ by aligning the cover slots with screws in the bottom of the canopy C Rotate the bottom cover JJ clockwise to lock in place NOTE Your fan features revolutionary advancements for quick and easy blade installation including an alignment post and captive blade bracket screws Fastening the blade assemblies to the motor...

Page 11: ...hole slots Turn the light kit fitter assembly E clockwise Re install the screw PP that was removed in step 1 Make sure all the screws are firmly tightened Set the switch ZZ on the light kit fitter assembly to your desired setting see page 12 Correlated Color Temperature CCT setting CAUTION To reduce the risk of electric shock disconnect the electrical supply circuit to the fan before installing th...

Page 12: ...eather Reverse An upward airflow moves warm air off of the ceiling This allows you to set your heating unit on a lower setting without affecting your comfort NOTE Wait for the fan to stop before reversing the direction of the blade rotation Operation OPERATING YOUR FAN A Warm Weather B Cool Weather Correlated Color Temperature CCT setting Your fan is equipped with a color changing LED module There...

Page 13: ...ing above the tip of one of the blades Measure from a point on the center of each blade to the point on the ceiling Measure this distance Rotate the fan until the next blade is positioned for measurement Repeat for each blade Any measurement deviation should be within 1 8 in Run the fan for ten minutes If the fan continues to wobble please contact Customer Service and a balancing kit will be sent ...

Page 14: ...Questions problems missing parts Before returning to the store call Home Depot Pro Customer Service 8 a m 6 p m EST Monday Friday 1 800 283 7048 Retain this manual for future use ...

Page 15: ... 283 7048 de lunes a viernes entre 8 a m y 6 p m hora estándar del Este GRACIAS POR TU COMPRA Apreciamos la confianza que has depositado en The Home Depot Pro al comprar este ventilador de techo Nos esforzamos en crear continuamente productos de calidad diseñados para mejoras del hogar del cliente Visítanos por Internet para ver nuestra línea completa de productos destinados a satisfacer tus neces...

Page 16: ...el ventilador antes de instalar las aspas o de verificar el motor ADVERTENCIA Para reducir el riesgo de incendio o descarga eléctrica no utilices este ventilador con ningún dispositivo de estado sólido para control de velocidad ADVERTENCIA Para evitar una posible descarga eléctrica desconecta la electricidad en la caja principal de fusibles antes de realizar el cableado En caso de no tener suficie...

Page 17: ...os a cualquier pieza por accidente instalación o uso inadecuado o por montar cualquier accesorio no están cubiertos por esta garantía Puesto que las condiciones climáticas pueden variar esta garantía no cubre ningún cambio del acabado en latón como óxido perforación corrosión manchas o descascaramiento Este tipo de acabados en latón tiene una la vida útil prolongada si se lo protege contra las con...

Page 18: ...rte 1 CC Pasador de cierre 1 Pieza Descripción Cantidad DD Tornillos de aspas 16 EE Tuerca para conectar cables 3 FF Tornillo adicional para soporte de aspas 1 Preinstalación continuación HERRAJES INCLUIDOS NOTA Los herrajes no se muestran en su tamaño real AA BB CC DD EE FF ...

Page 19: ...ieza Descripción Cantidad F Soporte de aspa con tornillos preinstalados 5 G Aspa 5 H Carcasa del kit de luces 1 I Conjunto del soporte del kit de luces 1 J Pantalla de vidrio 1 IMPORTANTE Este producto y o sus componentes están protegidos por una o más de las siguientes patentes de los EE UU 5 947 436 5 988 580 6 010 110 6 046 416 6 210 117 así como otras patentes pendientes Preinstalación continu...

Page 20: ...opiados La caja eléctrica y su soporte tienen que ser aptos para sostener completamente el peso en movimiento del ventilador al menos 35 lb 15 9 kg No uses una caja eléctrica de plástico Las ilustraciones a continuación muestran tres formas distintas de montar la caja eléctrica Si la cubierta C toca el conjunto del tubo bajante esfera B retira la tapa inferior decorativa de la cubierta y gira 180º...

Page 21: ...ajado en su posición Vuelve a apretar los tornillos de fijación LL del collarín en la parte superior del conjunto motor ventilador E Retira la tapa inferior JJ de la cubierta C girándola hacia la izquierda hasta soltarla Afloja los dos tornillos de la cubierta HH ubicados en la parte inferior del soporte de montaje A y gira la cubierta hacia la izquierda para retirar de ella C el soporte A Inserta...

Page 22: ...ntaje MM 1 ADVERTENCIA Para reducir el riesgo de incendio descarga eléctrica o lesiones personales instala en una caja eléctrica clasificada como apropiada para sostener ventiladores de 35 lb 15 9 kg o menos y usa los tornillos de montaje que vienen con la caja eléctrica Cómo colgar el ventilador 2 Hay que levantar con cuidado el conjunto motor ventilador E hasta el soporte de montaje deslizante A...

Page 23: ...cm incluido puedes recortar los cables terminales al largo deseado no menos de 12 plg 30 5 cm Esto dejará más espacio en la cubierta C Si no quieres cortar los cables deberás enrollarlos cuidadosamente Conecta los cables verdes del motor del ventilador al cable verde o desnudo del hogar usando una tuerca de conexión de cables EE Conecta el cable blanco del motor del ventilador al cable blanco del ...

Page 24: ...dura Ajusta firmemente los dos tornillos de montaje HH Instala la tapa inferior decorativa JJ alineando sus ranuras con los tornillos en la parte inferior de la cubierta C Gira la tapa inferior JJ hacia la derecha para fijarla en su lugar NOTA Tu ventilador cuenta con avances novedosos para facilitar y acelerar la instalación de las aspas incluyendo un poste de alineación y tornillos fijos para el...

Page 25: ...a Gira el conjunto del soporte del kit de luces E hacia la derecha Reinstala el tornillo PP que retiraste en el paso 1 Comprueba que todos los tornillos estén firmemente apretados Coloca el interruptor ZZ en el ensamblaje del soporte del kit de luces en la configuración deseada consulta la página 12 Configuración de temperatura de color correlacionada CCT PRECAUCIÓN Para disminuir el riesgo de des...

Page 26: ...de aire ascendente mueve el aire cálido lejos del techo Esto permite fijar tu unidad de calefacción en una configuración más baja sin afectar tu comodidad NOTA Espera a que se detenga el ventilador antes de invertir la dirección de giro de las aspas Funcionamiento CÓMO USAR TU VENTILADOR A Clima cálido B Clima frío Configuración de Temperatura de Color Correlacionada CCT Tu ventilador está equipad...

Page 27: ...que las aspas no están al mismo nivel Verifica este nivel seleccionando un punto en el techo sobre la punta de una de las aspas Mide desde un punto en el centro de cada aspa al punto en el techo Mide esta distancia Gira el ventilador hasta que la siguiente aspa quede en posición para medir Repite el procedimiento para cada aspa Las desviaciones de la medición no deben pasar de 1 8 plg 0 32 cm dura...

Page 28: ...lemas piezas faltantes Antes de devolver a la tienda llama al servicio al cliente de Home Depot Pro de lunes a viernes de 8 00 a m a 6 00 p m hora estándar del Este 1 800 283 7048 Conserva este manual para uso futuro ...

Reviews: