background image

         Item # 


Model #             ,            , 

UL Model # 

USE AND CARE GUIDE

FC132-BMRL/FC140-BMRL 52/56-INCH CEILING FAN

Questions, problems, missing parts? Before returning to the store call 

Home Decorators Collection Customer Service

8 a.m. - 6 p.m., EST, Monday-Friday


1-800-986-3460

HOMEDEPOT.COM/HOMEDECORATORS

Item #1000******/
           1000******

Model #FC132-BMRL/
              FC140-BMRL

THANK YOU

create quality products designed to enhance your home. Visit us online to see our full line of products available for your home improvement needs. 

Thank you for choosing Home Decorators Collection!

We appreciate the trust and confidence you have placed in Home Decorators Collection through the purchase of this ceiling fan. We strive to continually 

Summary of Contents for FC132-BMRL

Page 1: ...6 3460 HOMEDEPOT COM HOMEDECORATORS Item 1000 1000 Model FC132 BMRL FC140 BMRL THANK YOU create quality products designed to enhance your home Visit us online to see our full line of products availabl...

Page 2: ...ed With The Outlet Box WARNING To Avoid Possible Electrical Shock Turn The Electricity Off At The Main Fuse Box Before Wiring If You Feel You Do Not Have Enough ElectricalWiring Knowledge Or Experienc...

Page 3: ...Damage to any part such as by accident or misuse or improper installation or by afxing any accessories is not covered by this warranty Because of varying climatic conditions this warranty does not co...

Page 4: ...Hardwarenotshowntoactualsize TOOLS REQUIRED Phillips screwdriver Flat blade screwdriver Adjustable wrench Electrical tape Wire cutter Stripper Step ladder Part Description Quantity BB CC Blade Attachm...

Page 5: ...e 5 G 1 I 1 J Remote control Receiver assembly include 8 plastic wire nuts and 2 batteries H Light kit fitter assembly Fan motor assembly 1 1 Glass Shade IMPORTANT This product and or components are g...

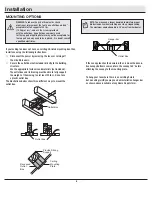
Page 6: ...tions WARNING To reduce the risk of fire electric shock or personal injury mount the fan to an outlet box marked acceptable for fan support of 35 lbs 15 9kg or less and use the screws provided with th...

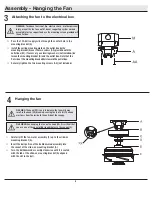
Page 7: ...jam the hanger pin FF against the wiring inside the downrod B Insert the locking pin FF through the hole near the end of the hanger pin EE until it snaps into its locked position Reinstall the setscre...

Page 8: ...n mounting bracket A Insert the ball portion of the ball downrod assembly into the socket of the slide on mounting bracket A Turn the ball downrod assembly clockwise until it is seated with the tab of...

Page 9: ...t from the Receiver Connect the BLUE wire from the fan to the BLUE wire marked Light from the Receiver Connect the YELLOW wire from the fan to the YELLOW wire marked V from the Receiver Connect the RE...

Page 10: ...e hangerball Failuretoproperlyseatthetabinthegroovecouldcausedamage tothewiring NOTE FollowthisstepONLYifyoudidnotcuttheextralengthofffromthe wirescomingfromtheceilingfan Firmly tighten the two screws...

Page 11: ...ssembly G to the wires from the switch cup of the fan motor assembly by connecting the molded adaptor plugs together blue to blue orange to orange Carefully tuck all wires and splices in the switch cu...

Page 12: ...embly G aligning the three flat areas on the top flange of the glass bowl J with the three raised dimples in the light kit assembly G Turn the glass bowl J clockwise until it stops 12 WARNING Do not o...

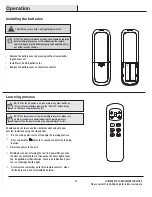
Page 13: ...operating during the learning process Separate the fan power switches by approximately 7 meters Press and hold the button for 5 seconds to enter the learning function NOTE The battery will weaken with...

Page 14: ...will increase the speed the fan from speed 1 to speed 6 then decrease the speed of the fan to speed1 in 24 seconds 5 Fan button Press and release the button will automatically turn fan and light if l...

Page 15: ...year Ensure they are secure Because of the fan s natural movement some connections may become loose over time It is not necessary to remove the fan from the ceiling Clean your fan periodically Use onl...

Page 16: ...e glassware are tight Check that the light bulbs are also secure Ensure the canopy is a short distance from the ceiling It should not touch the ceiling Ensure your outlet box is secure and rubber isol...

Reviews: