background image

Operation (continued)

Care and Cleaning

     Check the support connections, brackets, and blade 

attachments twice a year. Make sure they are secure.  
Because of the fan’s natural movement, some 
connections may become loose over time. It is not 
necessary to remove the fan from the ceiling.

     Clean your fan periodically. Use only a soft brush or 

lint-free cloth to avoid scratching the finish. The plating is 
sealed with a lacquer to minimize discoloration or 
tarnishing.

     (Optional) Apply a light coat of furniture polish to the wood 

blades.

     (Optional) Cover small scratches with a light application of 

shoe polish.

Do

Do

     Use water when cleaning. Water could damage the motor, 

or the wood, or possibly cause an electrical shock.

     Apply oil to your fan or motor. The motor has 

permanently-lubricated sealed ball bearings.

Do not

Do not

NOTE:


Wait for the fan to stop before reversing the direction 

of the blade rotation.

REVERSE SWITCH OPERATING INSTRUCTIONS

REVERSE SWITCH OPERATING INSTRUCTIONS

The reverse switch is located on the top of the fan housing. Slide 
the switch to the left for warm weather operation. Slide the switch 
to the right for cool weather operation.

Warm weather - (Counterclockwise Direction) A downward air flow 
creates a cooling effect. This allows you to set your air conditioner 
on a warmer setting without affecting your comfort.

Cool weather - (Clockwise Direction) An upward air flow moves 
warm air off the ceiling. This allows you to set your heating unit on 
a cooler setting without affecting your comfort.

18

Summary of Contents for VARUCHI

Page 1: ...2 972 Model YG591 BN YG591 NI Questions problems missing parts Before returning to the store call Home Decorators Collection Customer Service 8 a m 7 p m EST Monday Friday 9 a m 6 p m EST Saturday 1 8...

Page 2: ...8 19 20 Table of Contents 2 Table of Contents Safety Information Warranty Pre Installation Tools Required Hardware Included Package Contents Dual Mounting Instructions Installation Assembly Standard C...

Page 3: ...lectrician 3 The outlet box and support structure must be securely mounted and capable of reliably supporting a minimum of 35 lbs 15 9 kg or less Use only UL listed outlet boxes marked FOR FAN SUPPORT...

Page 4: ...eful life when protected from varying weather conditions A certain amount of wobble is normal and should not be considered a defect Servicing performed by unauthorized persons shall render the warrant...

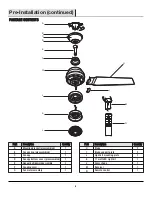
Page 5: ...Clevis pin preassembled Cotter pin preassembled Collar setscrew preassembled Collar mounting screw with lock washer preassembled Light kit mounting plate screw preassembled Light kit mounting screw pr...

Page 6: ...te 17 watt LED Light kit Glass shade Receiver Remote control Quantity Quantity 3 3 1 1 1 1 1 Part Part A B C D E F G Quantity Quantity 1 1 1 1 1 1 1 Description Description Mounting bracket preassembl...

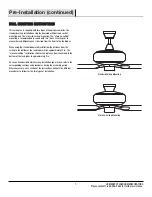
Page 7: ...ard downrod installation the distance from the ceiling to the bottom of the fan blades will be approximately 12 in The close to ceiling installation reduces the distance from the ceiling to the bottom...

Page 8: ...ree different ways to mount the outlet box MM not included MM MM NN MM MM A Installation MOUNTING OPTIONS MOUNTING OPTIONS WARNING To reduce the risk of fire electric shock or personal injury mount th...

Page 9: ...cross pin KK Remove the hanger ball OO from the hanger ball downrod assembly E OO LL KK Carefully feed the motor wires up through the downrod PP Thread the downrod PP into the collar Align the holes...

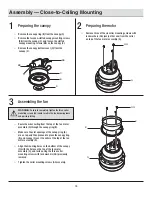
Page 10: ...oute the wires exiting from the top of the fan motor assembly G through the canopy ring B Make sure the slot openings of the canopy ring B are on top and then proceed to place the canopy ring B and ca...

Page 11: ...o the mounting bracket A and seat the hanger ball E in the mounting bracket A socket Make sure the tab on the mounting bracket socket is properly seated in the groove in the hanger ball E This will he...

Page 12: ...out of the reach of children M N JJ Setting the Code on the Remote Remove the battery cover on the back of the remote control N by pressing firmly on the arrow and sliding the cover off Slide the cod...

Page 13: ...If your outlet box MM has a ground wire green or bare copper connect it to the fan ground wires otherwise connect the hanger ball downrod assembly E ground wire to the mounting bracket A Secure each w...

Page 14: ...Locking slots of the canopy C are provided only as an aid to mounting Do not leave the fan assembly unattended until all four canopy mounting screws BB are engaged and firmly tightened Slide the canop...

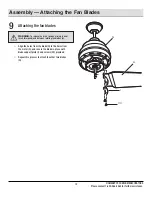
Page 15: ...her assistance 15 WARNING To reduce the risk of personal injury do not insert foreign objects between rotating fan blades H Align the holes from the blade H to the holes from the motor G and secure th...

Page 16: ...circuit breaker or removing the fuse at the fuse box Turning power off using the fan switch is not sufficient to prevent electric shock Remove one of the three light kit mounting screws II from the l...

Page 17: ...e 4 times turns the fan off Press and release the button to turn the light on or off If you are using dimmable bulbs and you have previously set O D dip switch in your remote to the D position press a...

Page 18: ...or or the wood or possibly cause an electrical shock Apply oil to your fan or motor The motor has permanently lubricated sealed ball bearings Do not Do not NOTE Wait for the fan to stop before reversi...

Page 19: ...mounting bracket and outlet box The fan will not start The fan sounds noisy WARNING Make sure the power is off at the electrical panel box before you attempt any repairs Refer to step 7 Making the el...

Page 20: ...preassembled Light kit mounting screw preassembled 1 5V AAA battery Cross pin preassembled Setscrew preassembled Service Parts I J K L M N 20 Part Part A B C D E F G H I J K L M N Description Descript...

Page 21: ...arts Before returning to the store call Home Decorators Collection Customer Service 8 a m 7 p m EST Monday Friday 9 a m 6 p m EST Saturday 1 800 986 3460 HOMEDEPOT COM HOMEDECORATORS Retain this manua...

Reviews: