background image

ENGLISH

25

CLEANING AND CARE

Brew head 

•  Remove the coffee grounds from this area with a damp cloth or sponge. 
•  If necessary do a thorough cleaning as follows:
•  With a screwdriver remove the screw holding the screen to the brew head. 
•  Clean the brew head (15) with a damp cloth or sponge. 
•  Thoroughly clean the screen with a little detergent and a brush. If the holes are plugged, clean them with a 

needle. Rinse the screen thoroughly and let it dry. 

•  Re-attach the screen to the brew head. 

Drip tray and drip tray grid 

•  The drip tray (13) is equipped with a red fluid level indicator (14) to show the amount of water in the tray. 

Empty and clean the drip tray whenever the indicator becomes visible. 

•  Rinse the drip tray grid (12) with warm water. 
•  Dry each part thoroughly before re-inserting it. 

Descaling the device

•  Depending on the calcium content of the water and the frequency of use, descale your device regularly. 
•  We recommend the use of a product designed especially for the descaling of espresso machines. Follow the 

instructions of the manufacturer. 

•  Make sure the filter holder is not attached, and place a container under the brew head. 
•  Pour fresh water and the recommended amount of descaler into the water tank. 
•  Turn the function knob to the 

 position, and wait until the 

OK

 indicator light (1) comes on. 

•  Turn the function knob to the   position and wait until about half of the solution has run into the bowl. 
•  Then turn the function knob (5) to the   position and let the device rest for about 15 minutes. Empty the 

bowl.

•  After 15 minutes switch the device on again by turning the function knob to the 

 position. Wait until the 

OK

 indicator light comes on, and then turn the function knob to the   position. Allow all of the solution to 

flow from the water tank. 

•  Repeat descaling as needed.
•  After descaling, run several brewing cycles to rinse the device and remove any descaling solution residue. 

Always use clean, fresh water. 

•  We are not liable for any repairs of the device caused by scale problems, if the device has not been descaled 

regularly. 

EPM5002A-IM-DE-EN-V2.indb   25

15/06/2010   9:37 AM

Summary of Contents for EPM5002A

Page 1: ...Espressomaschine Alu Espresso maker aluminium EPM5002A Bedienungsanleitung User Manual EPM5002A IM DE EN V2 indb 1 15 06 2010 9 37 AM ...

Page 2: ... 1100 W Wassertank 1 5 l Hergestellt für JGC Company GmbH Heckhofweg 146 50739 Köln Kundendienst E2 Servicecenter GmbH Max Planck Strasse 13 50858 Köln Marsdorf Telefon 01805 221784 Montag Freitag 10 18 Uhr 0 14 Min aus dem deutschen Festnetz max 0 42 Min aus den deutschen Mobilfunknetzen Tragen Sie hier die Seriennummer Ihres Gerätes ein INHALTSVERZEICHNIS TECHNISCHE DATEN INHALTSVERZEICHNIS TECH...

Page 3: ...zu benutzen ist Kinder sollten beaufsichtigt werden um sicherzustellen dass sie nicht mit dem Gerät spielen Lassen Sie das Gerät nie unbeaufsichtigt solange es eingeschaltet ist Stellen Sie keine schweren Gegenstände auf das Gerät Tauchen Sie elektrische Teile des Geräts während des Reinigens oder des Betriebs nie in Wasser oder andere Flüssigkeiten Halten Sie das Gerät nie unter fließendes Wasser...

Page 4: ...on Dampf steht fließt heißes Wasser aus der Dampf Heißwasser Düse Vorsicht Verbrennungsgefahr Entfernen Sie niemals den Filterhalter während der Kaffee gebrüht wird oder wenn der Funktionsschalter auf Position Kaffee oder Dampf steht Heißer Dampf könnte plötzlich austreten und zu Verbrennungen führen Bewegen oder transportieren Sie das Gerät nicht während des Betriebes oder wenn sich noch heißes W...

Page 5: ...ter 3 Wassertank abnehmbar 11 Messlöffel mit Kaffee Tamper 4 Dampf Heißwasser Regler 12 Abtropfgitter 5 Funktionsschalter 13 Abtropfschale 6 Dampf Heißwasser Düse 14 Füllstandanzeige 7 Netzkabel mit Netzstecker 15 Boilerauslauf 8 Filter 1 Tasse Funktionsschalter Dampf Gerät ausgeschaltet Gerät heizt auf Kaffee heißes Wasser EPM5002A IM DE EN V2 indb 5 15 06 2010 9 37 AM ...

Page 6: ... Wassertank wieder ein und drücken Sie ihn leicht an Hinweis Betreiben Sie das Gerät niemals mit leerem Wassertank und füllen Sie ihn immer auf sobald der Wasserstand einige Zentimeter vom Wassertankboden erreicht hat Sie können den Wassertank auch auffüllen ohne ihn aus dem Gerät herauszuziehen Gießen Sie Wasser direkt mit einer Kanne in den Wassertank ein Schwenken Sie Dampf Heißwasser Düse 6 he...

Page 7: ...eeren Sie das Wasser aus das sich darin gesammelt hat Sie können nun den ersten Espresso zubereiten Zubereitung mit gemahlenem Espresso Heizen Sie die Espressomaschine vor siehe Kapitel Gerät vorheizen Überprüfen Sie ob sich genügend Wasser im Wassertank 3 befindet Wenn Sie nur eine Tasse Espresso zubereiten möchten setzen Sie den kleineren Filter 8 in den Filterhalter 10 ein Geben Sie einen gestr...

Page 8: ...frisches Trinkwasser für die Espressozubereitung Entsorgen Sie den Kaffeesatz nach jedem Brühvorgang Verwenden Sie niemals den gleichen Kaffeesatz für einen erneuten Brühvorgang da das Aroma nicht erhalten bleibt Achten Sie beim Kauf von gemahlenem Espresso Kaffee darauf dass er auch für Espressomaschinen geeignet ist Damit der Espresso länger heiß bleibt wärmen Sie die Espressotassen immer vor Sp...

Page 9: ...t kalter H Milch 1 5 Prozent Fett Das Milchvolumen kann sich beim Aufschäumen verdoppeln oder sogar verdreifachen Verwenden Sie deshalb ein Gefäß von geeigneter Größe z B Milchschaum Kännchen Wichtig Schäumen Sie Milch nie länger als 2 Minuten auf Stellen Sie das Gefäß unter die Dampf Heißwasser Düse 6 und tauchen Sie sie in die Milch ein Abb 3 Drehen Sie den Dampf Heißwasser Regler 4 gegen den Uh...

Page 10: ... Drehen Sie den Funktionsschalter auf Position und stellen Sie den Dampf Heißwasser Regler auf Position STEAM OFF Das Gerät ist wieder breit für die Espressozubereitung Heißes Wasser zubereiten Überprüfen Sie ob sich genügend Wasser im Wassertank 3 befindet Stellen Sie den Funktionsschalter 5 auf Position Die Kontrolllampe 2 leuchtet Warten Sie bis das Gerät aufgeheizt hat Stellen Sie einen Behält...

Page 11: ...er warmem Wasser ab und lassen ihn trocknen Filter Nehmen Sie den Filter 8 9 vom Filterhalter ab Waschen Sie ihn in heißem Wasser nach jedem Gebrauch Sollte der Filter stark verschmutzt sein reinigen Sie ihn mit einer Bürste Wenn die Löcher im Filter verstopft sind verwenden Sie eine Nadel um sie zu reinigen Trocknen Sie die Filter gründlich ab Dampf Heißwasser Düse Lassen Sie vor dem Reinigen etw...

Page 12: ...m Entkalken von Espressomaschinen zu verwenden Beachten Sie die Hinweise des Herstellers Vergewissern Sie sich dass der Filterhalter nicht befestigt ist und stellen Sie eine Schüssel unter den Boilerauslauf Gießen Sie frisches Wasser und die angegebene Menge an Entkalkungsmittel in den Wassertank Stellen Sie den Funktionsschalter 5 auf Position und warten Sie bis die Kontrolllampe OK 1 leuchtet St...

Page 13: ...paratur oder Austausch des Gerätes bzw des defekten Teiles erfüllt wird Weitere Ansprüche sind ausgeschlossen Sollten Sie Fragen zu HOME ELECTRIC Produkten haben sparen Sie sich den zeitraubenden Weg zum Händler und wenden sich direkt an unsere Servicehotline oder unser Servicecenter Ein Team von hochqualifizierten Produktberatern und Technikern steht Ihnen Montag bis Freitag von 10 18 Uhr zur Ver...

Page 14: ... Feuchträumen oder im Freien bei Schäden die auf höhere Gewalt Krieg Wasser Blitzschlag Überspannung und andere von HOME ELECTRIC nicht zu verantwortende Gründe zurückzuführen sind bei übermäßiger Nutzung insbesondere bei anderer als privater Nutzung bei Missachtung der Bedienungsanleitung und Installationsfehlern wenn das Gerät keinen technischen Defekt aufweist für Transport und Fahrtkosten sowi...

Page 15: ...1 5 l Manufactured for JGC Company GmbH Heckhofweg 146 50739 Köln Customer service E2 Servicecenter GmbH Max Planck Strasse 13 50858 Köln Marsdorf Telefon 01805 221784 Monday Friday 10 00 18 00 0 14 min from German landline max 0 42 min from German mobile networks Please enter the serial number of your device here TABLE OF CONTENTS TECHNICAL DATA TABLE OF CONTENTS TECHNICAL DATA 15 IMPORTANT SAFET...

Page 16: ... do not play with the device Never leave the device unsupervised while it is switched on Do not place heavy objects on top of the device Never immerse electrical parts of the device in water during cleaning or operation Never hold the device under running water Do not under any circumstances attempt to repair the device yourself For servicing and repairs please consult an authorized dealer or qual...

Page 17: ...tion Risk of Burning When the function knob is turned to the Steam position the steam hot water jet emits hot water Caution Risk of Burning Never remove the filter holder while coffee is brewing or when the function knob is turned to the Coffee or Steam position Hot steam may be discharged suddenly and cause burns Do not move or transport the device while in operation or with hot water in the wate...

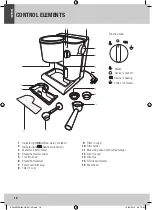
Page 18: ...ilter holder 3 Water tank removable 11 Measuring spoon with coffee tamper 4 Steam hot water control 12 Drip tray grid 5 Function knob 13 Drip tray 6 Steam hot water jet 14 Fluid level indicator 7 Power cord with plug 15 Brew head 8 Filter 1 cup Function knob Steam Device is shut off Device is heating Coffee hot water EPM5002A IM DE EN V2 indb 18 15 06 2010 9 37 AM ...

Page 19: ...r operate the device with an empty water tank and always refill it as soon as the water level is a few centimeters from the bottom of the tank You may also fill the water tank without removing it from the device Pour the water from a jug directly into the water tank Swing the steam hot water jet 6 out and place a jug underneath Attach the empty filter holder 10 to the brew head 15 Start with the h...

Page 20: ...ater left in it You are now ready to make your first espresso Preparation with ground espresso coffee Preheat the espresso machine see section Preheating the device Check to make sure there is sufficient water in the water tank 3 If you wish to make just one cup of espresso place the smaller filter 8 in the filter holder 10 Put a level measuring spoon 11 of espresso coffee into the filter Use the ...

Page 21: ...gestions Use only clean fresh drinking water to prepare espresso Dispose of coffee grounds after each brewing Never use the same coffee grounds for a fresh brewing The aroma will be lost When buying ground espresso coffee make sure it is suitable for espresso machines To keep your espresso hot longer always pre warm your cups with hot water Store ground coffee in a cool dry and dark place Always s...

Page 22: ...cup under the filter holder Best results are achieved using cold UHT milk 1 5 fat The milk volume may double or even triple during frothing Always use a container of sufficient size i e a frothing pitcher Important Never froth milk longer than 2 minutes Put the pitcher under the steam hot water jet 6 and immerse it in the milk fig 3 Turn the steam hot water control 4 counterclockwise The amount of...

Page 23: ...off Turn the function knob to the position and the steam hot water control to the STEAM OFF position The device is ready for another espresso preparation Preparing hot water Check to make sure there is sufficient water in the water tank 3 Turn the function knob 5 to the position The indicator light 2 will come on Wait until the device has heated up Place a container under the steam hot water jet 6...

Page 24: ...der 10 in warm water and allow it to dry Filter Remove the filter 8 9 from the filter holder Wash it in hot water after each use Should the filter be heavily soiled clean it with a brush If the holes in the filter are plugged use a needle to clean them Dry the filter thoroughly Steam hot water jet Before cleaning it allow some hot water to run through the steam hot water jet 6 see section Preparin...

Page 25: ... designed especially for the descaling of espresso machines Follow the instructions of the manufacturer Make sure the filter holder is not attached and place a container under the brew head Pour fresh water and the recommended amount of descaler into the water tank Turn the function knob to the position and wait until the OK indicator light 1 comes on Turn the function knob to the position and wai...

Page 26: ...nt of the device or defect component Other claims are excluded In case of questions regarding HOME ELECTRIC products you no longer need to take the time to go to the seller but may call our service hotline or service center directly A team of highly qualified product consultants and technicians is available from Monday through Friday from 10 00 a m to 6 00 p m Service Hotline O18O5 22 17 84 0 14 m...

Page 27: ... case of damages resulting from force war water lightning excess voltage and other reasons not within the scope of HOME ELECTRIC s responsibility in case of excessive use in particular in case of non domestic use in case of disregard of the user instructions and installation errors if the device does not have a technical defect for transport and travel costs as well as costs incurred by installing...

Reviews: