4
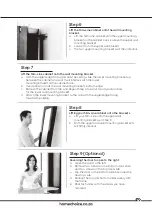
Lift the Slim-Line cabinet onto the wall mounting bracket.
a. With the angled edge facing towards the ceiling, slide the lower mounting bracket up
between the cabinet and wall. It will interlock with the lower
mounting bracket on the cabinet back.
b. Use a pencil to mark the wall mounting bracket’s bottom edge.
c. Remove the cabinet from the wall. Repeat Step 4 to install two drywall anchors
for the lower wall mounting bracket.
d. Attach the lower mounting bracket to the wall with the angled edge facing
towards the ceiling.
Step 7
Lifting your Slim-Line cabinet onto the brackets.
a. Lift your Slim-Line onto the upper wall
mounting bracket as in Step 6.
b. Both the upper and lower mounting bracket sets
will firmly interlock.
Step 8
Lift the Slim-Line cabinet onto the wall mounting
bracket.
a. Lift the Slim-Line cabinet until the upper mounting
bracket on the cabinet back is above the upper wall
mounting bracket.
b. Lower it onto the upper wall bracket.
c. The two upper mounting brackets will then interlock.
Step 6
Reversing the door to open to the right.
a. Open the door to the left
b. Remove two screws on the bottom door slide
and two screws on the top door slide.
c. Flip the door so the bottom slide becomes the
new top slide.
d. Realign the top and bottom slides evenly with
the frame.
e. Reattach slides with the screws you have
removed.
Step 9 (Optional)


