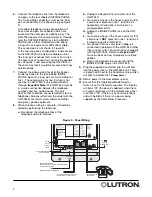
3
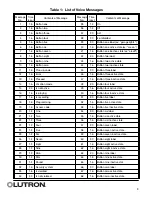
1-38 are integral to the operation of the HWI-TEL9
and must be recorded as noted in Table 1, “List of
Voice Messages.” If it is desired, these messages
may be recorded over with a different voice, but their
contents must remain as specified in Table 1.
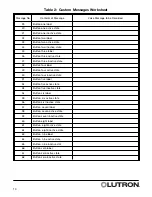
The remaining messages, 39-68, are intended for
customization to individual homes. Fill out the
Custom Messages Worksheet, Table 2, with the
function names and state labels that you wish to
record. When programming the active and inactive
states for the custom voice messages, you should
consider what the button function does. If the LED
logic for a button function is programmed as “room”
or “pathway”, you may want to record “Is on” and “Is
off” for the active and inactive states. Also, if you
have a button that controls a single zone, you
probably will want to use room LED logic. If the LED
logic for a button is programmed as “scene” logic,
you may want to record “Is active” and “Is not active”
for the states.
Recording Custom Voice Messages
To record over your pre-recorded messages:
1.
Remove the unit’s enclosure cover.
2.
Provide power from either the
HomeWorks
Panel
or a 15 V
source, as described above.
3.
Plug a handset from a standard analog telephone
into the HANDSET jack on the HWI-TEL9.
4.
Set the Operational Mode Selector Switch to the
RECORD position. The Display will show the
number of the voice message which is ready to
be recorded.
If the number displayed is not the desired
message to record, press the +MESSAGE button
or -MESSAGE button and hold until the number
for the desired message is displayed.
5.
To record a message, press and hold the
ENABLE button while speaking into the handset.
Release the ENABLE button when you have
finished saying the message.
If the green LED lights, you have successfully
recorded a message. The Display will increment
itself so that the next message can be recorded.
If the red LED lights, you have exceeded the time
limit of that voice message. The Display will not
increment itself, and you will have the opportunity
to repeat the process and rerecord the message.
6.
If you wish to hear the message which you have
just recorded, refer to the PLAYBACK section
below.
7.
When finished with RECORD functions, set the
Operational Mode Selector Switch to the
NORMAL position.
12.
Ensure that the Answering Machine Mode
Selector Switch is set to the appropriate position,
Answering Machine or No Answering Machine.
See the
Configuration
section for more
information on the mode that you require.
13.
Ensure that the Ring Count Selector Switch is set
to the appropriate position.
14.
Ensure that all voice messages are recorded as
desired. See the
Voice Recording and Playback
section for more information.
15.
Program the HWI-TEL9’s Pickup Code, Access
Code, and Status List. Refer to the
Programming
section for detailed instructions on how to
perform the programming. Even if you intend to
use the HomeWorks
®
Utility to set the Pickup
Code, Access Code, and Status List, refer to the
Programming
section for specific guidance on
allowable codes.
16.
Remove the handset from the HANDSET jack,
tighten the strain relief, and replace the cover and
screws.
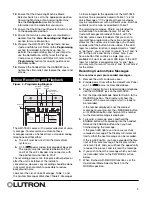
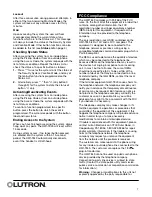
Figure 4 - Programming Diagram
Voice Recording and Playback
The HWI-TEL9 comes with a prerecorded set of voice
messages. To rerecord and customize these
messages requires a handset from a standard analog
telephone and that either:
a.
The unit must be wired into the
HomeWorks
system, or
b.
A 15 V
power supply (not provided) be used.
The supply must be connected between Pins 1
and 2 of the unit’s Keypad Link connector, with
the positive terminal tied to Pin 2.
The recording process can take place either before or
after the unit is installed, at the installer’s
convenience. However, any recording should be done
in as quiet an environment as possible to reduce
background noise.
Look over the List of Voice Messages, Table 1, and
the Custom Messages Worksheet, Table 2. Messages
HANDSET
JACK
DISPLAY
MESSAGE
SELECTOR
ENABLE
BUTTON
OPERATIONAL
MODE SELECTOR
SWITCH


