66
Servicing Your Honda
Clutch System
Clutch Disc/Plate Installation
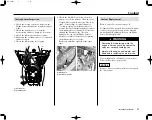
1. Install the spring seat (1) and judder spring (2)
onto the clutch center as shown.
2. Coat the clutch discs (3) and plates (4) with
engine oil.
3. Install the clutch disc A (larger I.D. disc) (5)
onto the clutch outer.
Stack the seven clutch plates and seven clutch
discs alternately.
4. Apply grease to the clutch lifter rod (6) ends.
5. Insert the clutch lifter rod into the mainshaft.
6. Apply engine oil to the needle bearing of the
clutch lifter.
7. Install the clutch lifter (7) onto the clutch
lifter rod.
(6) clutch lifter rod
(7) clutch lifter
8. Install the clutch pressure plate (8).
9. Install the five clutch springs and clutch
spring bolts (9).
(8) clutch pressure plate
(9) clutch spring bolts/clutch springs
(10) O-ring (new)
(11) clutch cover
(4)
(1)
(2)
(5)
(3)
(6)
(7)
(8)
(9)
(10)
(11)
11. Apply oil to a new O-ring (10) and install in
the groove of the clutch cover (11).
12. Install the cover by tightening the cover bolts
A, and B in a crisscross pattern in two or
three steps to the specified torque:
7 lbf·ft (10 N·m, 1.0 kgf·m)
(1) spring seat
(4) clutch plates
(2) judder spring
(5) clutch disc A
(3) clutch discs
10. Tighten the bolts in a crisscross pattern in two
or three steps, to the specified torque:
9 lbf·ft (12 N·m, 1.2 kgf·m)
Summary of Contents for crf250r 2012
Page 1: ......
Page 2: ...2012 Honda CRF250R OWNER S MANUAL COMPETITION HANDBOOK ...
Page 7: ......
Page 17: ...10 Instruments Controls ...
Page 21: ...14 Before Riding ...
Page 27: ...20 Basic Operating Instructions ...
Page 147: ...140 Adjustments for Competition ...
Page 165: ...158 Technical Information Wiring Diagram ...
Page 174: ...MEMO ...
Page 175: ...MEMO ...
Page 176: ...MEMO ...


