background image

Summary of Contents for EM500

Page 1: ...Owner s Manual Generator EM500 l EM600 Q1997 American Honda Motor Co Inc All Rights Reserved I I I III I I Printedon Aecvcled Paper ...

Page 2: ......

Page 3: ...and remain with the generator when sold Pay special attention to statements preceded by the following words B Indicates a strong possibility of severe personal injury or loss of life if instructions are not followed CAUTION Indicates a possibility of personal injury or equipment damage if instructions are not followed NOTE Gives helpful information If a problem should arise or if you have any ques...

Page 4: ...AFETY 1 2 COMPONENT IDENTIFICATION 2 3 PRE OPERATION CHECK 4 4 STARTING THE ENGINE 7 5 GENERATOR USE 8 6 STOPPING THE ENGINE 11 7 MAINTENANCE 12 8 TRANSPORTING STORAGE 21 9 TROUBLESHOOTING 22 10 SPECIFICATIONS 24 ll WIRING DIAGRAM 25 ...

Page 5: ...e the generator without proper instructions l Keep children and pets away from the generator when it is in operation l Keep away from rotating parts while the generator is running l The generator is a potential source of electrical shocks when misused do not operate with wet hands l Do not operate the generator in rain or snow and do not let it get wet When charging a battery l Battery electrolyte...

Page 6: ...2 COMPONENT IDENTIFICATION CIRCUIT BREAKERS OIL ALERT LAMP EM600 ONLY PILOT LAMP SPARK PLUG CAP DC RECEPTACLE FREQUENCY METER AC RECEPTACLE EXHAUST OUTLET RiCOlL STARTER 2 ...

Page 7: ...CARRYING HANDLE FUEL TANK CAP THROTTL GROUND AIR CLEANER COVER 3 ...

Page 8: ...utomobile manufacturer s requirements for Service Classification SE or SF Motor oils classified SE or SF will show this designation on the container SAE low 40 is recommended for general all temperature use Other viscosities shown in the chart may be used when the average temperature in your area is within the indicated range Remove the oil filler cap and check the oil level If the level is low fi...

Page 9: ...gine oil level becomes too low If this occurs stop the engine and fill to the top of the filler neck with the recommended oil page 4 l The oil alert lamp should always light when starting but should go out after the engine is running if there is sufficient oil If the lamp does not light at all replace the bulb OIL ALERT LAMP 5 ...

Page 10: ...Gasoline is extremely flammable and explosive under certain conditions Refuel in a well ventilated area with the engine stopped l Do not smoke or allow flames or sparks in the area where the generator is refueled or where gasoline is stored l Do not overfill the tank and make sure the filler cap is securely closed after refueling l Be careful not to spill fuel when refueling Fuel vapor or spilled ...

Page 11: ...witch to ON ENGINE 3 Pull the starter rope lightly until resistance is felt then pull briskly CAUTION Do not allow the starter grip to snap back against the generator Return it gently to prevent damage to the housing NOTE Make sure the pilot lamp comes on If not the filament may be burnt out 7 ...

Page 12: ...wer of 4OOVA EM5001 and 450VA EM600 l Do not exceed the current limit specified for any one receptacle l Do not connect the generator to a household circuit This could cause damage to the generator or to electrical appliances in the house NOTE l The EM500 EM600 generate both AC and DC power but they cannot be used at the same time The interlock selector switch prevents simultaneous use l Most appl...

Page 13: ...he circuit breaker Lesser overloading will not switch off the circuit breaker and will shorten the service life of the gen erator 4 Check the frequency meter to verify that the generator is operating at 60Hz If it is not turn the throttle knob to increase or decrease engine speed until the correct frequency is obtained meter bar next to 60 will vibrate NOTE l An overloaded AC circuit will trip the...

Page 14: ...g reconnect the grounded cable last This procedure will prevent the possibility of a short circuit and sparks if your tools accidentally make con tact between a battery terminal and the vehicle s frame or body CAUTION l Do not attempt to start an automobile engine with the generator still connected to the battery The generator may be damaged l Connect the positive battery terminal to the positive ...

Page 15: ...el jet in the carburetor and readjusting the pilot screw If you always operate the generator at altitudes higher than 6 000 feet above sea level have your authorized Honda Generator dealer perform these carburetor modifications Even with suitable carburetor jetting engine horsepower will decrease approximately 3 5 for each 1 000 foot increase in altitude The effect of altitude on horsepower will b...

Page 16: ...onous carbon monoxide gas CAUTION Use only genuine HONDA parts or their equivalent The use of replacement parts which are not of equivalent quality may damage the generator Tool kit The screwdriver and spark plug wrench stored under the generator will enable you to perform the owner maintenance procedures listed on page 13 The 10 mm socket end of the spark plug wrench can also be used to turn the ...

Page 17: ...ection 0 element Cleaning l 1 Fuel filter cleaning 0 Spark plug maintenance a Valve clearance adjustment l 2 Combustion chamber and valve cleaning l 2 Fuel line inspection 0 Replace if necessary Spark arrester Clean every 100 operating hours NOTE 1 Service more frequently when used in dusty areas 2 These items should be serviced by an authorized Honda dealer unless the owner has the proper tools a...

Page 18: ...cer if repeatedly left in contact with the skin for prolonged periods Although this is unlikely unless you handle used oil on a daily basis it is still advisable to thoroughly wash your hands with soap and water as soon as possible after handling used oil NOTE Please dispose of used motor oil in a manner that is compatible with the environment We sug gest you take it in a sealed container to your ...

Page 19: ...flash point solvents for cleaning the air cleaner element A fire or explosion could result I CAUTION Never run the generator without the air cleaner Rapid engine wear may result 1 Loosen the cover bolt remove the air cleaner cover and remove the ele ment 2 Wash the element in a non flammable or high flash point solvent and dry it thoroughly 3 Soak the element in clean engine oil and squeeze out th...

Page 20: ...g cap 2 Use the wrench supplied in the tool kit to remove the spark plug 3 Visually inspect the spark plug Discard it if the insulator is cracked or chipped Clean the spark plug with a wire brush if it is to be reused 4 Measure the plug gap with a feeler gauge The gap should be 0 9 1 0 mm 0 035 0 039 in Correct as necessary by bending the side electrode 0 9 mm l O mm 0 035 0 039 in 16 ...

Page 21: ...urn with the wrench to compress the washer If you are reusing a plug it should only take l 8 1 4 turn after the plug seats CAUTION l The spark plug must be securely tightened An improperly tightened plug can become very hot and possibly damage the generator l Never use a spark plug with an improper heat range 17 ...

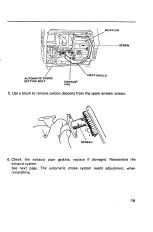
Page 22: ...emove the cover SCREW 2 Remove the mounting bolt for the muffler the mounting bolt for the choke bimetal strip and the two nuts that attach the exhaust pipe to the engine Remove the muffler and exhaust pipe 3 Remove the two screws that attach the heat shield to the muffler Remove the heat shield 4 Remove the two bolts that attach the exhaust pipe to the muffler Remove the exhuast pipe from the muf...

Page 23: ...ST PIPE 5 Use a brush to remove carbon deposits from the spark arrester screen 6 Check the exhaust pipe gaskets replace if damaged Reassemble the exhaust system See next page The automatic choke system needs adjustment when reinstalling 19 ...

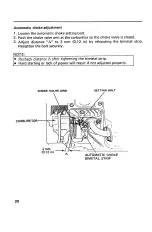
Page 24: ... choke valve is closed 3 Adjust distance A to 3 mm 0 12 in by relocating the bimetal strip Retighten the bolt securely NOTE l Recheck distance A after tightening the bimetal strip l Hard starting or lack of power will result if not adjusted properly CHOKE VALVE ARM SETTING BOLT CARBURETOR AUTOMATIC CHOKE BIMETAL STRIP 20 ...

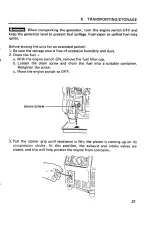
Page 25: ... is free of excessive humidity and dust 2 Drain the fuel a With the engine switch ON remove the fuel filler cap b Loosen the drain screw and drain the fuel into a suitable container Retighten the screw c Move the engine switch to OFF DRAIN 3 Pull the starter grip until resistance is felt the piston is coming up on its compression stroke At this position the exhaust and intake valves are closed and...

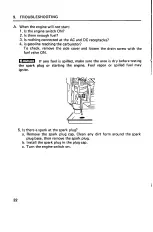
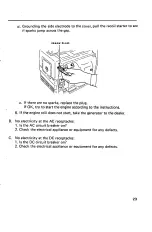
Page 26: ...ide cover and loosen the drain screw with the fuel valve ON m If any fuel is spilled make sure the area is dry before testing the spark plug or starting the engine Fuel vapor or spilled fuel may ignite 5 Is there a spark at the spark plug a Remove the spark plug cap Clean any dirt form around the spark plug base then remove the spark plug b Install the spark plug in the plug cap c Turn the engine ...

Page 27: ... the engine according to the instructions 6 If the engine still does not start take the generator to the dealer B No electricity at the AC receptacles 1 Is the AC circuit breaker on 2 Check the electrical appliance or equipment for any defects C No electricity at the DC receptacles 1 Is the DC circuit breaker on 2 Check the electrical appliance or equipment for any defects 23 ...

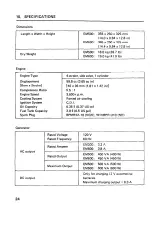
Page 28: ...ine Speed Cooling System Ignition System Oil Capacity Fuel Tank Capacity Spark Plug 59 8 cc 3 65 cu in 46x 36 mm 1 81 x 1 42 in 5 5 1 3 600 r p m Forced air cooling C D I 0 35 c 0 37 us qt 2 0 Q 0 5 US gal BPMR4A 10 NGK W14MPRUlO ND Generator Rated Frequency 1 EM500 3 3 A I Ratea Ampere EM600 3 8 A I AP n n t Rated Output EM500 400 VA 400 W EM600 450 VA 450 W Maximum Output EM500 500 VA 500 W EM60...

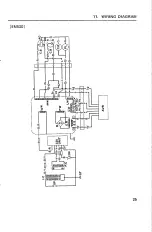
Page 29: ...I C mr B Y B Y r P I I I E kY I I AVR I ...

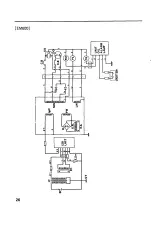
Page 30: ... EM6001 0 u 26 ...

Page 31: ...ter Winding FM Frequency Meter C B Circuit Breaker FW Field Winding GT Ground Terminal IC Ignition Coil klw Ignition Winding LW Lamp Winding MW Main Winding A0 AC Output Receptacle DO DC Output Receptacle PC Pulser Coil PL Pilot Lamp SP Spark Plug B L Br G Gr Lg R W Y Color Black Blue Brown Green Gray Light green Red White Yellow Y ...

Page 32: ...MEMO 28 ...

Page 33: ...t the Power Equipment Customer Relations Department of American Honda Motor Co Inc American Honda Motor Co inc Power Equipment Customer Relations Department P O Box 50 Gardena California 90247 0805 Telephone 2 13 604 2400 We will need the following information in order to assist you Your name address and telephone number Product model and serial number Date of purchase Dealer name and address Natu...

Page 34: ...his way If you are dissatisfied with the decision made by the dealership s management contact the Honda Power Equipment Customer Relations Office You can write American Honda Motor Co Inc Power Equipment Division Customer Relations Office 4900 Marconi Drive Alpharetta GA 30005 8847 Or telephone 770 497 6400 M F 8 30 am 7 00 pm EST When you write or call please provide the following information Mod...

Page 35: ...MEMO 30 ...

Page 36: ......

Page 37: ......

Reviews: