background image

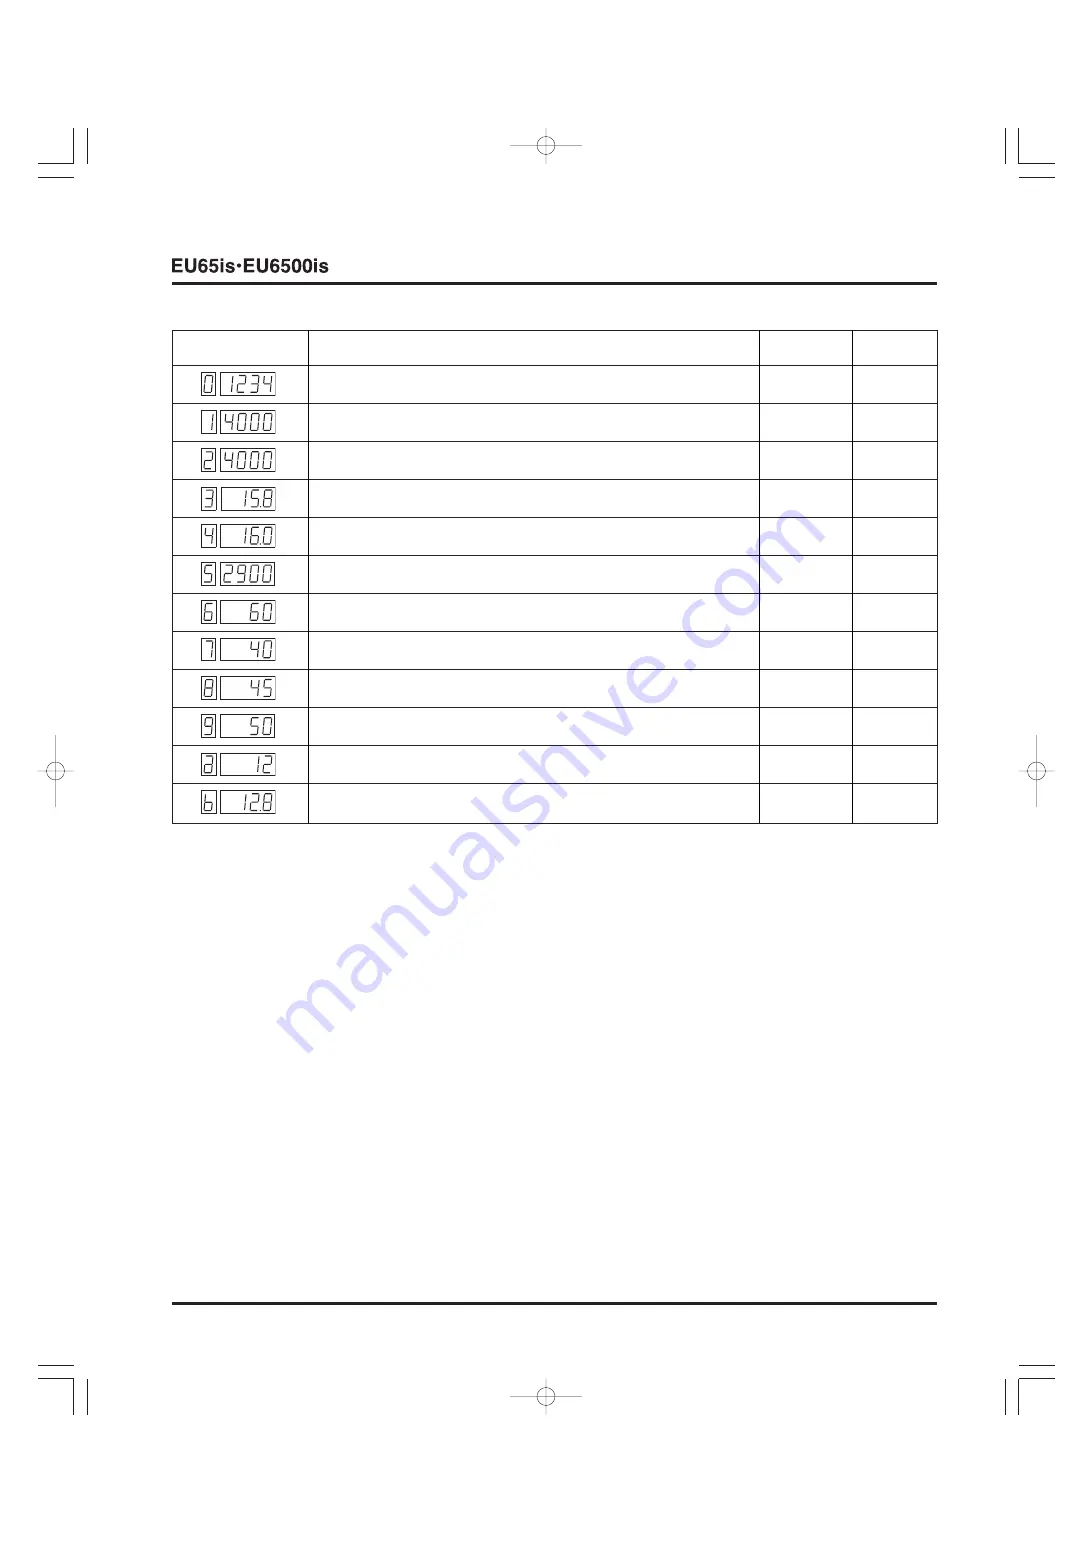
DESCRIPCIONES PARA EL MODO DE REGISTRO DE ERRORES DETALLADOS

2-10

Número de error detallado

Indicación del contenido visualizado del registro de errores

Unidad de 

Ejemplo

visualización

Tiempo de funcionamiento del motor

Horas

1.234 horas

Tensión de salida del inversor (principal)

VA

4.000 VA

Tensión de salida del inversor (secundario)

VA

4.000 VA

Amperaje de salida del inversor (principal)

A

15,8 A

Amperaje de salida del inversor (secundario)

A

16,0 A

Velocidad del motor

rpm

2.900 rpm

Temperatura del FET (transistor de efecto de campo) del inversor (principal)

°C

60°C

Temperatura del FET (transistor de efecto de campo) del inversor (secundario)

°C

40°C

Temperatura del SCR (rectificador controlado por silicio) del inversor (principal)

°C

45°C

Temperatura del SCR (rectificador controlado por silicio) del inversor (secundario)

°C

50°C

Ángulo de la mariposa de gases del carburador

pasos

12 pasos

Tensión de la batería

V

12,8 V

cap.02  EU65is  6500is̲Sp.qxd    07.12.17    4:30  PM    ページ2-10

Summary of Contents for EU6500is

Page 1: ... You must use your own good judgment You will find important safety information in a variety of forms including Safety labels on the generator Safety messages Preceded by a safety alert symbol and one of three signal words DANGER WARNING or CAUTION These signal words mean You WILL be KILLED or SERIOUSLY HURT if you don t follow instructions You CAN be KILLED or SERIOUSLY HURT if you don t follow i...

Page 2: ...ANK 7 1 1 FUEL TANK 7 1 8 REAR COVER MUFFLER MUFFLER PROTECTORS 8 1 1 REAR COVER OUTER MUFFLER PROTECTOR 8 1 2 MUFFLER 8 2 3 INNER MUFFLER PROTECTOR 8 3 9 RECOIL STARTER FRONT FRAME 9 1 1 RECOIL STARTER 9 1 2 FRONT FRAME 9 5 10 ENGINE GENERATOR ASSEMBLY FRAME 10 1 1 ENGINE GENERATOR ASSEMBLY 10 1 2 FRAME UNDER PLATE BOTTOM RUBBERS 10 3 3 UNDER SHROUD 10 4 11 FAN COVER COOLING FAN GENERATOR 11 1 1 ...

Page 3: ...e sécurité sous une foule de formes dont des Etiquettes de sécurité sur le générateur Messages de sécurité précédés d un symbole de consigne de sécurité et d un des trois mots de signalisation DANGER ATTENTION ou PRECAUTION Ces mots de signalisation signifient Signale des BLESSURES CORPORELLES GRAVES voire un DANGER MORTEL si les instructions ne sont pas suivies Signale une forte possibilité de BL...

Page 4: ...OTECTEUR DE SILENCIEUX EXTERNE 8 1 2 SILENCIEUX 8 2 3 PROTECTEUR DE SILENCIEUX INTERNE 8 3 9 LANCEUR A REENROULEMENT CHASSIS AVANT 9 1 1 LANCEUR A REENROULEMENT 9 1 2 CHASSIS AVANT 9 5 10 ENSEMBLE DE MOTEUR GENERATEUR CHASSIS 10 1 1 ENSEMBLE DE MOTEUR GENERATEUR 10 1 2 CHASSIS PLAQUE INFERIEURE CAOUTCHOUCS INFERIEURS 10 3 3 BOUCLIER INFERIEUR 10 4 11 CACHE DE VENTILATEUR VENTILATEUR DE REFROIDISSE...

Page 5: ...esen Generatoren entstehen könnten Die Entscheidung ob Sie eine bestimmte Reparatur ausführen können oder nicht muss Ihnen daher selbst überlassen bleiben Relevante Sicherheitshinweise erscheinen in verschiedenen Formen darunter Sicherheitsaufkleber am Generator angebracht Sicherheitshinweise diese sind mit dem Sicherheits Warnsymbol und einem der drei Signalwörter GEFAHR WARNUNG oder VORSICHT ver...

Page 6: ...SCHUTZBLENDEN 8 1 1 HINTERE ABDECKUNG ÄUSSERE SCHALLDÄMPFER SCHUTZBLENDE 8 1 2 SCHALLDÄMPFER 8 2 3 INNERE SCHALLDÄMPFER SCHUTZBLENDE 8 3 9 SEILZUGANLASSER VORDERER RAHMEN 9 1 1 SEILZUGANLASSER 9 1 2 VORDERER RAHMEN 9 5 10 MOTOR GENERATOR EINHEIT RAHMEN 10 1 1 MOTOR GENERATOR EINHEIT 10 1 2 RAHMEN BODENPLATTE UNTERE GUMMIDÄMPFER 10 3 3 UNTERE ABSCHIRMUNG 10 4 11 VENTILATOR ABDECKUNG KÜHLGEBLÄSE LIC...

Page 7: ...entido común Encontrará información de seguridad importante en varias formas incluyendo Etiquetas de seguridad en el generador Mensajes de seguridad Precedidos por un símbolo de alerta de seguridad y una de las tres palabras de indicación PELIGRO ADVERTENCIA o PRECAUCIÓN Estas palabras de indicación significan Correrá el peligro de MUERTE o de HERIDAS GRAVES si no sigue las instrucciones Podrá cor...

Page 8: ...ROTECTOR DEL SILENCIADOR EXTERIOR 8 1 2 SILENCIADOR 8 2 3 PROTECTOR DEL SILENCIADOR INTERIOR 8 3 9 ARRANCADOR DE RETROCESO BASTIDOR FRONTAL 9 1 1 ARRANCADOR DE RETROCESO 9 1 2 BASTIDOR FRONTAL 9 5 10 MOTOR CONJUNTO DEL GENERADOR BASTIDOR 10 1 1 MOTOR CONJUNTO DEL GENERADOR 10 1 2 BASTIDOR PLACA INFERIOR GOMAS INFERIORES 10 3 3 PROTECTOR INFERIOR 10 4 11 CUBIERTA DEL VENTILADOR VENTILADOR DE ENFRIA...

Page 9: ...NOTE cap 00 EU65is 6500is Eu qxd 07 12 17 4 23 PM ページ7 ...

Page 10: ...cription code GCAA Type 4 stroke overhead valve single cylinder inclined 25 Displacement 389 cm3 23 7 cu in Bore x stroke 88 x 64 mm 3 46 x 2 52 in Compression ratio 8 0 1 Cooling system Forced air Ignition system Transistorized magneto ignition Ignition timing 25 B T D C at 2 400 min 1 rpm Spark plug BPR5ES NGK W16EPR U DENSO Carburetor Horizontal type butterfly valve Air cleaner Semi dry type Lu...

Page 11: ... 220 V 240 V 220 V 120 240 V Rated current 45 8 22 9 A 25 0 A 22 9 A 25 0 A 45 8 22 9 A Power factor 1 0 cos ø Voltage variation Momentary 10 max rate Average 6 max Average time 3 sec max Voltage stability 1 0 Frequency variation Momentary 1 max rate Average 1 max Average time 1 sec max Frequency stability 0 1 Hz Insulation resistance 10 M min Circuit protector 61 9 30 9 A 33 8 A 30 9 A 33 8 A 61 ...

Page 12: ...rature and humidity The output voltage will be higher than usual when the generator is still cold immediately after the engine starts AC EXTERNAL CHARACTERISTIC CURVES C L Type U Type SK R Type 240V RATED 22 9A LOAD CURRENT A OUTPUT VOLTAGE V 120V RATED 45 8A OUTPUT VOLTAGE V OUTPUT VOLTAGE V LOAD CURRENT A LOAD CURRENT A 240V RATED 22 9A 220V RATED 25 0A cap 01 EU65is 6500is Eu qxd 07 12 17 4 24 ...

Page 13: ...ec soupape en tête incliné de 25 Cylindrée 389 cm3 Alésage x Course 88 x 64 mm Taux de compression 8 0 1 Système de refroidissement Air forcé Système d allumage Allumage par magnéto transistorisée Calage à l allumage 25 Av P M H à 2 400 tr min Bougie d allumage BPR5ES NGK W16EPR U DENSO Carburateur Soupape papillon type horizontal Filtre à air Type semi sec Système de graissage Barbotage Contenanc...

Page 14: ...A Fréquence nominale 60 Hz 50 Hz 60 Hz Tension nominale 120 240 V 220 V 240 V 220 V 120 240 V Courant nominal 45 8 22 9 A 25 0 A 22 9 A 25 0 A 45 8 22 9 A Facteur de puissance 1 0 cos ø Taux de variation de tension Provisoire 10 max Moyen 6 max Durée moyenne 3 sec max Stabilité de tension 1 0 Taux de variation de fréquence Provisoire 1 max Moyen 1 max Durée moyenne 1 sec max Stabilité de fréquence...

Page 15: ...tude lorsque le générateur est encore froid immédiatement après le démarrage du moteur COURBES DE CARACTERISTIQUES EXTERNES CA Type C L 1 3 1 2 3 4 5 6 7 8 9 10 11 12 13 14 15 16 17 18 19 20 Type U Type SK R NOMINALE 240 V 22 9 A INTENSITE DE CHARGE A TENSION DE SORTIE V NOMINALE 120 V 45 8 A TENSION DE SORTIE V TENSION DE SORTIE V INTENSITE DE CHARGE A INTENSITE DE CHARGE A NOMINALE 240 V 22 9 A ...

Page 16: ... mit oben liegender Nockenwelle um 25º geneigt Hubraum 389 cm3 Bohrung und Hub 88 x 64 mm Verdichtungsverhältnis 8 0 1 Kühlsystem Zwangsluftkühlung Zündsystem Transistorisierte Magnetzündung Zündzeitpunkt 25 vor OT bei 2400 U min Zündkerze BPR5ES NGK W16EPR U DENSO Vergaser Flachstromvergaser Klappenventil Luftfilter Feuchtfilter Schmiersystem Spritzölschmierung Ölkapazität 1 12 Liter Empfohlene Ö...

Page 17: ...0 V 240 V 220 V 120 240 V Nennstrom 45 8 22 9 A 25 0 A 22 9 A 25 0 A 45 8 22 9 A Leistungsfaktor 1 0 cos ø Spannungs Kurzzeitig Maximal 10 schwankungsfaktor Im Durchschnitt Maximal 6 Durchschnittliche Maximal 3 Sekunden Zeitdauer Spannungsstabilität 1 0 Frequenz Kurzzeitig Maximal 1 schwankungsfaktor Im Durchschnitt Maximal 1 Durchschnittliche Maximal 1 Sekunde Zeitdauer Frequenzstabilität 0 1 Hz ...

Page 18: ...geringfügig verändern Die Ausgangsspannung liegt unmittelbar nach dem Anlassen und bei noch kaltem Generator etwas höher als gewöhnlich EXTERNE WECHSELSPANNUNGS KENNLINIEN Typ C L Typ U Typ SK R NENNSPANNUNG 240 V 22 9 A LASTSTROM A AUSGANGSSPANNUNG V NENNSPANNUNG 120 V 45 8 A AUSGANGSSPANNUNG V AUSGANGSSPANNUNG V LASTSTROM A LASTSTROM A NENNSPANNUNG 240 V 22 9 A NENNSPANNUNG 220 V 25 0 A cap 01 E...

Page 19: ...con válvulas en cabeza inclinado 25 Cilindrada 389 cm3 Calibre x carrera 88 x 64 mm Relación de compresión 8 0 1 Sistema de enfriamiento Aire forzado Sistema de encendido Encendido por magneto transistorizado Distribución del encendido 25 APMS a 2 400 rpm Bujía BPR5ES NGK W16EPR U DENSO Carburador Tipo de válvula de mariposa horizontal Filtro de aire Tipo semiseco Sistema de lubricación Salpicadur...

Page 20: ... Hz 50 Hz 60 Hz Tensión nominal 120 240 V 220 V 240 V 220 V 120 240 V Corriente nominal 45 8 22 9 A 25 0 A 22 9 A 25 0 A 45 8 22 9 A Factor de potencia 1 0 cos ø Razón de variación de Momentánea 10 máx tensión Media 6 máx Tiempo medio 3 segundo máx Estabilidad de la tensión 1 0 Razón de variación de Momentánea 1 máx frecuencia Media 1 máx Tiempo medio 1 segundo máx Estabilidad de la frecuencia 0 1...

Page 21: ...ión de salida será más alta de lo normal cuando el generador todavía esté frío inmediatamente después de haber puesto en marcha el motor CURVAS CARACTERÍSTICAS EXTERNAS DE CA Tipos C y L Tipo U Tipos SK y R 240 V NOMINAL 22 9 A CORRIENTE DE CARGA A TENSIÓN DE SALIDA V 120 V NOMINAL 45 8 A TENSIÓN DE SALIDA V TENSIÓN DE SALIDA V CORRIENTE DE CARGA A CORRIENTE DE CARGA A 240 V NOMINAL 22 9 A 220 V N...

Page 22: ...7 18 19 20 4 DIMENSIONAL DRAWING Unit mm in 540 21 3 1195 47 0 850 33 5 672 26 5 788 31 0 716 28 2 4 SCHEMA DE DIMENSIONS Unité mm 4 MASSZEICHNUNGEN Einheit mm 4 PLANOS DE DIMENSIONES Unidad mm cap 01 EU65is 6500is Eu qxd 07 12 17 4 24 PM ページ1 4 ...

Page 23: ...NOTE 1 3 4 5 6 7 8 9 10 11 12 13 14 15 16 17 18 19 20 cap 01 EU65is 6500is Eu qxd 07 12 17 4 24 PM ページ1 5 ...

Page 24: ... g Hot parts wear gloves If you have not received shop safety training or do not feel confident about your knowledge of safe servicing practices we recommend that you do not attempt to perform the procedures described in this manual Some of the most important precautions are given below However we cannot warn you of every conceivable hazard that can arise in performing maintenance or repairs Only ...

Page 25: ...g this unit Metric bolts nuts and screws are not interchangeable with non metric fasteners The use of incorrect tools and fasteners will damage the unit 9 Hold the connector body to disconnect the connector Do not disconnect by pulling the wire harness To disconnect the locking connector be sure to unlock first then disconnect 10 Check the connector terminals for bend excessive extrusion missing t...

Page 26: ... CABLE HARNESS ROUTING for the connector locations and terminal arrangement of the connectors The terminal No on inspection shows the terminal arrangement by viewing the connector from the terminal side Note that the double frame connector indicates a male terminal connector while the single frame indicates a female terminal connector 5 SERIAL NUMBER LOCATION The engine serial number is stamped on...

Page 27: ...ndant nous ne pouvons pas vous prévenir de tous les risques concevables pouvant se poser lors de l entretien ou de réparations Vous seul pouvez décider si vous devez oui ou non effectuer une tâche donnée 2 IMPORTANTES PRECAUTIONS DE SECURITE Toujours avoir une bonne compréhension de toutes les pratiques de base en matière de sûreté d atelier et porter des vêtements appropriés et un équipement de s...

Page 28: ...tiliser que des outils métriques lors de l entretien de cet appareil Les boulons écrous et vis métriques ne sont pas interchangeables avec des pièces de fixation non métriques L utilisation d outils et de pièces de fixation incorrects endommagera l appareil 9 Tenir le corps du connecteur pour déconnecter le connecteur Ne pas déconnecter en tirant le faisceau de fils Pour déconnecter le connecteur ...

Page 29: ... CABLES FAISCEAUX pour les emplacements des connecteurs et la disposition des bornes des connecteurs Lors du contrôle le N de borne montre la disposition des bornes en voyant le connecteur du côté des bornes Noter que le connecteur à double châssis indique un connecteur de borne mâle alors que le connecteur à châssis unique indique un connecteur de borne femelle 5 EMPLACEMENTS DES NUMEROS DE SERIE...

Page 30: ...t allerdings nicht möglich jede denkbare Gefahrensituation aufzuführen die bei der Ausführung von Wartungsarbeiten oder Reparaturen entstehen könnte Die Entscheidung ob eine bestimmte Arbeit ausgeführt werden kann oder nicht bleibt daher Ihnen überlassen 2 WICHTIGE SICHERHEITSHINWEISE Machen Sie sich unbedingt mit allen grundlegenden Werkstattvorschriften in Bezug auf Sicherheit vertraut tragen Si...

Page 31: ...de und oder die Bohrung beschädigt werden 8 Bei allen Wartungsarbeiten an diesem Generator sind nur metrische Werkzeuge zu benutzen Metrische Schrauben Muttern und Befestigungsteile sind mit Zollschrauben nicht austauschbar Die Verwendung von inkorrekten Werkzeugen oder Befestigungsteilen kann eine Beschädigung des Generators zur Folge haben 9 Beim Abziehen von Steckern stets am Stecker selbst anf...

Page 32: ... die Klemmennummer hin Für die Lage der Stecker und die Klemmen Anordnung der einzelnen Stecker sich auf die Seiten 2 51 bis 2 64 VERLEGUNG DER SEILZÜGE KABEL beziehen Die bei Überprüfungen angegebenen Klemmennummern und gezeigten Klemmen Anordnungen werden von der Klemmenseite her gesehen Dabei ist zu beachten dass es sich bei doppelt umrandeten Steckern um einen Stecker bei einfach umrandeten St...

Page 33: ... No obstante no podemos avisarle sobre todos los peligros concebibles que pueden surgir al realizar el mantenimiento o las reparaciones Sólo usted será quien pueda decidir si debe o no llevar a cabo una tarea dada 2 PRECAUCIONES DE SEGURIDAD IMPORTANTES Asegúrese de tener una comprensión clara de todos los procedimientos de seguridad básicos del taller y de ir vestido con prendas adecuadas y de ut...

Page 34: ...ramientas métricas para realizar el servicio de este aparato Los pernos tuercas y tornillos métricos no son intercambiables por fijadores que no sean métricos El empleo de herramientas y fijadores incorrectos ocasionará daños en el aparato 9 Para desconectar el conector tómelo por el cuerpo del conector No lo desconecte tirando del mazo de cables Para desconectar el conector con seguro abra primer...

Page 35: ... conectores consulte las P 2 51 a 2 64 del apartado INSTALACIÓN DE CABLES MAZOS DE CABLES El N de terminal en la inspección indica la disposición de terminales mirando el conector desde el lado de los terminales Tenga presente que el conector de marco doble indica un conector de terminal macho mientras que uno de marco sencillo indica un conector de terminal hembra 5 SITUACIÓN DEL NÚMERO DE SERIE ...

Page 36: ...8 1 75 0 069 Connecting Small end I D 20 005 20 020 0 7876 0 7882 20 07 0 790 rod Big end I D 36 025 36 039 1 4183 1 4189 36 07 1 420 Big end oil clearance 0 040 0 066 0 0016 0 0026 0 12 0 005 Big end side clearance 0 1 0 7 0 004 0 028 1 0 0 04 Crankshaft Crank pin O D 35 975 35 985 1 4163 1 4167 35 93 1 415 Valves Valve clearance IN 0 15 0 02 0 006 0 001 EX 0 20 0 02 0 008 0 001 Stem O D IN 6 575...

Page 37: ...stance 297 363 Engine Resistance 1 684 2 824 k at 20 30 C F temperature sensor Unit mm in Parts Item Terminals Standard Service limit Stator AC coil resistance Master 1 2 0 44 0 62 2 3 0 44 0 62 1 3 0 44 0 62 Slave 1 2 0 44 0 62 2 3 0 44 0 62 1 3 0 44 0 62 AC output voltage Master 1 2 AC15V Min by pulling recoil 2 3 starter 1 3 Slave 1 2 AC15V Min 2 3 1 3 GENERATOR Generator wire harness connector...

Page 38: ...r de segment Feu Etanchéité 2 0 1 75 Bielle D I de pied de bielle 20 005 20 020 20 07 D I de tête de bielle 36 025 36 039 36 07 Jeu de lubrification de tête de bielle 0 040 0 066 0 12 Jeu latéral de tête de bielle 0 1 0 7 1 0 Vilebrequin D E de maneton 35 975 35 985 35 93 Soupapes Jeu aux soupapes ADM 0 15 0 02 ECH 0 20 0 02 D E de tige ADM 6 575 6 590 6 44 ECH 6 535 6 550 6 40 Guides de soupape D...

Page 39: ...age Résistance 297 363 Ω Capteur de température de moteur Résistance 1 684 2 824 kΩ à 20 30 C Pièces Article Bornes Valeur standard Limite de service Stator Résistance de bobine CA Primaire 1 2 0 44 0 62 Ω 2 3 0 44 0 62 Ω 1 3 0 44 0 62 Ω Secondaire 1 2 0 44 0 62 Ω 2 3 0 44 0 62 Ω 1 3 0 44 0 62 Ω Primaire 1 2 15 V CA min 2 3 1 3 Secondaire 1 2 15 V CA min 2 3 1 3 Connecteurs de faisceau de fils de ...

Page 40: ... 2 0 7 1 0 Kolbenringdicke Oberer zweiter Ring 2 0 1 75 Pleuelstange Innendurchmesser des Pleuelauges 20 005 20 020 20 07 Innendurchmesser des Pleuelfußes 36 025 36 039 36 07 Laufspiel des Pleuelfußes 0 040 0 066 0 12 Seitenspiel des Pleuelfußes 0 1 0 7 1 0 Kurbelwelle Außendurchmesser des Lagerzapfens 35 975 35 985 35 93 Ventile Ventilspiel EIN 0 15 0 02 AUS 0 20 0 02 Außendurchmesser EIN 6 575 6...

Page 41: ...tand 1 684 2 824 kΩ bei 20 30 C Kabelbaumstecker des Generators Von der Klemmenseite her gesehen Für die Lage und Kabelfarben siehe S 2 51 Komponente Gegenstand Klemmen Standardwert Verschleißgrenze Stator AC Wicklungswiderstand Hauptwicklung 1 2 0 44 0 62 Ω 2 3 0 44 0 62 Ω 1 3 0 44 0 62 Ω Nebenwicklung 1 2 0 44 0 62 Ω 2 3 0 44 0 62 Ω 1 3 0 44 0 62 Ω Hauptwicklung 1 2 Mindestens 15 V 2 3 Wechselsp...

Page 42: ...hura de los anillos Superior segundo 2 0 1 75 Biela Diámetro interior de pie de biela 20 005 20 020 20 07 Diámetro interior de la cabeza de biela 36 025 36 039 36 07 Holgura de aceite de la cabeza de biela 0 040 0 066 0 12 Holgura lateral de la cabeza de biela 0 1 0 7 1 0 Cigüeñal Diámetro exterior del pasador del cigüeñal 35 975 35 985 35 93 Válvulas Holgura de válvulas ADM 0 15 0 02 ESC 0 20 0 0...

Page 43: ...e la temperatura del motor Resistencia 1 684 2 824 kΩ a 20 30 C Partes Elemento Terminales Estándar Límite de servicio Estator Resistencia de la bobina de CA Principal 1 2 0 44 0 62 Ω 2 3 0 44 0 62 Ω 1 3 0 44 0 62 Ω Secundario 1 2 0 44 0 62 Ω 2 3 0 44 0 62 Ω 1 3 0 44 0 62 Ω Principal 1 2 15 V CA mín 2 3 1 3 Secundario 1 2 15 V CA mín 2 3 1 3 Conectores de mazos de cables del generador Visto desde ...

Page 44: ...screw M5 x 0 8 4 0 4 3 0 Fuel valve lever screw M4 x 0 7 2 1 0 2 1 5 Silencer chamber nut M6 x 1 0 8 5 0 9 6 3 Air cleaner cover bolt M6 x 1 0 2 3 0 2 1 7 Air cleaner connecting tube band screw M4 x 0 7 0 7 0 1 0 5 Handle pipe socket bolt M8 x 1 25 21 5 2 2 16 Handle holder bolt M8 x 1 25 21 5 2 2 16 Ground terminal bolt M6 x 1 0 3 0 3 2 2 Front frame bolt M8 x 1 25 24 2 4 18 Ground cable terminal...

Page 45: ...length N m kgf m lbf ft Screw 3 mm 1 0 1 0 7 4 mm 2 0 2 1 5 5 mm 4 2 0 4 3 1 6 mm 8 9 0 9 6 6 Bolt and nut 5 mm 5 2 0 5 3 8 6 mm 10 1 0 7 8 mm 21 5 2 2 16 10 mm 34 3 5 25 12 mm 54 5 5 40 Flange bolt and nut 4 mm 3 4 0 3 2 5 5 mm 5 4 0 6 4 0 6 mm SH bolt 9 0 9 6 6 6 mm CT bolt 12 1 1 2 1 9 1 10 2 1 0 2 7 2 6 mm 11 1 1 8 8 mm 26 5 2 7 20 10 mm 39 4 0 29 cap 02 EU65is 6500is Eu qxd 07 12 17 4 25 PM ペ...

Page 46: ...uille de guidon M8 x 1 25 21 5 2 2 Boulon de support de manche M8 x 1 25 21 5 2 2 Boulon de borne de terre M6 x 1 0 3 0 3 Boulon de châssis avant M8 x 1 25 24 2 4 Ecrou de borne de câble de terre M6 x 1 0 8 5 0 9 Ecrou de cache de ventilateur M6 x 1 0 8 5 0 9 Vis de support de câble haute tension Vis de taraudage M5 3 4 0 3 Ecrou de rotor 1 M16 x 1 5 Ecrou spécial 113 11 5 Boulon à douille de stat...

Page 47: ...10 1 0 8 mm 21 5 2 2 10 mm 34 3 5 12 mm 54 5 5 Boulon et écrou à collerette 4 mm 3 4 0 3 5 mm 5 4 0 6 6 mm boulon SH 9 0 9 6 mm boulon CT 12 1 1 2 1 10 2 1 0 2 6 mm 11 1 1 8 mm 26 5 2 7 10 mm 39 4 0 Boulon SH Boulon à petite tête Boulon CT Boulon auto serrant 1 Au serrage pour la première fois du boulon CT au niveau d un trou pilote de boulon CT 2 Au resserrage cap 02 EU65is 6500is Fr qxd 07 12 17...

Page 48: ... 1 25 21 5 2 2 Schraube des Lenkerhalters M8 x 1 25 21 5 2 2 Schraube der Masseklemme M6 x 1 0 3 0 3 Vordere Rahmenschraube M8 x 1 25 24 2 4 Mutter der Massekabelklemme M6 x 1 0 8 5 0 9 Mutter der Ventilatorabdeckung M6 x 1 0 8 5 0 9 Schraube des Hochspannungskabel Halters M5 Schneidschraube 3 4 0 3 Rotormutter 1 M16 x 1 5 Spezialmutter 113 11 5 Innensechskantschraube des Stators M6 x 1 0 CT Schra...

Page 49: ...mm 10 1 0 8 mm 21 5 2 2 10 mm 34 3 5 12 mm 54 5 5 Bundschraube und Mutter 4 mm 3 4 0 3 5 mm 5 4 0 6 6 mm SH Schraube 9 0 9 6 mm CT Schraube 12 1 1 2 1 10 2 1 0 2 6 mm 11 1 1 8 mm 26 5 2 7 10 mm 39 4 0 SH Schraube Kleiner Schraubenkopf CT Schraube Schneidschraube 1 Wenn eine CT Schraube zum ersten Mal in einer Bohrung festgezogen wird 2 Bei erneutem Festziehen cap 02 EU65is 6500is Ge qxd 07 12 17 4...

Page 50: ...tubo del manillar M8 x 1 25 21 5 2 2 Perno del soporte del manillar M8 x 1 25 21 5 2 2 Perno del terminal de tierra M6 x 1 0 3 0 3 Perno del bastidor frontal M8 x 1 25 24 2 4 Tuerca del terminal de tierra M6 x 1 0 8 5 0 9 Tuerca de la cubierta del ventilador M6 x 1 0 8 5 0 9 Tornillo del soporte del cable de alta tensión M5 Tornillo de enrosque 3 4 0 3 Tuerca del rotor 1 M16 x 1 5 tuerca especial ...

Page 51: ... 10 1 0 8 mm 21 5 2 2 10 mm 34 3 5 12 mm 54 5 5 Perno y tuerca de brida 4 mm 3 4 0 3 5 mm 5 4 0 6 6 mm perno SH 9 0 9 6 mm perno CT 12 1 1 2 1 10 2 1 0 2 6 mm 11 1 1 8 mm 26 5 2 7 10 mm 39 4 0 Perno SH Perno de cabeza pequeña Perno CT Perno de autoenrosque 1 Al apretar el perno CT por primera vez en un orificio piloto de perno CT 2 Al reapretar cap 02 EU65is 6500is Sp qxd 07 12 17 4 30 PM ページ2 7 ...

Page 52: ...g EX 10 Valve seat cutter 32 38 5 mm 07780 0012400 Valve seat reconditioning IN 11 Valve seat cutter 32 33 mm 07780 0012900 Valve seat reconditioning EX 12 Valve seat cutter 60 30 mm 07780 0014000 Valve seat reconditioning EX 13 Valve seat cutter 60 42 mm 07780 0014400 Valve seat reconditioning IN 14 Cutter holder 6 6 mm 07781 0010202 Valve seat reconditioning IN EX 15 Crank pulley holder 47 mm 07...

Page 53: ...0 0012400 Remise en état du siège de soupape ADM 11 Outil de coupe de siège de soupape 32 33 mm 07780 0012900 Remise en état du siège de soupape ECH 12 Outil de coupe de siège de soupape 60 30 mm 07780 0014000 Remise en état du siège de soupape ECH 13 Outil de coupe de siège de soupape 60 42 mm 07780 0014400 Remise en état du siège de soupape ADM 14 Outil de maintien d outil de coupe 6 6 mm 07781 ...

Page 54: ...32 38 5 mm 07780 0012400 Nachschleifen der Ventilsitze EIN 11 Ventilsitzfräser 32 33 mm 07780 0012900 Nachschleifen der Ventilsitze AUS 12 Ventilsitzfräser 60 30 mm 07780 0014000 Nachschleifen der Ventilsitze AUS 13 Ventilsitzfräser 60 42 mm 07780 0014400 Nachschleifen der Ventilsitze EIN 14 Halter für Ventilsitzfräser 6 6 mm 07781 0010202 Nachschleifen der Ventilsitze EIN AUS 15 Halter für Kurbel...

Page 55: ...eacondicionamiento del asiento de válvulas admisión 11 Cortador de asientos de válvula 32 33 mm 07780 0012900 Reacondicionamiento del asiento de válvulas escape 12 Cortador de asientos de válvula 60 30 mm 07780 0014000 Reacondicionamiento del asiento de válvulas escape 13 Cortador de asientos de válvula 60 42 mm 07780 0014400 Reacondicionamiento del asiento de válvulas admisión 14 Soporte del cort...

Page 56: ...est to the oldest When END appears in this mode press the display button longer than 3 seconds to change the display back to the normal display mode DETAILED ERROR LOG MODE When you press the display button longer than 3 seconds on an error code the display goes into detailed error log mode and it shows the engine run time generator output engine speed inverter temperature throttle angle and batte...

Page 57: ...rage master A 15 8 A Inverter output amperage slave A 16 0 A Engine speed rpm 2 900 rpm Inverter FET Field Effect Transistor temperature master C 60 C Inverter FET Field Effect Transistor temperature slave C 40 C Inverter SCR Silicon Controlled Rectifier temperature master C 45 C Inverter SCR Silicon Controlled Rectifier temperature slave C 50 C Carburetor throttle angle step 12 step Battery volta...

Page 58: ...21 E 06 FLASH OFF unit internal failure E 07 FLASH OFF GCU internal failure or inverter Engine is stopped 2 22 E 08 FLASH OFF unit internal failure E 09 FLASH OFF E 10 or E 20 FLASH OFF Inverter and generator control Engine is stopped 2 22 unit communication error E 11 or E 21 FLASH OFF Inverter internal communication Engine is stopped 2 23 error E 12 or E 22 ON OFF Inverter protection activated A...

Page 59: ...ignition switch and GCU for open or short circuit and for proper connection Replace the ignition switch P 6 6 thru 10 Normal Abnormal Replace or repair the engine wire harness and or control wire harness Abnormal Normal Turn the ignition switch OFF and then restart the engine and check the error code If the same error occurs replace the GCU P 6 6 IGNITION SWITCH Br W Br W Bl Y Bl Y Bl Y ENGINE WIR...

Page 60: ...ch and GCU for open or short circuit and for proper connection Replace or repair the engine wire harness and or control wire harness Abnormal IGNITION SWITCH Br W Br W Bl Y Bl Y Bl Y ENGINE WIRE HARNESS CONTROL WIRE HARNESS Viewed from terminal side Wire harness check points GCU FUSE 1A FUSE 15A Bl BLACK Y YELLOW W WHITE Br BROWN Normal Turn the ignition switch OFF and then restart the engine and ...

Page 61: ...cuit and for proper connection Normal Turn the ignition switch OFF and then restart the engine and check the error code If the same error occurs replace the GCU P 6 6 Replace or repair the engine wire harness and or control wire harness Abnormal Abnormal Viewed from terminal side G G Bl Y Y OIL LEVEL SWITCH ENGINE WIRE HARNESS CONTROL WIRE HARNESS GND5 C42 Wire harness check points GCU Bl BLACK Y ...

Page 62: ...4 Replace the ignition pulse generator P 11 3 Normal Check the harness connecting the ignition pulse generator and GCU for open or short circuit and for proper connection Replace or repair the wire harness Abnormal Abnormal GND5 C21 C22 IGNITION PULSE GENERATOR Y Bu Y Bu Bu Bl ENGINE WIRE HARNESS CONTROL WIRE HARNESS G G GCU Viewed from terminal side Wire harness check points Normal To P 2 16 Y YE...

Page 63: ...oper connection Replace or repair the engine wire harness and or control wire harness Abnormal Abnormal GND5 C41 STARTER SOLENOID Bl W Bl W G G ENGINE WIRE HARNESS CONTROL WIRE HARNESS Viewed from terminal side Wire harness check points GCU GCU Bl Bl BLACK G GREEN W WHITE Normal Turn the ignition switch OFF and then restart the engine and check the error code If the same error occurs replace the G...

Page 64: ...RE HARNESS CONTROL WIRE HARNESS IGNITION SWITCH See above W Y Bl Y Bl Y Bl Y Bl W Y W Bu Br Bu REMOTE CONTROL HARNESS Viewed from terminal side Wire harness check points Viewed from terminal side Wire harness check points GCU GCU FUSE 1A FUSE 15A Bl BLACK Y YELLOW G GREEN W WHITE O ORANGE Bu BLUE W WHITE Br BROWN G O Check the remote control box P 15 3 Replace or repair the remote control box P 15...

Page 65: ...per connection Replace or repair the engine wire harness and or control wire harness Abnormal Abnormal Normal Turn the ignition switch OFF and then restart the engine and check the error code If the same error occurs replace the GCU P 6 6 IGNITION SWITCH CONTROL WIRE HARNESS ENGINE WIRE HARNESS W Y Bl Y Bl Y Bl Y Bl W Y Viewed from terminal side Wire harness check points GCU FUSE 1A FUSE 15A G O B...

Page 66: ...on Replace or repair the engine wire harness and or control wire harness Abnormal Abnormal ENGINE TEMPERATURE SENSOR ENGINE WIRE HARNESS CONTROL WIRE HARNESS Y R Y R C46 C45 Y Bl Y Bl Viewed from terminal side GCU GCU Bl BLACK Y YELLOW R RED Normal Turn the ignition switch OFF and then restart the engine and check the error code If the same error occurs replace the GCU P 6 6 Wire harness check poi...

Page 67: ... Replace or repair the control wire harness Abnormal INVERTER UNIT INVERTER UNIT THROTTLE CONTROL MOTOR CONTROL WIRE HARNESS ENGINE WIRE HARNESS Viewed from terminal side O Y O W Bu Y R W O Bu O G Wire harness check points Wire harness check points GCU Y YELLOW Bu BLUE G GREEN W WHITE O ORANGE Y YELLOW Bu BLUE R RED W WHITE Normal Check the inverter unit replace if necessary P 6 2 After replacing ...

Page 68: ...rt circuit and for proper connection Replace or repair the control wire harness and or generator wire harness Abnormal Normal Check the inverter unit P 6 3 and 4 Replace the inverter unit P 6 2 Abnormal Normal Turn the ignition switch OFF and then restart the engine and check the error code If the same error occurs replace the GCU P 6 6 Abnormal GCU Bu W Viewed from terminal side GENERATOR SLAVE G...

Page 69: ...s connecting the inverter unit and GCU for open or short circuit and for proper connection Replace or repair the control wire harness Abnormal INVERTER UNIT CONTROL WIRE HARNESS Viewed from terminal side O Y O W O Bu O G Wire harness check points GCU Y YELLOW Bu BLUE R RED W WHITE Normal Check the inverter unit P 6 3 and 4 Replace the inverter unit P 6 2 Abnormal Normal Turn the ignition switch OF...

Page 70: ...ewed from terminal side GENERATOR SLAVE GENERATOR MASTER GENERATOR WIRE HARNESS INVERTER UNIT INVERTER UNIT Bu BLUE R RED W WHITE W R Bu W Check the inverter unit P 6 3 and 4 Replace the inverter unit P 6 2 Abnormal Normal Turn the ignition switch OFF and then restart the engine and check the error code If the same error occurs replace the inverter unit P 6 6 Replace or repair the generator wire h...

Page 71: ... Not displayed Normal Check the inverter unit P 6 3 and 4 Replace the inverter unit P 6 2 Abnormal Normal Turn the ignition switch OFF and then restart the engine and check the error code If the same error occurs replace the inverter unit P 6 6 Check the harness connecting the inverter unit and generator for open or short and for proper connection Wire harness check points Viewed from terminal sid...

Page 72: ...op the engine and turn the ignition switch to OFF 4 Restart the engine and check the error code If the same error code occurs replace the inverter unit and retest P 6 2 Inverter unit internal failure Turn the ignition switch OFF and then restart the engine and check the error code If the same error occurs replace the inverter unit and retest P 6 2 E 2d E 2C E 26 E 1d E 1C E 16 E 25 E 24 E 15 E 14 ...

Page 73: ... 3 and 4 Replace the inverter unit P 6 2 Abnormal Normal Turn the ignition switch OFF and then restart the engine and check the error code If the same error occurs replace the GCU P 6 6 Check the harness connecting the inverter unit and generator for open or short and for proper connection Wire harness check points Viewed from terminal side GENERATOR SLAVE GENERATOR MASTER GENERATOR WIRE HARNESS I...

Page 74: ...splayed on the i Monitor Refer to Failure By Error Code P 2 11 Not displayed Displayed Check the fuel level in the tank Add fuel and then restart the engine Sufficient Insufficient Remove the spark plug and check for wet or fouled electrodes Clean the electrodes and restart If flooding is severe check the carburetor float valve P 4 7 Check for restriction in the carburetor port nozzle and jet Norm...

Page 75: ...perature of the cylinder head when the ignition switch is turned ON Check the harness connecting the choke control motor and GCU for open or short circuit and for proper connection No good Good Turn the ignition switch OFF and then restart the engine and check the error code If the same error occurs replace the GCU P 6 6 Normal CHOKE SHAFT Wire harness check points W Y R Bu W Y R Bu CONTROL WIRE H...

Page 76: ...s check points INVERTER UNIT Y YELLOW Bu BLUE R RED W WHITE Replace or repair the engine wire harness Abnormal Normal Turn the ignition switch OFF and then restart the engine and check the error code If the same error occurs replace the inverter unit P 6 2 Check the valve clearance P 3 6 Check for carbon deposits in the combustion chamber P 13 1 Check the valve clearance P 3 6 Check that the cylin...

Page 77: ...plug P 3 5 3 Install a compression gauge in the spark plug hole 4 Pull the recoil starter forcefully several times and measure the cylinder compression 2 30 Cylinder 0 59 0 83 MPa compression 6 0 8 5 kgf cm2 86 120 psi at 600 min 1 rpm COMPRESSION GAUGE Commercially available cap 02 EU65is 6500is Eu qxd 07 12 17 4 25 PM ページ2 30 ...

Page 78: ...he cooling air duct causing overheating Check whether the generator is placed by the side of a wall Set the generator in the correct position and restart the engine and recheck Incorrect Good Check the harness connecting the inverter unit and AC receptacle for open or short circuit and for proper connection Check the harness connecting the inverter unit and generator for open or short and for prop...

Page 79: ...temperature of the cylinder head when the ignition switch is turned ON No good Good CHOKE SHAFT To P 2 33 Check the choke control motor P 4 10 Replace the choke control motor P 4 6 Normal Abnormal Turn the ignition switch OFF and then restart the engine and check the error code If the same error occurs replace the GCU P 6 6 Abnormal Replace or repair the engine wire harness and or control wire har...

Page 80: ...s check points INVERTER UNIT Y YELLOW Bu BLUE R RED W WHITE Replace or repair the engine wire harness Abnormal Normal Turn the ignition switch OFF and then restart the engine and check the error code If the same error occurs replace the inverter unit P 6 2 Check the valve clearance P 3 6 Check for carbon deposits in the combustion chamber P 13 1 Check the valve clearance P 3 6 Check that the cylin...

Page 81: ...n circuit or poor ground and for proper connection Replace the ignition switch P 6 6 Normal Stop takes 10 seconds or more Abnormal Replace or repair the engine wire harness and or control wire harness Abnormal Wire harness check points W Bl ENGINE WIRE HARNESS CONTROL WIRE HARNESS IGNITION SWITCH GND5 GCU Bl BLACK Y YELLOW Bu BLUE R RED W WHITE G G Bl Viewed from terminal side Normal Turn the igni...

Page 82: ...spark plug P 3 5 Normal Abnormal Perform spark test again using a new spark plug P 2 38 No spark Check the ignition coil P 12 7 Replace the ignition coil P 12 1 Normal Abnormal Check the spark plug cap P 12 7 Replace the spark plug cap P 12 1 Normal Abnormal Check the ignition pulse generator air gap P 11 4 Adjust the ignition pulse generator air gap P 11 4 Correct Incorrect To P 2 36 cap 02 EU65i...

Page 83: ...bnormal GND5 C21 C22 IGNITION PULSE GENERATOR Y Bu Y Bu Bu Bl ENGINE WIRE HARNESS CONTROL WIRE HARNESS G G GCU Viewed from terminal side Wire harness check points Normal Y YELLOW Bu BLUE G GREEN Check the harness connecting the ignition coil and GCU for open or short circuit and for proper connection Normal Wire harness check points ENGINE WIRE HARNESS IGNITION COIL GCU Viewed from terminal side B...

Page 84: ...the stator P 11 5 Check the harness connecting the generator and GCU for open or short circuit and for proper connection Replace or repair the control wire harness and or generator wire harness Abnormal Normal GCU Bu W Viewed from terminal side GENERATOR SLAVE GENERATOR WIRE HARNESS CONTROL WIRE HARNESS Bu BLUE R RED W WHITE Wire harness check points R Bu W R Turn the ignition switch OFF and then ...

Page 85: ...the unburnt gas from the cylinder before testing WARNING 1 Open the L maintenance cover 2 Remove the plug cover and then remove the spark plug cap and spark plug 3 Pull the recoil starter several times to release the unburnt gas from the cylinder 4 Attach the removed spark plug to the plug cap 5 Turn the engine stop switch to the ON position 6 Ground the negative electrode i e threaded part of the...

Page 86: ... the battery P 5 1 and 2 Good Abnormal Check the harness connecting the ignition switch and GCU for open or short circuit and for proper connection IGNITION SWITCH CONTROL WIRE HARNESS ENGINE WIRE HARNESS W Y Bl Y Bl Y Bl Y Bl W Y Viewed from terminal side Wire harness check points GCU FUSE 1A FUSE 15A O G Bl BLACK Y YELLOW G GREEN W WHITE O ORANGE Normal Check the starter solenoid P 12 4 Replace ...

Page 87: ... STARTER SOLENOID Bl W Bl W G G ENGINE WIRE HARNESS CONTROL WIRE HARNESS Viewed from terminal side Wire harness check points GCU Bl Bl BLACK G GREEN W WHITE Normal Check the starter motor P 12 4 Replace or repair starter motor P 12 1 and 3 Normal Abnormal Turn the ignition switch OFF and then restart the engine and recheck Replace the GCU if necessary P 6 6 cap 02 EU65is 6500is Eu qxd 07 12 17 4 2...

Page 88: ...s Check whether the starter motor is operating when the ignition switch is turned to the START position Check the remote control box P 15 3 Check the remote control harness for open or short circuit and for proper connection Does not operate Operates Normal Normal Perform the Starter Motor Does Not Turn troubleshooting P 2 39 Engine Does Not Start With The Remote Control Box Start Switch Go to P 2...

Page 89: ...CU if the engine does not start P 6 6 Wire harness check points W Bu Br Bu Viewed from terminal side GCU GCU CONTROL WIRE HARNESS Wire harness check points Viewed from terminal side CONTROL WIRE HARNESS REMOTE CONTROL HARNESS From P 2 41 Repair or replace the control wire harness Normal Replace the ignition switch P 6 6 Check the ignition switch P 6 11 Normal Br Y Br Y G O IGNITION SWITCH GCU Abno...

Page 90: ...the remote control box P 15 3 Check the remote control harness for open or short circuit and for proper connection Normal Normal Check the harness connecting the remote control harness and GCU for open or short circuit and for proper connection Wire harness check points W G Viewed from terminal side REMOTE CONTROL HARNESS Repair or replace the control wire harness Normal Stops Abnormal Abnormal Ab...

Page 91: ...Turn the ignition switch OFF and then start the engine and recheck Replace the GCU if the LED does not come on P 6 6 Wire harness check points Viewed from terminal side CONTROL WIRE HARNESS Br Bu G Bu GCU GCU Abnormal Abnormal REMOTE CONTROL HARNESS Turn the ignition switch OFF and then start the engine and recheck Replace the GCU if the LED does not come on P 6 6 Repair or replace the remote cont...

Page 92: ...ness connecting the generator and inverter unit for open or short circuit and for proper connection Wire harness check points R Bu W R Bu W Viewed from terminal side GENERATOR SLAVE GENERATOR MASTER GENERATOR WIRE HARNESS INVERTER UNIT RED TAPE MARKS Bu BLUE W WHITE R RED Go to P 2 46 Normal Normal Displayed Not displayed On Normal Off Abnormal Abnormal Abnormal INVERTER UNIT Replace or repair the...

Page 93: ... generator is placed by the side of a wall Correct if necessary Turn the ignition switch OFF and then restart the engine and recheck Replace the inverter unit if necessary P 6 2 Check the throttle control motor P 4 10 Replace the throttle control motor P 4 6 Replace or repair the engine wire harness THROTTLE ARM STOPPER Normal Go to P 2 47 Low engine speed Abnormal Normal engine speed On Off Norma...

Page 94: ...usted automatically according to the temperature of the cylinder head when the ignition switch is turned ON CHOKE SHAFT Check the harness connecting the choke control motor and GCU for open or short circuit and for proper connection Wire harness check points R Bu Y CONTROL WIRE HARNESS ENGINE WIRE HARNESS CHOKE CONTROL MOTOR GCU Viewed from terminal side Check the choke control motor P 4 10 Abnorm...

Page 95: ...R Y Bl Y Bl Viewed from terminal side Wire harness check points GCU GCU Turn the ignition switch OFF and then restart the engine and check the error code If the same error occurs replace the GCU P 6 6 Replace or repair the engine wire harness and or control wire harness Replace the engine temperature sensor P 13 1 Abnormal Normal Normal Abnormal From P 2 47 C45 C46 Bl BLACK Y YELLOW R RED cap 02 E...

Page 96: ...trol wire harness Check the harness connecting the choke control motor and GCU for open or short circuit and for proper connection Wire harness check points Viewed from terminal side Check the choke control motor P 4 10 Abnormal Abnormal Not displayed Closed Normal Normal Go to P 2 50 R Bu Y CONTROL WIRE HARNESS ENGINE WIRE HARNESS CHOKE CONTROL MOTOR GCU Bu BLUE W WHITE Y YELLOW R RED W R Bu Y W ...

Page 97: ...ts GCU GCU Turn the ignition switch OFF and then restart the engine and check the error code If the same error occurs replace the GCU P 6 6 Replace or repair the engine wire harness and or control wire harness Replace the engine temperature sensor P 13 1 Check the engine temperature sensor P 13 5 From P 2 49 Abnormal Abnormal Normal Y R Y Bl Y Bl Y R Normal C45 C46 Bl BLACK Y YELLOW R RED cap 02 E...

Page 98: ... apparaît dans ce mode appuyez plus de 3 secondes sur la touche d affichage pour ramener l affichage au mode d affichage normal MODE DE REGISTRE D ERREURS DETAILLEES Lorsque vous appuyez plus de 3 secondes sur la touche d affichage sur un code d erreur l affichage passe en mode de registre d erreurs détaillées et il affiche la durée de service du moteur la sortie du générateur le régime moteur la ...

Page 99: ...ortie d inverseur primaire A 15 8 A Ampérage de sortie d inverseur secondaire A 16 0 A Régime moteur tr min 2 900 tr min Température TEC transistor à effet de champ d inverseur primaire C 60 C Température TEC transistor à effet de champ d inverseur secondaire C 40 C Température SCR redresseur commandé d inverseur primaire C 45 C Température SCR redresseur commandé d inverseur secondaire C 50 C Ang...

Page 100: ... E 16 ou E 26 CLIGNOTEMENT Eteint Défaillance interne d unité d inverseur Le moteur est arrêté 2 25 E 17 ou E 27 CLIGNOTEMENT Eteint Le moteur est arrêté 2 26 E 18 ou E 28 CLIGNOTEMENT Eteint E 19 ou E 29 CLIGNOTEMENT Eteint E 1A ou E 2A CLIGNOTEMENT Eteint E 1b ou E 2b CLIGNOTEMENT Eteint E 1C ou E 2C CLIGNOTEMENT Eteint Défaillance interne d unité d inverseur Le moteur est arrêté 2 25 E 1d ou E ...

Page 101: ...P 6 6 à 10 Anormal Remplacer ou réparer le faisceau de fils de moteur et ou le faisceau de fils de commande Anormal Vérifier le commutateur d allumage P 6 11 Vérifier si le faisceau connectant le commutateur d allumage et la GCU est en circuit ouvert ou en court circuit et si la connexion est correcte Normaux Désenclencher le commutateur d allumage puis remettre le moteur en marche et vérifier le ...

Page 102: ...uit et si la connexion est correcte Bonne Vérifier le commutateur d allumage P 6 11 Anormal Remplacer le commutateur d allumage P 6 6 à 10 Normal Désenclencher le commutateur d allumage puis remettre le moteur en marche et vérifier le code d erreur Si la même erreur se produit remplacer la GCU P 6 6 Normal Normaux Br W Br W Bl Y FAISCEAU DE FILS DE MOTEUR FAISCEAU DE FILS DE COMMANDE Vu du côté de...

Page 103: ...st en circuit ouvert ou en court circuit et si la connexion est correcte Correct Désenclencher le commutateur d allumage puis remettre le moteur en marche et vérifier le code d erreur Si la même erreur se produit remplacer la GCU P 6 6 Normal Normal FAISCEAU DE FILS DE MOTEUR FAISCEAU DE FILS DE COMMANDE Vu du côté des bornes Points de contrôle de faisceau de fils GCU Bl NOIR Y JAUNE G VERT CONTAC...

Page 104: ...orrecte Bonne Vérifier le générateur d impulsions d allumage P 11 4 Anormal Remplacer le générateur d impulsions d allumage P 11 3 Normal Vers P 2 16 Normal Normal GND5 C21 C22 GENERATEUR D IMPULSIONS D ALLUMAGE Y Bu Y Bu Bu Bl FAISCEAU DE FILS DE MOTEUR FAISCEAU DE FILS DE COMMANDE G G GCU Vu du côté des bornes Points de contrôle de faisceau de fils Y JAUNE Bu BLEU G VERT GENERATEUR D IMPULSIONS ...

Page 105: ...u connectant le démarreur électrique et la GCU est en circuit ouvert ou en court circuit et si la connexion est correcte Normal De P 2 15 Désenclencher le commutateur d allumage puis remettre le moteur en marche et vérifier le code d erreur Si la même erreur se produit remplacer la GCU P 6 6 Normal Normale Points de contrôle de faisceau de fils GND5 C41 Bl W Bl W G G GCU GCU Bl SOLENOIDE DE DEMARR...

Page 106: ... moteur en marche et vérifier le code d erreur Si la même erreur se produit remplacer la GCU P 6 6 Normal Normal Remplacer ou réparer le boîtier de télécommande P 15 1 et 2 Anormal Vérifier le boîtier de télécommande P 15 3 Remplacer ou réparer le faisceau de télécommande Anormal Vérifier si le faisceau de télécommande est en circuit ouvert ou en court circuit et si la connexion est correcte Norma...

Page 107: ...eur d allumage et la GCU est en circuit ouvert ou en court circuit et si la connexion est correcte Bonne Désenclencher le commutateur d allumage puis remettre le moteur en marche et vérifier le code d erreur Si la même erreur se produit remplacer la GCU P 6 6 Normal Normal W Y Bl Y Bl Y Bl Y Bl W Y GCU FUSIBLE 1A FUSIBLE 15A G O Points de contrôle de faisceau de fils COMMUTATEU R D ALLUMAGE FAISCE...

Page 108: ...3 5 Vérifier si le faisceau connectant le capteur de température de moteur et la GCU est en circuit ouvert ou en court circuit et si la connexion est correcte Désenclencher le commutateur d allumage puis remettre le moteur en marche et vérifier le code d erreur Si la même erreur se produit remplacer la GCU P 6 6 Normal Normal Points de contrôle de faisceau de fils Y R Y R C46 C45 Y Bl Y Bl GCU GCU...

Page 109: ...emplacer si nécessaire P 6 2 Après avoir remplacé l unité d inverseur désenclencher le commutateur d allumage puis remettre le moteur en marche et vérifier le code d erreur Si la même erreur se produit remplacer la GCU P 6 6 Normal Normal Bu Y R W Points de contrôle de faisceau de fils MOTEUR DE COMMANDE DE PAPILLON UNITE D INVERSEUR FAISCEAU DE FILS DE MOTEUR Vu du côté des bornes Y JAUNE Bu BLEU...

Page 110: ...l situé dans le boîtier de commande est en circuit ouvert ou en court circuit et si la connexion est correcte Vérifier si le faisceau connectant l alternateur et la GCU est en circuit ouvert ou en court circuit et si la connexion est correcte Normal Vérifier l unité d inverseur P 6 3 et 4 Anormale Remplacer l unité d inverseur P 6 2 Normale Désenclencher le commutateur d allumage puis remettre le ...

Page 111: ...le Remplacer ou réparer le faisceau de fils de commande Anormal Vérifier l unité d inverseur P 6 3 et 4 Vérifier si le faisceau connectant l unité d inverseur et la GCU est en circuit ouvert ou en court circuit et si la connexion est correcte Désenclencher le commutateur d allumage puis remettre le moteur en marche et vérifier le code d erreur Si la même erreur se produit remplacer la GCU P 6 6 No...

Page 112: ...n est correcte Désenclencher le commutateur d allumage puis remettre le moteur en marche et vérifier le code d erreur Si la même erreur se produit remplacer l unité d inverseur P 6 6 Normal Normale Points de contrôle de faisceau de fils Remplacer l unité d inverseur P 6 2 Anormal Vérifier l alternateur P 11 7 Normal R Bu W R Bu W UNITE D INVERSEUR UNITE D INVERSEUR BOBINE SECONDAIRE BOBINE PRIMAIR...

Page 113: ... inverseur P 6 6 Normal Normale Points de contrôle de faisceau de fils Remplacer l unité d inverseur P 6 2 Anormal Vérifier l alternateur P 11 7 Normal Normal Déconnecter l appareil électrique et arrêter le moteur Remettre le moteur en marche et vérifier le code d erreur Remplacer ou réparer le faisceau de fils principal Pas affiché Vérifier si le faisceau de fils principal situé dans le boîtier d...

Page 114: ... désenclencher le commutateur d allumage 4 Remettre le moteur en marche et vérifier le code d erreur Si la même erreur se produit remplacer l unité d inverseur et réessayer P 6 2 Défaillance interne d unité d inverseur Désenclencher le commutateur d allumage puis remettre le moteur en marche et vérifier le code d erreur Si la même erreur se produit remplacer l unité d inverseur et réessayer P 6 2 ...

Page 115: ... en marche et vérifier le code d erreur Si la même erreur se produit remplacer la GCU P 6 6 Normal Normale Points de contrôle de faisceau de fils Remplacer l unité d inverseur P 6 2 Anormal Vérifier l alternateur P 11 7 Normal Normal Remplacer ou réparer le faisceau de fils principal Vérifier si le faisceau de fils principal situé dans le boîtier de commande est en circuit ouvert ou en court circu...

Page 116: ...onitor Se reporter à Défaillance par code d erreur P 2 11 Affiché Normale Déposer la bougie d allumage et vérifier si les électrodes sont humides ou encrassées Nettoyer les électrodes et remettre en marche Si le noyage est sévère vérifier le pointeau de carburateur P 4 7 Humides Vérifier si la lumière la buse et le gicleur de carburateur sont obstrués Sèches L essence atteint le carburateur Desser...

Page 117: ...rmé avec le commutateur d allumage enclenché L étrangleur sera initialement fermé puis il sera automatiquement ajusté en fonction de la température de la culasse lorsque le commutateur d allumage est enclenché Vers P 2 29 Bon ARBRE DE STARTER Vérifier si le faisceau connectant le moteur de commande de starter et la GCU est en circuit ouvert ou en court circuit et si la connexion est correcte Vu du...

Page 118: ...ion P 13 1 Effectuer la vérification de compression de cylindre P 2 30 Vérifier le moteur de commande de papillon P 4 10 Remplacer le moteur de commande de papillon P 4 6 Compression de cylindre faible Le commutateur d allumage étant désenclenché vérifier si le papillon des gaz est entièrement ouvert La biellette de commande des gaz doit entrer en contact avec la butée Pas entièrement ouvert Vérif...

Page 119: ... la bougie d allumage P 3 5 3 Installer un compressiomètre dans le trou de bougie d allumage 4 Tirer plusieurs fois de force le lanceur à réenroulement et mesurer la compression de cylindre COMPRESSIOMETRE disponible dans le commerce Compression de cylindre 0 59 0 83 MPa 6 0 8 5 kgf cm2 à 600 tr min cap 02 EU65is 6500is Fr qxd 07 12 17 4 27 PM ページ2 30 ...

Page 120: ...urcharge est allumé lors de l arrêt du moteur Vers P 2 32 Eteint Vérifier si le faisceau connectant l unité d inverseur et la prise secteur est en circuit ouvert ou en court circuit et si la connexion est correcte Vérifier si le faisceau connectant l unité d inverseur et l alternateur est en circuit ouvert ou en court circuit et si la connexion est correcte Vu du côté des bornes Points de contrôle...

Page 121: ... sera initialement fermé puis il sera automatiquement ajusté en fonction de la température de la culasse lorsque le commutateur d allumage est enclenché Vers P 2 33 Bon Vérifier si le faisceau connectant le moteur de commande de starter et la GCU est en circuit ouvert ou en court circuit et si la connexion est correcte Vérifier si la lumière la buse et le gicleur de carburateur sont obstrués Humid...

Page 122: ... 6 Compression de cylindre faible Le commutateur d allumage étant désenclenché vérifier si le papillon des gaz est entièrement ouvert La biellette de commande des gaz doit entrer en contact avec la butée Pas entièrement ouvert Vérifier si le faisceau connectant le moteur de commande de papillon et l unité d inverseur est en circuit ouvert ou en court circuit et si la connexion est correcte Normal ...

Page 123: ...urt circuit et si la connexion est correcte Désenclencher le commutateur d allumage puis remettre le moteur en marche et revérifier Remplacer la GCU si le moteur ne s arrête pas P 6 6 Normal Normal Points de contrôle de faisceau de fils Remplacer le commutateur d allumage P 6 6 L arrêt nécessite au moins 10 secondes Vérifier si le moteur peut être arrêté en tournant le commutateur d allumage vers ...

Page 124: ...ge P 12 7 Normale Normal Ajuster l entrefer du générateur d impulsions d allumage P 11 4 Incorrect Vérifier l entrefer du générateur d impulsions d allumage P 11 4 Correct Vers P 2 36 Remplacer la bougie d allumage P 3 5 Affiché Vérifier si le témoin d alerte d huile est allumé et si OIL est affiché sur l i Monitor Pas affiché FAISCEAU DE FILS DE GENERATEUR FAISCEAU DE FILS DE MOTEUR BOBINE Second...

Page 125: ... le commutateur d allumage P 6 6 Anormal Vérifier si le faisceau connectant le générateur d impulsions d allumage et la GCU est en circuit ouvert ou en court circuit et si la connexion est correcte Normal De P 2 35 GND5 C21 C22 Y Bu Y Bu Bu Bl G G GCU GCU Bl G Bl Bl G Bl C44 C43 Points de contrôle de faisceau de fils BOBINE D ALLUMAGE FAISCEAU DE FILS DE MOTEUR FAISCEAU DE FILS DE COMMANDE Vu du c...

Page 126: ...i le faisceau connectant le commutateur d allumage et la GCU est en court circuit Normal De P 2 36 Points de contrôle de faisceau de fils COMMUTATEUR D ALLUMAGE FAISCEAU DE FILS DE COMMANDE Vu du côté des bornes Bl NOIR W BLANC Désenclencher le commutateur d allumage puis remettre le moteur en marche et revérifier Remplacer la GCU si nécessaire P 6 6 W Bl GCU GCU Bu W R Bu W R Points de contrôle d...

Page 127: ...lbuteurs et tirer le lanceur à réenroulement pour vérifier si des étincelles jaillissent en travers des électrodes L essence est très inflammable et explosive Si elle est allumée l essence peut gravement vous brûler Vérifier qu il n y a pas d essence renversée près du moteur Placer la bougie d allumage à distance du trou de bougie d allumage L essence non brûlée peut s allumer si elle est laissée ...

Page 128: ...U est en circuit ouvert ou en court circuit et si la connexion est correcte Normal Normale Vers P 2 40 Normaux Remplacer le fusible P 6 5 Anormale Vérifier la batterie P 5 1 Bonne Remplacer le commutateur d allumage P 6 6 à 10 Anormal Remplacer la solénoïde de démarreur P 12 3 Anormale Vérifier le commutateur d allumage P 6 11 Normal W Y Bl Y Bl Y Bl Y Bl W Y GCU FUSIBLE 1A FUSIBLE 15A O G Points ...

Page 129: ...ectrique et la GCU est en circuit ouvert ou en court circuit et si la connexion est correcte De P 2 39 Désenclencher le commutateur d allumage puis remettre le moteur en marche et revérifier Remplacer la GCU si nécessaire P 6 6 GND5 C41 Bl W Bl W G G GCU Bl Points de contrôle de faisceau de fils SOLENOIDE DE DEMARREUR FAISCEAU DE FILS DE MOTEUR FAISCEAU DE FILS DE COMMANDE Vu du côté des bornes Bl...

Page 130: ...rifier si le faisceau de télécommande est en circuit ouvert ou en court circuit et si la connexion est correcte Ne fonctionne pas Fonctionne Normal Normal Effectuer le dépistage des pannes Le démarreur électrique ne tourne pas P 2 39 Le moteur ne démarre pas avec le commutateur de démarrage du boîtier de télécommande Passer à P 2 42 Anormal Anormal DEMARREUR ELECTRIQUE FAISCEAU DE FILS DE COMMANDE...

Page 131: ...lacer la GCU si le moteur ne s arrête pas P 6 6 Points de contrôle de faisceau de fils W Bu Br Bu Vu du côté des bornes GCU GCU FAISCEAU DE FILS DE COMMANDE Points de contrôle de faisceau de fils Vu du côté des bornes FAISCEAU DE FILS DE COMMANDE FAISCEAU DE TELECOMMANDE De P 2 41 Remplacer ou réparer le faisceau de fils de commande Normal Remplacer le commutateur d allumage P 6 6 Vérifier le comm...

Page 132: ...e télécommande P 15 3 Vérifier si le faisceau de télécommande est en circuit ouvert ou en court circuit et si la connexion est correcte Normal Normal Vérifier si le faisceau connectant le faisceau de télécommande et la GCU est en circuit ouvert ou en court circuit et si la connexion est correcte Points de contrôle de faisceau de fils W G Vu du côté des bornes FAISCEAU DE TELECOMMANDE Réparer ou re...

Page 133: ...correcte Désenclencher le commutateur d allumage puis mettre le moteur en marche et revérifier Remplacer la GCU si la DEL ne s allume pas P 6 6 Points de contrôle de faisceau de fils Vu du côté des bornes FAISCEAU DE FILS DE COMMANDE Br Bu G Bu GCU GCU Anormal Anormal FAISCEAU DE TELECOMMANDE Désenclencher le commutateur d allumage puis mettre le moteur en marche et revérifier Remplacer la GCU si ...

Page 134: ...ctant l alternateur et l unité d inverseur est en circuit ouvert ou en court circuit et si la connexion est correcte Points de contrôle de faisceau de fils R Bu W Vu du côté des bornes BOBINE SECONDAIRE BOBINE PRIMAIRE FAISCEAU DE FILS DE GENERATEUR UNITE D INVERSEUR MARQUES DE RUBAN ROUGE Bu BLEU W BLANC R ROUGE Passer à P 2 46 Normal Normal Affiché Pas affiché Allumé Normal Eteint Anormal Anorma...

Page 135: ...saire Désenclencher le commutateur d allumage puis remettre le moteur en marche et revérifier Remplacer l unité d inverseur si nécessaire P 6 2 Vérifier le moteur de commande de papillon P 4 10 Remplacer le moteur de commande de papillon P 4 6 Remplacer ou réparer le faisceau de fils de moteur BIELLETTE DE COMMANDE DES GAZ BUTEE Normal Passer à P 2 47 Régime moteur faible Anormal Régime moteur nor...

Page 136: ...nt ajusté en fonction de la température de la culasse lorsque le commutateur d allumage est enclenché ARBRE DE STARTER Vérifier si le faisceau connectant le moteur de commande de starter et la GCU est en circuit ouvert ou en court circuit et si la connexion est correcte Points de contrôle de faisceau de fils R Bu Y FAISCEAU DE FILS DE COMMANDE FAISCEAU DE FILS DE MOTEUR MOTEUR DE COMMANDE DE START...

Page 137: ... R Y R Y Bl Y Bl Vu du côté des bornes Points de contrôle de faisceau de fils GCU GCU Désenclencher le commutateur d allumage puis remettre le moteur en marche et vérifier le code d erreur Si la même erreur se produit remplacer la GCU P 6 6 Remplacer ou réparer le faisceau de fils de moteur et ou le faisceau de fils de commande Remplacer le capteur de température de moteur P 13 1 Anormal Normal No...

Page 138: ...nde Vérifier si le faisceau connectant le moteur de commande de starter et la GCU est en circuit ouvert ou en court circuit et si la connexion est correcte Points de contrôle de faisceau de fils Vu du côté des bornes Vérifier le moteur de commande de starter P 4 10 Anormal Anormal Pas affiché Fermé Normal Normal Passer à P 2 50 R Bu Y FAISCEAU DE FILS DE COMMANDE FAISCEAU DE FILS DE MOTEUR MOTEUR ...

Page 139: ...de fils GCU GCU Désenclencher le commutateur d allumage puis remettre le moteur en marche et vérifier le code d erreur Si la même erreur se produit remplacer la GCU P 6 6 Remplacer ou réparer le faisceau de fils de moteur et ou le faisceau de fils de commande Remplacer le capteur de température de moteur P 13 1 Vérifier le capteur de température de moteur P 13 5 De P 2 49 Anormal Anormal Normal Y ...

Page 140: ...eige END erscheint muss die Display Taste länger als 3 Sekunden gedrückt gehalten werden um auf den normalen Display Modus zurückzuschalten DETAILLIERTER FEHLERCODE MODUS Wenn bei Anzeige eines Fehlercodes die Display Taste länger als 3 Sekunden gedrückt gehalten wird schaltet der i Monitor in den detaillierten Fehlercode Modus worauf die Motor Gesamtbetriebszeit Generator Ausgangsleistung Motordr...

Page 141: ...trom Hauptwicklung A 15 8 A Wechselrichter Ausgangsstrom Nebenwicklung A 16 0 A Motordrehzahl U min 2900 U min Temperatur des Wechselrichter FET Feldeffekt Transistor Hauptwicklung C 60 C Temperatur des Wechselrichter FET Feldeffekt Transistor Nebenwicklung C 40 C Temperatur des Wechselrichter SCR Siliziumgleichrichter Hauptwicklung C 45 C Temperatur des Wechselrichter SCR Siliziumgleichrichter Ne...

Page 142: ...Motor bleibt stehen 2 26 E 18 oder E 28 BLINKT AUS E 19 oder E 29 BLINKT AUS E 1A oder E 2A BLINKT AUS E 1b oder E 2b BLINKT AUS E 1C oder E 2C BLINKT AUS Motor bleibt stehen 2 25 E 1d oder E 2d BLINKT AUS Wenn der Zündschalter auf die START Position gedreht wird läuft der Anlasser nicht Wenn der Zündschalter auf die START Position gedreht wird läuft der Anlasser nicht Nach dem Abschalten der AC A...

Page 143: ...ersetzen S 6 6 bis 6 10 Nicht in Ordnung Den Motorkabelbaum und oder den Steuerkabelbaum reparieren bzw ersetzen Nicht in Ordnung Den Zündschalter überprüfen S 6 11 Die Kabelbaum Verbindung zum Zündschalter und der GCU auf offenen Stromkreis Kurzschluss und korrekten Anschluss überprüfen In Ordnung Den Zündschalter auf OFF drehen dann den Motor wieder anlassen und den Fehlercode überprüfen Wenn de...

Page 144: ...Stromkreis Kurzschluss und korrekten Anschluss überprüfen In Ordnung Den Zündschalter überprüfen S 6 11 Nicht in Ordnung Den Zündschalter ersetzen S 6 6 bis 6 10 In Ordnung Den Zündschalter auf OFF drehen dann den Motor wieder anlassen und den Fehlercode überprüfen Wenn der gleiche Fehler erneut auftritt die GCU ersetzen S 6 6 In Ordnung In Ordnung Br W Br W Bl Y MOTOR KABELBAUM STEUERKABELBAUM An...

Page 145: ...tandsschalter und der GCU auf offenen Stromkreis Kurzschluss und korrekten Anschluss überprüfen In Ordnung Den Zündschalter auf OFF drehen dann den Motor wieder anlassen und den Fehlercode überprüfen Wenn der gleiche Fehler erneut auftritt die GCU ersetzen S 6 6 In Ordnung In Ordnung MOTOR KABELBAUM STEUERKABELBAUM Ansicht von der Klemmenseite Kabelbaum Prüfpunkte GCU Bl SCHWARZ Y GELB G GRÜN ÖLST...

Page 146: ...omkreis Kurzschluss und korrekten Anschluss überprüfen In Ordnung Den Zündimpulsgeber überprüfen S 11 4 Nicht in Ordnung Den Zündimpulsgeber ersetzen S 11 3 In Ordnung Auf S 2 16 fortgesetzt In Ordnung In Ordnung GND5 C21 C22 ZÜNDIMPULS GEBER Y Bu Y Bu Bu Bl MOTORKABELBAUM STEUERKABELBAUM G G GCU Ansicht von der Klemmenseite Kabelbaum Prüfpunkte Y GELB Bu BLAU G GRÜN ZÜNDIMPULSGEBER ANLASSER MAGNE...

Page 147: ...indung zum Anlasser und der GCU auf offenen Stromkreis Kurzschluss und korrekten Anschluss überprüfen In Ordnung Von S 2 15 fortgesetzt Den Zündschalter auf OFF drehen dann den Motor wieder anlassen und den Fehlercode überprüfen Wenn der gleiche Fehler erneut auftritt die GCU ersetzen S 6 6 In Ordnung In Ordnung Kabelbaum Prüfpunkte GND5 C41 Bl W Bl W G G GCU GCU Bl ANLASSER MAGNETSCHALTER MOTOR K...

Page 148: ...n und den Fehlercode überprüfen Wenn der gleiche Fehler erneut auftritt die GCU ersetzen S 6 6 In Ordnung In Ordnung Das Fernbedienungsgehäuse reparieren oder ersetzen S 15 1 und 15 2 Nicht in Ordnung Das Fernbedienungsgehäuse überprüfen S 15 3 Den Fernbedienungskabelbaum reparieren oder ersetzen Nicht in Ordnung Den Fernbedienungskabelbaum auf offenen Stromkreis Kurzschluss und korrekten Anschlus...

Page 149: ...um Zündschalter und der GCU auf offenen Stromkreis Kurzschluss und korrekten Anschluss überprüfen In Ordnung Den Zündschalter auf OFF drehen dann den Motor wieder anlassen und den Fehlercode überprüfen Wenn der gleiche Fehler erneut auftritt die GCU ersetzen S 6 6 In Ordnung In Ordnung W Y Bl Y Bl Y Bl Y Bl W Y GCU SICHERUNG 1 A SICHERUNG 15 A G O Kabelbaum Prüfpunkte ZÜNDSCHALTER MOTOR KABELBAUM ...

Page 150: ...abelbaum Verbindung zum Motortemperatur Sensor und der GCU auf offenen Stromkreis Kurzschluss und korrekten Anschluss überprüfen Den Zündschalter auf OFF drehen dann den Motor wieder anlassen und den Fehlercode überprüfen Wenn der gleiche Fehler erneut auftritt die GCU ersetzen S 6 6 In Ordnung In Ordnung Kabelbaum Prüfpunkte Y R Y R C46 C45 Y Bl Y Bl GCU GCU MOTORTEMPERATUR SENSOR MOTORKABELBAUM ...

Page 151: ... S 6 2 Nach dem Ersetzen der Wechselrichter Einheit den Zündschalter auf OFF drehen dann den Motor wieder anlassen und den Fehlercode überprüfen Wenn der gleiche Fehler erneut auftritt die GCU ersetzen S 6 6 In Ordnung In Ordnung Bu Y R W Kabelbaum Prüfpunkte DROSSELKLAPPEN STEUERMOTOR WECHSELRICHTER EINHEIT MOTORKABELBAUM Ansicht von der Klemmenseite Y GELB Bu BLAU R ROT W WEISS Den Steuerkabelba...

Page 152: ...euergehäuse auf offenen Stromkreis Kurzschluss und korrekten Anschluss überprüfen Die Kabelbaum Verbindung zur Lichtmaschine und der GCU auf offenen Stromkreis Kurzschluss und korrekten Anschluss überprüfen In Ordnung Die Wechselrichter Einheit überprüfen S 6 3 und 6 4 Nicht in Ordnung Die Wechselrichter Einheit ersetzen S 6 2 In Ordnung Den Zündschalter auf OFF drehen dann den Motor wieder anlass...

Page 153: ...nheit ersetzen S 6 2 Nicht in Ordnung Den Steuerkabelbaum reparieren bzw ersetzen Nicht in Ordnung Die Wechselrichter Einheit überprüfen S 6 3 und 6 4 Die Kabelbaum Verbindung zur Wechselrichter Einheit und der GCU auf offenen Stromkreis Kurzschluss und korrekten Anschluss überprüfen Den Zündschalter auf OFF drehen dann den Motor wieder anlassen und den Fehlercode überprüfen Wenn der gleiche Fehle...

Page 154: ...üfen Den Zündschalter auf OFF drehen dann den Motor wieder anlassen und den Fehlercode überprüfen Wenn der gleiche Fehler erneut auftritt die Wechselrichter Einheit ersetzen S 6 6 In Ordnung In Ordnung Kabelbaum Prüfpunkte Die Wechselrichter Einheit ersetzen S 6 2 Nicht in Ordnung Die Lichtmaschine überprüfen S 11 7 In Ordnung R Bu W R Bu W WECHSELRICHTER EINHEIT WECHSELRICHTER EINHEIT LICHTMASCHI...

Page 155: ...richter Einheit ersetzen S 6 6 In Ordnung In Ordnung Kabelbaum Prüfpunkte Die Wechselrichter Einheit ersetzen S 6 2 Nicht in Ordnung Die Lichtmaschine überprüfen S 11 7 In Ordnung In Ordnung Den AC Stromverbraucher abklemmen und den Motor abstellen Den Motor wieder anlassen und den Fehlercode überprüfen Den Hauptkabelbaum reparieren bzw ersetzen Keine Anzeige Den Hauptkabelbaum im Steuergehäuse au...

Page 156: ...Den Motor wieder anlassen und den Fehlercode überprüfen Falls der gleiche Fehlercode erneut angezeigt wird die Wechselrichter Einheit ersetzen und die Überprüfung noch einmal durchführen S 6 2 Interner Defekt der Wechselrichter Einheit Den Zündschalter auf OFF stellen dann den Motor wieder anlassen und den Fehlercode überprüfen Falls der gleiche Fehlercode erneut angezeigt wird die Wechselrichter ...

Page 157: ...er anlassen und den Fehlercode überprüfen Wenn der gleiche Fehler erneut auftritt die GCU ersetzen S 6 6 In Ordnung In Ordnung Kabelbaum Prüfpunkte Die Wechselrichter Einheit ersetzen S 6 2 Nicht in Ordnung Die Lichtmaschine überprüfen S 11 7 In Ordnung In Ordnung Den Hauptkabelbaum reparieren bzw ersetzen Den Hauptkabelbaum im Steuergehäuse auf offenen Stromkreis Kurzschluss und korrekten Anschlu...

Page 158: ...hlercodes beziehen S 2 11 Wird angezeigt In Ordnung Die Zündkerze ausbauen und die Elektrode auf Feuchtigkeit oder Verölung überprüfen Die Zündkerzenelektrode trocknen dann den Motor wieder anlassen Bei starker Überflutung das Schwimmernadel ventil des Vergasers überprüfen S 4 7 Feucht Die Vergaser Einlassöffnung den Düsenträger und die Düse auf Blockierung überprüfen Trocken Kraftstoff gelangt zu...

Page 159: ... automatischen Chokes in der geschlossenen Position befindet wenn der Zündschalter auf ON steht Das Choke Ventil ist am Anfang geschlossen wird aber dann automatisch geöffnet abhängig von der Zylinderkopf Temperatur sobald der Zündschalter auf ON gestellt wird Auf S 2 29 fortgesetzt In Ordnung CHOKE WELLE Die Kabelbaum Verbindung zum Choke Steuermotor und der GCU auf offenen Stromkreis Kurzschluss...

Page 160: ...rprüfen S 3 6 Die Verbrennungskammer auf übermäßige Ölkohleablagerungen überprüfen S 13 1 Die Zylinderkompressionsprüfung durchführen S 2 30 Den Drosselklappen Steuermotor überprüfen S 4 10 Den Drosselklappen Steuermotor ersetzen S 4 6 Kompressionsdruck ist zu niedrig Überprüfen ob bei auf OFF stehendem Zündschalter das Drosselklappenventil ganz geöffnet ist Der Drosselklappenarm muss am Anschlag ...

Page 161: ...ze ausbauen S 3 5 3 Ein Kompressionsprüfgerät in die Zündkerzenöffnung einsetzen 4 Den Rücklaufanlasser mehrere Male kräftig durchziehen und dabei die Kompressionswerte feststellen KOMPRESSIONSPRÜFGERÄT im Fachhandel erhältlich Zylinderkompressionsdruck 0 59 0 83 MPa 6 0 8 5 kgf cm2 bei 600 U min cap 02 EU65is 6500is Ge qxd 07 12 17 4 28 PM ページ2 30 ...

Page 162: ...Vergaser gelangt Überprüfen ob beim Abstellen des Motors die Überlastungsanzeige aufleuchtet Auf S 2 32 fortgesetzt AUS Die Kabelbaum Verbindung zur Wechselrichter Einheit und der AC Steckdose auf offenen Stromkreis Kurzschluss und korrekten Anschluss überprüfen Die Kabelbaum Verbindung zur Wechselrichter Einheit und der Lichtmaschine auf offenen Stromkreis Kurzschluss und korrekten Anschluss über...

Page 163: ... Zündschalter auf ON steht Das Choke Ventil ist am Anfang geschlossen wird aber dann automatisch geöffnet abhängig von der Zylinderkopf Temperatur sobald der Zündschalter auf ON gestellt wird Auf S 2 33 fortgesetzt In Ordnung Die Kabelbaum Verbindung zum Choke Steuermotor und der GCU auf offenen Stromkreis Kurzschluss und korrekten Anschluss überprüfen Die Vergaser Einlassöffnung den Düsenträger u...

Page 164: ...rprüfen S 4 10 Den Drosselklappen Steuermotor ersetzen S 4 6 Kompressionsdruck ist zu niedrig Überprüfen ob bei auf OFF stehendem Zündschalter das Drosselklappenventil ganz geöffnet ist Der Drosselklappenarm muss am Anschlag anliegen Nicht ganz geöffnet Die Kabelbaum Verbindung zum Drosselklappen Steuermotor und der Wechselrichter Einheit auf offenen Stromkreis Kurzschluss und korrekten Anschluss ...

Page 165: ...luss und korrekten Anschluss überprüfen Den Zündschalter auf OFF drehen dann den Motor wieder anlassen und die Überprüfung noch einmal durchführen Wenn der Motor nicht stehen bleibt die GCU ersetzen S 6 6 In Ordnung In Ordnung Kabelbaum Prüfpunkte Den Zündschalter ersetzen S 6 6 Es vergehen mehr als 10 Sekunden bis zum Abstellen Überprüfen ob sich der Motor abstellen lässt wenn der Zündschalter au...

Page 166: ...Die Zündspule überprüfen S 12 7 In Ordnung In Ordnung Den Luftspalt des Zündimpulsgeber einstellen S 11 4 Inkorrekter Luftspalt Den Luftspalt des Zündimpulsgebers überprüfen S 11 4 Korrekter Luftspalt Auf S 2 36 fortgesetzt Die Zündkerze ersetzen S 3 5 Wird angezeigt Überprüfen ob die Ölwarnanzeige eingeschaltet ist und OIL am i Monitor angezeigt wird Wird nicht angezeigt GENERATORKABELBAUM MOTORK...

Page 167: ...setzen S 11 3 Nicht in Ordnung Den Zündschalter ersetzen S 6 6 Nicht in Ordnung Die Kabelbaum Verbindung zum Zündimpulsgeber und der GCU auf offenen Stromkreis Kurzschluss und korrekten Anschluss überprüfen In Ordnung Von S 2 35 fortgesetzt GND5 C21 C22 Y Bu Y Bu Bu Bl G G GCU GCU Bl G Bl Bl G Bl C44 C43 Kabelbaum Prüfpunkte ZÜNDSPULE MOTORKABELBAUM STEUERKABELBAUM Ansicht von der Klemmenseite Bl ...

Page 168: ...ng Die Kabelbaum Verbindung zum Zündschalter und der GCU auf Kurzschluss überprüfen In Ordnung Von S 2 36 fortgesetzt Kabelbaum Prüfpunkte ZÜNDSCHALTER STEUERKABELBAUM Ansicht von der Klemmenseite Bl SCHWARZ W WEISS Den Zündschalter auf OFF drehen dann den Motor wieder anlassen und die Überprüfung noch einmal durchführen Nötigenfalls muss die GCU ersetzt werden S 6 6 W Bl GCU GCU Bu W R Bu W R Kab...

Page 169: ...e Zündkerze auf überspringende Funken zu überprüfen Kraftstoff ist hochbrennbar und explosiv Kraftstoff kann sich entzünden und schwere Verbrennungen verursachen Vor dieser Überprüfung sich vergewissern dass sich kein verschütteter Kraftstoff in der Nähe befindet Die Zündkerze nicht unmittelbar an der Zündkerzenöffnung positionieren Nicht verbranntes Kraftstoffgemisch im Zylinder kann sich entzünd...

Page 170: ...ten Anschluss überprüfen In Ordnung In Ordnung Auf S 2 40 fortgesetzt In Ordnung Die Sicherung ersetzen S 6 5 Nicht in Ordnung Die Batterie überprüfen S 5 1 In Ordnung Den Zündschalter ersetzen S 6 6 bis 6 10 Nicht in Ordnung Den Anlassermagnetschalter ersetzen S 12 3 Nicht in Ordnung Den Zündschalter überprüfen S 6 11 In Ordnung W Y Bl Y Bl Y Bl Y Bl W Y GCU SICHERUNG 1 A SICHERUNG 15 A O G Kabel...

Page 171: ...GCU auf offenen Stromkreis Kurzschluss und korrekten Anschluss überprüfen Von S 2 39 fortgesetzt Den Zündschalter auf OFF drehen dann den Motor wieder anlassen und die Überprüfung noch einmal durchführen Nötigenfalls muss die GCU ersetzt werden S 6 6 GND5 C41 Bl W Bl W G G GCU Bl Kabelbaum Prüfpunkte ANLASSER MAGNETSCHALTER MOTOR KABELBAUM STEUERKABELBAUM Ansicht von der Klemmenseite Bl SCHWARZ G ...

Page 172: ...s Fernbedienungsgehäuse überprüfen S 15 3 Den Fernbedienungskabelbaum auf offenen Stromkreis Kurzschluss und korrekten Anschluss überprüfen Anlasser dreht nicht Anlasser dreht In Ordnung In Ordnung Die Störungsbeseitigung im Abschnitt Anlasser dreht nicht durchführen S 2 39 Motor lässt sich nicht mit dem Start Schalter der Fernbedienung anlassen Auf S 2 42 fortgesetzt Nicht in Ordnung Nicht in Ord...

Page 173: ... der Motor nicht anspringt muss die GCU ersetzt werden S 6 6 Kabelbaum Prüfpunkte Ansicht von der Klemmenseite GCU GCU STEUERKABELBAUM Kabelbaum Prüfpunkte Ansicht von der Klemmenseite STEUERKABELBAUM FERNBEDIENUNGS KABELBAUM Von S 2 41 fortgesetzt Den Steuerkabelbaum reparieren bzw ersetzen In Ordnung Den Zündschalter ersetzen S 6 6 Den Zündschalter überprüfen S 6 11 In Ordnung ZÜNDSCHALTER GCU N...

Page 174: ... oder ersetzen Das Fernbedienungsgehäuse überprüfen S 15 3 Den Fernbedienungskabelbaum auf offenen Stromkreis Kurzschluss und korrekten Anschluss überprüfen In Ordnung In Ordnung Die Kabelbaum Verbindung zum Fernbedienungskabelbaum und der GCU auf offenen Stromkreis Kurzschluss und korrekten Anschluss überprüfen Kabelbaum Prüfpunkte Ansicht von der Klemmenseite FERNBEDIENUNGS KABELBAUM Den Steuerk...

Page 175: ...ndschalter auf OFF drehen dann den Motor wieder anlassen und die Überprüfung noch einmal durchführen Wenn die LED nicht aktiviert wird die GCU ersetzen S 6 6 Kabelbaum Prüfpunkte Ansicht von der Klemmenseite STEUERKABELBAUM GCU GCU FERNBEDIENUNGS KABELBAUM Den Zündschalter auf OFF drehen dann den Motor wieder anlassen und die Überprüfung noch einmal durchführen Wenn die LED nicht aktiviert wird di...

Page 176: ...en Stromkreis Kurzschluss und korrekten Anschluss überprüfen Kabelbaum Prüfpunkte Ansicht von der Klemmenseite LICHTMASCHINE NEBENWICKLUNG LICHTMASCHINE HAUPTWICKLUNG GENERATORKABELBAUM WECHSELRICHTER EINHEIT MARKIERUNGEN MIT ROTEM KLEBEBAND Bu BLAU W WEISS R ROT Auf S 2 46 fortgesetzt In Ordnung In Ordnung Wird angezeigt Wird nicht angezeigt Leuchtet auf In Ordnung Leuchtet nicht auf WECHSELRICHT...

Page 177: ...e an einer Wand o Ä aufgestellt wurde Den Zündschalter auf OFF drehen dann den Motor wieder anlassen und die Überprüfung noch einmal durchführen Nötigenfalls muss die Wechselrichter Einheit ersetzt werden S 6 2 Den Drosselklappen Steuermotor überprüfen S 4 10 Den Drosselklappen Steuermotor ersetzen S 4 6 Den Motorkabelbaum reparieren oder ersetzen DROSSEL KLAPPENARM ANSCHLAG In Ordnung Auf S 2 47 ...

Page 178: ...anz geschlossen wird aber dann automatisch geöffnet abhängig von der Zylinderkopf Temperatur sobald der Zündschalter auf ON gestellt wird CHOKE WELLE Die Kabelbaum Verbindung zum Choke Steuermotor und der GCU auf offenen Stromkreis Kurzschluss und korrekten Anschluss überprüfen Kabelbaum Prüfpunkte STEUERKABELBAUM MOTORKABELBAUM CHOKE STEUERMOTOR GCU Ansicht von der Klemmenseite Den Choke Steuermo...

Page 179: ...lbaum Prüfpunkte GCU GCU Den Zündschalter auf OFF drehen dann den Motor wieder anlassen und den Fehlercode überprüfen Wenn der gleiche Fehler erneut auftritt die GCU ersetzen S 6 6 Den Motorkabelbaum und oder den Steuerkabelbaum reparieren bzw ersetzen Den Motortemperatur Sensor ersetzen S 13 1 In Ordnung In Ordnung Von S 2 47 fortgesetzt C45 C46 Bl SCHWARZ Y GELB R ROT Nicht in Ordnung Nicht in O...

Page 180: ... oder den Steuerkabelbaum reparieren bzw ersetzen Die Kabelbaum Verbindung zum Choke Steuermotor und der GCU auf offenen Stromkreis Kurzschluss und korrekten Anschluss überprüfen Kabelbaum Prüfpunkte Ansicht von der Klemmenseite Den Choke Steuermotor überprüfen S 4 10 Wird nicht angezeigt Geschlossen In Ordnung In Ordnung Auf S 2 50 fortgesetzt STEUERKABELBAUM MOTORKABELBAUM CHOKE STEUERMOTOR GCU ...

Page 181: ... OFF drehen dann den Motor wieder anlassen und den Fehlercode überprüfen Wenn der gleiche Fehler erneut auftritt die GCU ersetzen S 6 6 Den Motorkabelbaum und oder den Steuerkabelbaum reparieren bzw ersetzen Den Motortemperatur Sensor ersetzen S 13 1 Den Motortemperatur Sensor überprüfen S 13 5 Von S 2 49 fortgesetzt In Ordnung In Ordnung C45 C46 Bl SCHWARZ Y GELB R ROT Nicht in Ordnung Nicht in O...

Page 182: ...egundos para volver a cambiar el visualizador al modo de visualización normal MODO DE REGISTRO DE ERRORES DETALLADOS Cuando se presiona el botón del visualizador durante más de 3 segundos en un código de error el visualización se establece en el modo de registro de errores detallados y muestra el tiempo de funcionamiento del motor la salida del generador la velocidad del motor la temperatura del i...

Page 183: ...incipal A 15 8 A Amperaje de salida del inversor secundario A 16 0 A Velocidad del motor rpm 2 900 rpm Temperatura del FET transistor de efecto de campo del inversor principal C 60 C Temperatura del FET transistor de efecto de campo del inversor secundario C 40 C Temperatura del SCR rectificador controlado por silicio del inversor principal C 45 C Temperatura del SCR rectificador controlado por si...

Page 184: ...2 26 E 18 o E 28 PARPADEA APAGADO E 19 o E 29 PARPADEA APAGADO E 1A o E 2A PARPADEA APAGADO E 1b o E 2b PARPADEA APAGADO E 1C o E 2C PARPADEA APAGADO Se para el motor 2 25 E 1d o E 2d PARPADEA APAGADO El motor de arranque se para cuando se gira el interruptor de encendido a la posición START El motor de arranque se para cuando se gira el interruptor de encendido a la posición START Después de habe...

Page 185: ...rruptor de encendido P 6 6 a 10 Anormal Reemplace o repare el mazo de cables del motor y o el mazo de cables de control Anormal Compruebe el interruptor de encendido P 6 11 Compruebe el mazo de cables que conecta el interruptor de encendido y la GCU para ver si hay circuito abierto o cortocircuito y el estado adecuado de su conexión Normal Gire el interruptor de encendido a la posición OFF y vuelv...

Page 186: ...estado adecuado de su conexión Bien Compruebe el interruptor de encendido P 6 11 Anormal Reemplace el interruptor de encendido P 6 6 a 10 Normal Gire el interruptor de encendido a la posición OFF y vuelva a arrancar el motor y compruebe el código de error Si ocurre el mismo error reemplace la GCU P 6 6 Normal Normal Br W Br W Bl Y MAZO DE CABLES DEL MOTOR MAZO DE CABLES DE CONTROL Visto desde el l...

Page 187: ...uito abierto o cortocircuito y el estado adecuado de su conexión Correcto Gire el interruptor de encendido a la posición OFF y vuelva a arrancar el motor y compruebe el código de error Si ocurre el mismo error reemplace la GCU P 6 6 Normal Normal MAZO DE CABLES DEL MOTOR MAZO DE CABLES DE CONTROL Visto desde el lado de los terminales Puntos de comprobación del mazo de cables GCU Bl NEGRO Y AMARILL...

Page 188: ...xión Bien Compruebe el generador de pulsos de encendido P 11 4 Anormal Reemplace el generador de pulsos de encendido P 11 3 Normal A la P 2 16 Normal Normal GND5 C21 C22 GENERADOR DE PULSOS DE ENCENDIDO Y Bu Y Bu Bu Bl MAZO DE CABLES DEL MOTOR MAZO DE CABLES DE CONTROL G G GCU Visto desde el lado de los terminales Puntos de comprobación del mazo de cables Y AMARILLO Bu AZUL G VERDE GENERADOR DE PU...

Page 189: ...nque y la GCU para ver si hay circuito abierto o cortocircuito y el estado adecuado de su conexión Normal Viene de la P 2 15 Gire el interruptor de encendido a la posición OFF y vuelva a arrancar el motor y compruebe el código de error Si ocurre el mismo error reemplace la GCU P 6 6 Normal Normal Puntos de comprobación del mazo de cables GND5 C41 Bl W Bl W G G GCU GCU Bl SOLENOIDE DEL MOTOR DE ARR...

Page 190: ... compruebe el código de error Si ocurre el mismo error reemplace la GCU P 6 6 Normal Normal Reemplace o repare la caja de control remoto P 15 1 y 2 Anormal Compruebe la caja de control remoto P 15 3 Reemplace o repare el mazo de cables de control remoto Anormal Compruebe el mazo de cables de control remoto para ver si hay circuito abierto o cortocircuito y el estado adecuado de su conexión Normal ...

Page 191: ...U para ver si hay circuito abierto o cortocircuito y el estado adecuado de su conexión Bien Gire el interruptor de encendido a la posición OFF y vuelva a arrancar el motor y compruebe el código de error Si ocurre el mismo error reemplace la GCU P 6 6 Normal Normal W Y Bl Y Bl Y Bl Y Bl W Y GCU FUSIBLE DE 1 A FUSIBLE DE 15 A G O Puntos de comprobación del mazo de cables INTERRUPTOR DE ENCENDIDO MAZ...

Page 192: ...cables que conecta el sensor de la temperatura del motor y la GCU para ver si hay circuito abierto o cortocircuito y el estado adecuado de su conexión Gire el interruptor de encendido a la posición OFF y vuelva a arrancar el motor y compruebe el código de error Si ocurre el mismo error reemplace la GCU P 6 6 Normal Normal Puntos de comprobación del mazo de cables Y R Y R C46 C45 Y Bl Y Bl GCU GCU ...

Page 193: ...spués de haber reemplazado la unidad del inversor gire el interruptor de encendido a la posición OFF y luego vuelva a arrancar el motor y compruebe el código de error Si ocurre el mismo error reemplace la GCU P 6 6 Normal Normal Bu Y R W Puntos de comprobación del mazo de cables MOTOR DE CONTROL DEL ACELERADOR UNIDAD DEL INVERSOR MAZO DE CABLES DEL MOTOR Visto desde el lado de los terminales Y AMA...

Page 194: ...la caja de control para ver si hay circuito abierto o cortocircuito y el estado adecuado de su conexión Compruebe el mazo de cables que conecta el alternador y la GCU para ver si hay circuito abierto o cortocircuito y el estado adecuado de su conexión Normal Compruebe la unidad del inversor P 6 3 y 4 Anormal Reemplace la unidad del inversor P 6 2 Normal Gire el interruptor de encendido a la posici...

Page 195: ...inversor P 6 2 Anormal Reemplace o repare el mazo de cables de control Anormal Compruebe la unidad del inversor P 6 3 y 4 Compruebe el mazo de cables que conecta la unidad del inversor y la GCU para ver si hay circuito abierto o cortocircuito y el estado adecuado de su conexión Gire el interruptor de encendido a la posición OFF y vuelva a arrancar el motor y compruebe el código de error Si ocurre ...

Page 196: ...ión Gire el interruptor de encendido a la posición OFF y vuelva a arrancar el motor y compruebe el código de error Si ocurre el mismo error reemplace la unidad del inversor P 6 6 Normal Normal Puntos de comprobación del mazo de cables Reemplace la unidad del inversor P 6 2 Anormal Compruebe el alternador P 11 7 Normal R Bu W R Bu W UNIDAD DEL INVERSOR UNIDAD DEL INVERSOR ALTERNADOR PRINCIPAL ALTER...

Page 197: ...inversor P 6 6 Normal Normal Puntos de comprobación del mazo de cables Reemplace la unidad del inversor P 6 2 Anormal Compruebe el alternador P 11 7 Normal Normal Desconecte el aparato de CA y pare el motor Vuelva a poner en marcha el motor y compruebe el código de error Reemplace o repare el mazo de cables principal No se visualiza Compruebe el mazo de cables principal de la caja de control para ...

Page 198: ...encendido a la posición OFF 4 Vuelva a poner en marcha el motor y compruebe el código de error Si ocurre el mismo código de error reemplace la unidad del inversor y vuelva a efectuar la prueba P 6 2 Falla interna de la unidad del inversor Gire el interruptor de encendido a la posición OFF y vuelva a arrancar el motor y compruebe el código de error Si ocurre el mismo error reemplace la unidad del i...

Page 199: ...n OFF y vuelva a arrancar el motor y compruebe el código de error Si ocurre el mismo error reemplace la GCU P 6 6 Normal Normal Puntos de comprobación del mazo de cables Reemplace la unidad del inversor P 6 2 Anormal Compruebe el alternador P 11 7 Normal Normal Reemplace o repare el mazo de cables principal Compruebe el mazo de cables principal de la caja de control para ver si hay circuito abiert...

Page 200: ...e visualiza algún código de error en el i Monitor Consulte el apartado Falla según el código de error P 2 11 Se visualiza Normal Extraiga la bujía y compruebe si los electrodos están húmedos o sucios Limpie los electrodos y vuelva a arrancar Si está muy anegado compruebe la válvula del flotador del carburador P 4 7 Húmedo Compruebe si hay restricciones en el orificio del carburador en la boquilla ...

Page 201: ...la posición ON La válvula del estrangulador se cerrará inicialmente y luego se ajustará automáticamente de acuerdo con la temperatura de la culata de cilindros cuando se gire el interruptor de encendido a la posición ON A la P 2 29 Bien EJE DEL ESTRANGULADOR Compruebe el mazo de cables que conecta el motor de control del estrangulador y la GCU para ver si hay circuito abierto o cortocircuito y el ...

Page 202: ...Efectúe la comprobación de la compresión del cilindro P 2 30 Compruebe el motor de control del acelerador P 4 10 Reemplace el motor de control del acelerador P 4 6 La compresión del cilindro es baja Con el interruptor de encendido en la posición OFF compruebe si la válvula de la mariposa de gases está completamente abierta La válvula de la mariposa de gases debe estar en contacto con el tope No es...

Page 203: ...ía y la misma bujía P 3 5 3 Instale un medidor de compresión en el orificio de la bujía 4 Tire con fuerza varias veces del arrancador de retroceso y mida la compresión del cilindro MEDIDOR DE COMPRESIÓN De venta en los establecimientos del ramo Compresión del cilindro 0 59 0 83 MPa 6 0 8 5 kgf cm2 a 600 rpm cap 02 EU65is 6500is Sp qxd 07 12 17 4 30 PM ページ2 30 ...

Page 204: ...ncendido cuando se para el motor A la P 2 32 Apagado Compruebe el mazo de cables que conecta la unidad del inversor y el receptáculo de CA para ver si hay circuito abierto o cortocircuito y el estado adecuado de su conexión Compruebe el mazo de cables que conecta la unidad del inversor y el alternador para ver si hay circuito abierto o cortocircuito y el estado adecuado de su conexión Visto desde ...

Page 205: ...almente y luego se ajustará automáticamente de acuerdo con la temperatura de la culata de cilindros cuando se gire el interruptor de encendido a la posición ON A la P 2 33 Bien Compruebe el mazo de cables que conecta el motor de control del estrangulador y la GCU para ver si hay circuito abierto o cortocircuito y el estado adecuado de su conexión Compruebe si hay restricciones en el orificio del c...

Page 206: ...ón del cilindro es baja Con el interruptor de encendido en la posición OFF compruebe si la válvula de la mariposa de gases está completamente abierta La válvula de la mariposa de gases debe estar en contacto con el tope No está completamente abierta Compruebe el mazo de cables que conecta el motor de control del acelerador y la unidad del inversor para ver si hay circuito abierto o cortocircuito y...

Page 207: ...rra defectuosa y el estado adecuado de su conexión Gire el interruptor de encendido a la posición OFF y vuelva a arrancar el motor y efectúe de nuevo la comprobación Si no se para el motor reemplace la GCU P 6 6 Normal Normal Puntos de comprobación del mazo de cables Reemplace el interruptor de encendido P 6 6 Tarda 10 o más segundos en pararse Compruebe si puede pararse el motor girando el interr...

Page 208: ...ntrehierros del generador de pulsos de encendido P 11 4 Incorrecto Compruebe el entrehierros del generador de pulsos de encendido P 11 4 Correcto A la P 2 36 Reemplace la bujía P 3 5 Se visualiza Compruebe si el indicador de alerta de aceite está encendido y si se visualiza OIL en el i Monitor No se visualiza MAZO DE CABLES DEL GENERADOR MAZO DE CABLES DEL MOTOR ALTERNADOR Secundario MAZO DE CABLE...

Page 209: ... 6 Anormal Compruebe el mazo de cables que conecta el generador de pulsos de encendido y la GCU para ver si hay circuito abierto o cortocircuito y el estado adecuado de su conexión Normal Viene de la P 2 35 GND5 C21 C22 Y Bu Y Bu Bu Bl G G GCU GCU Bl G Bl Bl G Bl C44 C43 Puntos de comprobación del mazo de cables BOBINA DE ENCENDIDO MAZO DE CABLES DEL MOTOR MAZO DE CABLES DE CONTROL Visto desde el ...

Page 210: ...e encendido y la GCU para ver si hay cortocircuito Normal Viene de la P 2 36 Puntos de comprobación del mazo de cables INTERRUPTOR DE ENCENDIDO MAZO DE CABLES DE CONTROL Visto desde el lado de los terminales Bl NEGRO W BLANCO Gire el interruptor de encendido a la posición OFF y vuelva a arrancar el motor y efectúe de nuevo la comprobación Reemplace la GCU si es necesario P 6 6 W Bl GCU GCU Bu W R ...

Page 211: ...erta de la culata de cilindros y tire del arrancador de retroceso para comprobar si saltan chispas por los electrodos La gasolina es muy inflamable y explosiva Si se enciende la gasolina puede causarle quemaduras graves Asegúrese de que no haya combustible derramado cerca del motor Aparte la bujía del orificio de la bujía Los gases no quemados podrían encenderse si se dejaran en el cilindro Afloje...

Page 212: ...bierto o cortocircuito y el estado adecuado de su conexión Normal Normal A la P 2 40 Normal Reemplace el fusible P 6 5 Anormal Compruebe la batería P 5 1 Bien Reemplace el interruptor de encendido P 6 6 a 10 Anormal Reemplace el solenoide del arrancador P 12 3 Anormal Compruebe el interruptor de encendido P 6 11 Normal W Y Bl Y Bl Y Bl Y Bl W Y GCU FUSIBLE DE 1 A FUSIBLE DE 15 A O G Puntos de comp...

Page 213: ...ierto o cortocircuito y el estado adecuado de su conexión Viene de la P 2 39 Gire el interruptor de encendido a la posición OFF y vuelva a arrancar el motor y efectúe de nuevo la comprobación Reemplace la GCU si es necesario P 6 6 GND5 C41 Bl W Bl W G G GCU Bl Puntos de comprobación del mazo de cables SOLENOIDE DEL MOTOR DE ARRANQUE MAZO DE CABLES DEL MOTOR MAZO DE CABLES DE CONTROL Visto desde el...

Page 214: ...3 Compruebe el mazo de cables de control remoto para ver si hay circuito abierto o cortocircuito y el estado adecuado de su conexión No funciona Funciona Normal Normal Efectúe la localización y reparación de averías del apartado El motor de arranque no vira P 2 39 El motor no arranca con el interruptor de arranque de la caja de control remoto Vaya a la P 2 42 Anormal Anormal MOTOR DE ARRANQUE MAZO...

Page 215: ...no se pone en marcha el motor reemplace la GCU P 6 6 Puntos de comprobación del mazo de cables Visto desde el lado de los terminales GCU GCU MAZO DE CABLES DE CONTROL Puntos de comprobación del mazo de cables Visto desde el lado de los terminales MAZO DE CABLES DE CONTROL MAZO DE CABLES DE CONTROL REMOTO Viene de la P 2 41 Repare o reemplace el mazo de cables de control Normal Reemplace el interru...

Page 216: ...ntrol remoto P 15 3 Compruebe el mazo de cables de control remoto para ver si hay circuito abierto o cortocircuito y el estado adecuado de su conexión Normal Normal Compruebe el mazo de cables que conecta el mazo de cables de control remoto y la GCU para ver si hay circuito abierto o cortocircuito y el estado adecuado de su conexión Puntos de comprobación del mazo de cables Visto desde el lado de ...

Page 217: ...ptor de encendido a la posición OFF y arranque entonces el motor y efectúe de nuevo la comprobación Si no se enciende el LED reemplace la GCU P 6 6 Puntos de comprobación del mazo de cables Visto desde el lado de los terminales MAZO DE CABLES DE CONTROL GCU GCU Anormal MAZO DE CABLES DE CONTROL REMOTO Gire el interruptor de encendido a la posición OFF y arranque entonces el motor y efectúe de nuev...

Page 218: ...nador y la unidad del inversor para ver si hay circuito abierto o cortocircuito y el estado adecuado de su conexión Puntos de comprobación del mazo de cables Visto desde el lado de los terminales ALTERNADOR SECUNDARIO ALTERNADOR PRINCIPAL MAZO DE CABLES DEL GENERADOR UNIDAD DEL INVERSOR MARCAS DE CINTA ROJA Bu AZUL W BLANCO R ROJO Vaya a la P 2 46 Normal Normal Se visualiza No se visualiza Encendi...

Page 219: ... si es necesario Gire el interruptor de encendido a la posición OFF y vuelva a arrancar el motor y efectúe de nuevo la comprobación Reemplace la unidad del inversor si es necesario P 6 2 Compruebe el motor de control del acelerador P 4 10 Reemplace el motor de control del acelerador P 4 6 Reemplace o repare el mazo de cables del motor BRAZO DEL ACELERADOR TOPE Normal Vaya a la P 2 47 Baja velocida...

Page 220: ... de acuerdo con la temperatura de la culata de cilindros cuando se gire el interruptor de encendido a la posición ON EJE DEL ESTRANGULADOR Compruebe el mazo de cables que conecta el motor de control del estrangulador y la GCU para ver si hay circuito abierto o cortocircuito y el estado adecuado de su conexión Puntos de comprobación del mazo de cables MAZO DE CABLES DE CONTROL MAZO DE CABLES DEL MO...

Page 221: ...esde el lado de los terminales Puntos de comprobación del mazo de cables GCU GCU Gire el interruptor de encendido a la posición OFF y vuelva a arrancar el motor y compruebe el código de error Si ocurre el mismo error reemplace la GCU P 6 6 Reemplace o repare el mazo de cables del motor y o el mazo de cables de control Reemplace el sensor de la temperatura del motor P 13 1 Anormal Normal Normal Ano...

Page 222: ...ntrol Compruebe el mazo de cables que conecta el motor de control del estrangulador y la GCU para ver si hay circuito abierto o cortocircuito y el estado adecuado de su conexión Puntos de comprobación del mazo de cables Visto desde el lado de los terminales Compruebe el motor de control del estrangulador P 4 10 Anormal Anormal No se visualiza Cerrado Normal Normal Vaya a la P 2 50 MAZO DE CABLES D...

Page 223: ...el mazo de cables GCU GCU Gire el interruptor de encendido a la posición OFF y vuelva a arrancar el motor y compruebe el código de error Si ocurre el mismo error reemplace la GCU P 6 6 Reemplace o repare el mazo de cables del motor y o el mazo de cables de control Reemplace el sensor de la temperatura del motor P 13 1 Compruebe el sensor de la temperatura del motor P 13 5 Viene de la P 2 49 Anorma...

Page 224: ...WIRE HARNESS BAND 4 5 GND3 G C and L types Y G U R and SK types 6 GND9 Y G C type only CONNECTORS Terminal Arrangement Viewed from terminal side 2 Terminal 3 Wire color number 1 W R W 2 Y R Y 4 O W 5 O Y 6 W R W 9 O Bu 10 O G 2 Terminal 3 Wire color number 1 W 2 R 3 Bu 2 Terminal 3 Wire color number 1 W 2 R 3 Bu 4 SK type only 1 C L and SK types only 2 Terminal 3 Wire color number 2 R Y 4 O W 5 O ...

Page 225: ...ORKABELBAUM 9 STEUERKABELBAUM 10 GENERATORKABELBAUM MARKIERUNG MIT ROTEM KLEBEBAND 11 Siehe S 2 52 bis 58 12 T41 Bl MINUSKLEMME DER BATTERIE 13 T42 Bl PLUSKLEMME DER BATTERIE 14 SICHERUNGSKASTEN STECKER Klemmenanordung Ansicht von der Klemmenseite 1 nur für Typen C L und SK 2 Klemmen Nummer 3 Kabelfarbe 4 nur für Typ SK 5 nur für Typen U und R 10 INSTALACIÓN DE CABLES MAZOS DE CABLES 1 BANDA DEL M...

Page 226: ...E 30A 125 250V 16 RECEPTACLE 20A 125V 6 RECEPTACLE 30A 125V GND1 14 See P 2 60 15 See P 2 51 5 MAIN WIRE HARNESS 8 CONTROL WIRE HARNESS 1 Terminal 2 Wire color number GND1 G GND2 G GND9 W C11 W C12 Y C31 Bu C32 R C33 Bu C35 R C36 Bu C37 R C38 Bu C51 Bu 1 Terminal 2 Wire color number C52 R C53 Bu T31 W T32 W T33 Bu T34 W T35 R T36 G T37 G T38 G T51 Bu T52 R T53 Bu 3 Wire harness side 4 Ignition swi...

Page 227: ...9 ZÜNDSCHALTER 10 SICHERUNGSKASTEN 11 SPANNUNGSWÄHLSCHALTER 12 ECO DROSSELKLAPPENSCHALTER 13 UNTERBRECHER 25 A 14 Siehe S 2 60 15 Siehe S 2 51 16 STECKDOSE 20 A 125 V STECKER Klemmenanordnung Ansicht von der Klemmenseite 1 Klemmen Nummer 2 Kabelfarbe 3 Kabelbaum Seite 4 Zündschalter Seite Sólo el tipo C 1 RECEPTÁCULO 30 A 125 250 V 2 PROTECTOR DEL CIRCUITO 20 A 3 BANDA DEL MAZO DE CABLES 7 4 PROTE...

Page 228: ...OL UNIT 11 VOLTAGE SELECTOR SWITCH 10 FUSE BOX 12 ECO THROTTLE SWITCH 13 CIRCUIT BREAKER 25A 1 RECEPTACLE 30A 125 250V 6 RECEPTACLE 30A 125V GND1 14 See P 2 60 5 MAIN WIRE HARNESS 8 CONTROL WIRE HARNESS 1 Terminal 2 Wire color number 1 G Bu 3 W G 4 Br Bu 6 W Bu 16 RECEPTACLE 20A 125V 15 See P 2 51 1 Terminal 2 Wire color number 1 Bu 2 W 3 Gr 4 Gr 5 Bu 6 Bu 1 Terminal 2 Wire color number 1 R 2 R 4 ...

Page 229: ...NHEIT 8 STEUERKABELBAUM 9 ZÜNDSCHALTER 10 SICHERUNGSKASTEN 11 SPANNUNGSWÄHLSCHALTER 12 ECO DROSSELKLAPPENSCHALTER 13 UNTERBRECHER 25 A 14 Siehe S 2 60 15 Siehe S 2 51 16 STECKDOSE 20 A 125 V STECKER Klemmenanordnung Ansicht von der Klemmenseite 1 Klemmen Nummer 2 Kabelfarbe Sólo el tipo C 1 RECEPTÁCULO 30 A 125 250 V 2 PROTECTOR DEL CIRCUITO 20 A 3 BANDA DEL MAZO DE CABLES 7 4 PROTECTOR DEL CIRCUI...

Page 230: ...AIN WIRE HARNESS 7 CONTROL WIRE HARNESS 13 See P 2 51 CONNECTORS Terminal Arrangement Viewed from terminal side 1 Terminal 2 Wire color number GND1 G GND2 G C11 W C12 Y T31 W T32 Bu T33 R T34 Bu T35 W T36 Bu T37 W T38 R 3 Wire harness side 4 Ignition switch side 1 Terminal 2 Wire color number 1 Br W 2 W Y 3 Br Y 4 W Bl 5 Bl Y 7 G O 8 G 1 Terminal 2 Wire color number 1 Bu R 2 G 3 Br W 4 Bu Y 1 Term...

Page 231: ...ELBAUM 8 ZÜNDSCHALTER 9 SICHERUNGSKASTEN 10 SPANNUNGSWÄHLSCHALTER 11 ECO DROSSELKLAPPENSCHALTER 12 Siehe S 2 60 13 Siehe S 2 51 14 STECKDOSE 30 A 125 250 V STECKER Klemmenanordnung Ansicht von der Klemmenseite 1 Klemmen Nummer 2 Kabelfarbe 3 Kabelbaum Seite 4 Zündschalter Seite Sólo el tipo L 1 MARCAS DE CINTA BLANCA 2 RECEPTÁCULO 20 A 125 V 3 BANDA DEL MAZO DE CABLES 7 4 RECEPTÁCULO 30 A 125 V 5 ...

Page 232: ...RE HARNESS BAND 7 14 RECEPTACLE 30A 125 250V 2 RECEPTACLE 20A 125V 4 RECEPTACLE 30A 125V 12 See P 2 60 5 MAIN WIRE HARNESS 7 CONTROL WIRE HARNESS 13 See P 2 51 CONNECTORS Terminal Arrangement Viewed from terminal side 1 Terminal 2 Wire color number 1 Bu 2 W 3 Gr 4 Gr 5 Bu 6 Bu 1 Terminal 2 Wire color number 4 Bu 5 Bu 6 R L type only cap 02 EU65is 6500is Eu qxd 07 12 17 5 58 PM ページ2 55 ...

Page 233: ...EUEREINHEIT 7 STEUERKABELBAUM 8 ZÜNDSCHALTER 9 SICHERUNGSKASTEN 10 SPANNUNGSWÄHLSCHALTER 11 ECO DROSSELKLAPPENSCHALTER 12 Siehe S 2 60 13 Siehe S 2 51 14 STECKDOSE 30 A 125 250 V STECKER Klemmenanordnung Ansicht von der Klemmenseite 1 Klemmen Nummer 2 Kabelfarbe Sólo el tipo L 1 MARCAS DE CINTA BLANCA 2 RECEPTÁCULO 20 A 125 V 3 BANDA DEL MAZO DE CABLES 7 4 RECEPTÁCULO 30 A 125 V 5 MAZO DE CABLES P...

Page 234: ... White 5 WIRE HARNESS BAND 7 1 RECEPTACLE 15A 250V 3 12 See P 2 60 CONNECTORS Terminal Arrangement Viewed from terminal side 3 Wire harness side 4 Ignition switch side 1 Terminal 2 Wire color number 1 Br W 2 W Y 3 Br Y 4 W Bl 5 Bl Y 7 G O 8 G 1 Terminal 2 Wire color number 1 Bu R 2 G 3 Br W 4 Bu Y 1 Terminal 2 Wire color number 1 G Bu 3 W G 4 Br Bu 6 W Bu 6 MAIN WIRE HARNESS 8 CONTROL WIRE HARNESS...

Page 235: ...T 8 STEUERKABELBAUM 9 ZÜNDSCHALTER 10 SICHERUNGSKASTEN 11 ECO DROSSELKLAPPENSCHALTER 12 Siehe S 2 60 13 Siehe S 2 51 STECKER Klemmenanordnung Ansicht von der Klemmenseite 1 Klemmen Nummer 2 Kabelfarbe 3 Kabelbaum Seite 4 Zündschalter Seite Sólo el tipo U 1 RECEPTÁCULO 15 A 250 V 3 2 Amarillo verde 3 Blanco 4 Marrón 5 BANDA DEL MAZO DE CABLES 7 6 MAZO DE CABLES PRINCIPAL 7 GCU UNIDAD DE CONTROL DEL...

Page 236: ...CLE 20A 250V 2 T33 T32 T31 T34 T35 T36 3 MAIN WIRE HARNESS 5 CONTROL WIRE HARNESS 9 See P 2 60 10 See P 2 51 CONNECTORS Terminal Arrangement Viewed from terminal side 3 Wire harness side 4 Ignition switch side 1 Terminal 2 Wire color number 1 Br W 2 W Y 3 Br Y 4 W Bl 5 Bl Y 7 G O 8 G 1 Terminal 2 Wire color number 1 Bu R 2 G 3 Br W 4 Bu Y 1 Terminal 2 Wire color number 1 G Bu 3 W G 4 Br Bu 6 W Bu ...

Page 237: ...RKABELBAUM 6 ZÜNDSCHALTER 7 SICHERUNGSKASTEN 8 ECO DROSSELKLAPPENSCHALTER 9 Siehe S 2 60 10 Siehe S 2 51 STECKER Klemmenanordnung Ansicht von der Klemmenseite 1 Klemmen Nummer 2 Kabelfarbe 3 Kabelbaum Seite 4 Zündschalter Seite Sólo el tipo R 1 RECEPTÁCULO 20 A 250 V 2 2 BANDA DEL MAZO DE CABLES 7 3 MAZO DE CABLES PRINCIPAL 4 GCU UNIDAD DE CONTROL DEL GENERADOR 5 MAZO DE CABLES DE CONTROL 6 INTERR...

Page 238: ...l 2 Wire color number 1 G Bu 3 W G 4 Br Bu 6 W Bu 9 IGNITION SWITCH 7 GCU GENERATOR CONTROL UNIT 10 FUSE BOX 11 ECO THROTTLE SWITCH GND1 GND2 2 Brown 2 Brown 2 Brown 3 Yellow Green 3 Yellow Green C12 C11 5 White 5 White 5 White 4 WIRE HARNESS BAND 7 1 RECEPTACLE 16A 250V 3 6 MAIN WIRE HARNESS 8 CONTROL WIRE HARNESS 12 See P 2 60 13 See P 2 51 1 Terminal 2 Wire color number GND1 G GND2 Y G C11 R W ...

Page 239: ...IT 8 STEUERKABELBAUM 9 ZÜNDSCHALTER 10 SICHERUNGSKASTEN 11 ECO DROSSELKLAPPENSCHALTER 12 Siehe S 2 60 13 Siehe S 2 51 STECKER Klemmenanordnung Ansicht von der Klemmenseite 1 Klemmen Nummer 2 Kabelfarbe 3 Kabelbaum Seite 4 Zündschalter Seite Sólo el tipo SK 1 RECEPTÁCULO 16 A 250 V 3 2 Marrón 3 Amarillo verde 4 BANDA DEL MAZO DE CABLES 7 5 Blanco 6 MAZO DE CABLES PRINCIPAL 7 GCU UNIDAD DE CONTROL D...

Page 240: ...d from terminal side 1 Terminal 2 Wire color number 1 Br W 3 Br Bu 4 Y Bl 5 G 6 O W 7 W Bl 8 Y 10 Bl 12 Bl G 14 G 15 O Y 16 O G 17 O Bu 18 Y Bu 1 Terminal 2 Wire color number 1 Y R 2 Br Y 3 W Bu 4 G Bu 5 Bl W 6 W 7 R 8 Bu 9 Y 10 W G 11 W Y 12 G O 1 Terminal 2 Wire color number 1 Bu Y 2 Bu R 1 Terminal 2 Wire color number 1 Bu 3 W 5 R cap 02 EU65is 6500is Eu qxd 07 12 17 5 58 PM ページ2 59 ...

Page 241: ...TEUERKABELBAUM 2 GCU GENERATOR STEUEREINHEIT Nur für Typen U R und SK STECKER Klemmenanordnung Ansicht von der Klemmenseite 1 Klemmen Nummer 2 Kabelfarbe Sólo los tipos C y L 1 MAZO DE CABLES DE CONTROL 2 GCU UNIDAD DE CONTROL DEL GENERADOR Sólo los tipos U R y SK CONECTORES Disposición de los terminales Visto desde el lado de los terminales 1 Número de terminal 2 Color del cable 2 59 cap 02 EU65i...

Page 242: ...nal 2 Wire color number 1 Gr 2 Bu 1 Terminal 2 Wire color number 1 W Gr 2 R Br 1 Terminal 2 Wire color number 1 G Y G 1 Terminal 2 Wire color number GND3 G G Y GND9 W 4 U R and SK types only 4 U R and SK types only 4 U R and SK types only 5 Inverter unit side 5 Inverter unit side 5 Inverter unit side 1 Terminal 2 Wire color number 1 Gr 2 Bu 1 Terminal 2 Wire color number 1 W 2 R 1 Terminal 2 Wire ...

Page 243: ...R EINHEIT 5 KABELBAUM HALTEBAND 2 STECKER Klemmenanordnung Ansicht von der Klemmenseite 1 Klemmen Nummer 2 Kabelfarbe 3 Hauptkabelbaum Seite 4 nur für Typen U R und SK 5 Wechselrichter Seite 1 MAZO DE CABLES PRINCIPAL 2 GND9 Sólo el tipo C 3 MAZO DE CABLES DEL MOTOR 4 UNIDAD DEL INVERSOR 5 BANDA DEL MAZO DE CABLES 2 CONECTORES Disposición de los terminales Visto desde el lado de los terminales 1 N...

Page 244: ... side 1 Terminal 2 Wire color number 1 R 3 W 5 Bu 3 Control wire harness side 1 Terminal 2 Wire color number 1 G 3 Y R 4 Y Bl 5 W 6 R 7 Y 8 Bu 9 Bl W 10 Bl Y 4 Engine wire harness side 1 Terminal 2 Wire color number 1 Y Bu 2 Y 3 Bl 4 Bl G 5 Generator wire harness side 1 Terminal 2 Wire color number 1 R 3 W 5 Bu 4 Engine wire harness side 1 Terminal 2 Wire color number 1 G 3 Y R 4 Y Bl 5 W 6 R 7 Y ...

Page 245: ...4 GENERATORKABELBAUM STECKER Klemmenanordnung Ansicht von der Klemmenseite 1 Klemmen Nummer 2 Kabelfarbe 3 Steuerkabelbaum Seite 4 Motor Kabelbaumseite 5 Generatorkabelbaum Seite 1 MAZO DE CABLES DE CONTROL 2 CAJA DE FUSIBLES 3 MAZO DE CABLES DEL MOTOR 4 MAZO DE CABLES DEL GENERADOR CONECTORES Disposición de los terminales Visto desde el lado de los terminales 1 Número de terminal 2 Color del cabl...

Page 246: ...TOR INSULATOR 1 HIGH TENSION CORD HOLDER 4 STARTER SOLENOID 5 ENGINE WIRE HARNESS C41 C44 C43 T43 CONNECTORS Terminal Arrangement Viewed from terminal side 1 Terminal 2 Wire color number 2 Bu 3 R 4 Y 5 W 1 Terminal 2 Wire color number 2 Bu 3 R 4 Y 5 W 1 Terminal 2 Wire color number C41 Bl W C42 Y C43 Bl C44 Bl G T43 Bl C42 cap 02 EU65is 6500is Eu qxd 07 12 17 5 58 PM ページ2 62 ...

Page 247: ...M KLEBEBAND 8 CHOKE STEUERMOTOR 9 DROSSELKLAPPEN STEUERMOTOR 10 ENTLÜFTUNGSSCHLAUCH 11 HOCHSPANNUNGSKABEL 12 HALTEKLAMMER VERGASER ISOLATOR STECKER Klemmenanordnung Ansicht von der Klemmenseite 1 Klemmen Nummer 2 Kabelfarbe 1 SOPORTE DEL CABLE DE ALTA TENSIÓN 2 BOBINA DE ENCENDIDO 3 MOTOR DE ARRANQUE 4 SOLENOIDE DEL MOTOR DE ARRANQUE 5 MAZO DE CABLES DEL MOTOR 6 RETENEDOR DEL MAZO DE CABLES 7 MARC...

Page 248: ...1 PROJECTIONS IInstall the ground terminals so they are held on the projections of the fan cover 2 Terminal 3 Wire color number GND4 G GND5 Bl GND6 G C42 Y CONNECTORS Terminal Arrangement Viewed from terminal side 1 C and L types only 2 Terminal 3 Wire color number GND4 Y G GND5 Bl GND6 Y G C42 Y 4 U R and SK types only cap 02 EU65is 6500is Eu qxd 07 12 17 5 58 PM ページ2 63 ...

Page 249: ...mmer 3 Kabelfarbe 4 Nur für Typen U R und SK 1 SALIENTES 2 CUBIERTA DEL VENTILADOR 3 MAZO DE CABLES DEL MOTOR 4 BANDA DEL MAZO DE CABLES 5 CABLE DEL INTERRUPTOR DEL NIVEL DE ACEITE Lado del interruptor C42 Amarillo 6 GND4 TERMINAL DE TIERRA CONECTORES Disposición de los terminales Visto desde el lado de los terminales 1 Sólo los tipos C y L 2 Número de terminal 3 Color del cable 4 Sólo los tipos U...

Page 250: ... BAND 5 ENGINE WIRE HARNESS 7 GROUND CABLE 8 IGNITION PULSE GENERATOR WIRE Generator wire harness side C22 Blue GND8 GND7 C46 C22 C45 1 WIRE CLIP 4 PLACES On the lower shroud CONNECTORS Terminal Arrangement Viewed from terminal side 1 Terminal 2 Wire color number GND7 Bl GND8 Bl C22 Y Bu C45 Y R C46 Y Bl cap 02 EU65is 6500is Eu qxd 07 12 17 5 58 PM ページ2 64 ...

Page 251: ...SENSORS Sensor Seite C45 Weiß C46 Weiß 5 MOTORKABELBAUM 6 KABELBAUM HALTEBAND 7 MASSEKABEL 8 KABEL DES ZÜNDIMPULSGEBERS Generatorkabelbaum Seite C22 Blau 9 GENERATORKABELBAUM STECKER Klemmenanordnung Ansicht von der Klemmenseite 1 Klemmen Nummer 2 Kabelfarbe 1 RETENEDOR DE CABLES 4 LUGARES En el protector inferior 2 CABLE DEL SENSOR DE LA TEMPERATURA DEL MOTOR 3 PROTECTOR INFERIOR 4 CABLE DEL SENS...

Page 252: ...3 6 Combustion chamber Clean After every 500 hrs 13 1 Fuel tank and strainer Clean 7 2 Fuel tube Check Every 2 years Replace if necessary 7 2 Each use First month or 20 hrs Every 3 months or 50 hrs Every 6 months or 100 hrs Every year or 200 hrs Refer to page 1 For commercial use log hours of operation to determine proper maintenance intervals 2 Service more frequently when used in dusty areas REG...

Page 253: ...eures 13 1 Réservoir et crépine d essence Nettoyer 7 2 Tuyau d essence Vérifier Tous les 2 ans Remplacer si nécessaire 7 2 Chaque utilisation Premier mois ou 20 heures Tous les 3 mois ou 50 heures Tous les 6 mois ou 100 heures Tous les ans ou 200 heures Se reporter à la page PERIODE D ENTRETIEN REGULIER 1 ELEMENT Effectuer ces opérations après le nombre de mois ou d heures d utilisation indiqué ce...

Page 254: ...igen 7 2 Kraftstoffschlauch Überprüfen Alle 2 Jahre nötigenfalls ersetzen 7 2 Bei jeder Verwendung Nach dem ersten Monat oder 20 Betriebsstunden Alle 3 Monate oder 50 Betriebsstunden Alle 6 Monate oder 100 Betriebsstunden Jedes Jahr oder alle 200 Betriebsstunden Siehe Seite NORMALE WARTUNGSINTERVALLE 1 GEGENSTAND Nach jedem angegebenen Monats oder Betriebsstunden Intervall durchführen je nachdem w...

Page 255: ...ada 500 horas 13 1 Depósito y colador de combustible Limpiar 7 2 Tubo de combustible Comprobar Cada 2 años reemplazar si es necesario 7 2 Cada utilización Primer mes o 20 horas Cada 3 meses o 50 horas Cada 6 meses o 100 horas Cada año o 200 horas Consulte la página PERÍODO DE SERVICIO REGULAR 1 ELEMENTO Efectúelo a cada intervalo indicado de meses o de horas de funcionamiento lo que primero aconte...

Page 256: ...the oil level 3 2 1 OIL FILLER CAP DIPSTICK 1 RIGHT MAINTENANCE COVER 1 OIL FILLER CAP DIPSTICK 2 UPPER LEVEL 2 AMBIENT TEMPERATURE 1 SAE Viscosity Grades Oil is a major factor affecting performance and service life Use 4 stroke automotive detergent oil SAE 10W 30 is recommended for general use Other viscosities shown in the chart may be used when the average temperature in your area is within the...

Page 257: ...otoröl eingefüllt wird Das Motoröl hat einen wesentlichen Einfluss auf die Leistung und Lebensdauer des Motors Ein für Kraftfahrzeuge gebräuchliches hochlösliches 4 Takt Öl verwenden SAE 10W 30 wird als allgemeines Motoröl empfohlen Öle mit anderen Viskositätswerten die in der folgenden Tabelle angegeben sind können entsprechend der in Ihrem Gebiet herrschenden Außentemperaturen verwendet werden 1...

Page 258: ...own a drain 6 Reinstall the oil drain bolt and sealing washer and tighten the drain bolt to the specified torque TORQUE 23 N m 2 3 kgf m 17 Ibf ft 7 With the generator on a level surface refill with the recommended oil to the top of the oil filler neck 8 Tighten the oil filler cap dipstick securely 9 Clean the oil drain guide and set the oil drain hole cover 10 Close the right maintenance cover 3 ...

Page 259: ...hrung reinigen dann die Gummiabdeckung der Ablassöffnung wieder anbringen 10 Die rechte Wartungsabdeckung wieder anbringen 1 GUMMIABDECKUNG DER ABLASSÖFFNUNG 2 ABDICHTSCHEIBE 3 ÖLABLASSSCHRAUBE 4 ÖLEINFÜLLDECKEL ÖLMESSSTAB Cambio del aceite Drene el aceite usado mientras el motor esté caliente El aceite caliente se drena con más rapidez y por completo 1 Ponga el generador sobre una superficie nive...

Page 260: ... rinse and allow to dry thoroughly or clean with a high flash point solvent and allow to dry 4 Dip the element in clean engine oil and squeeze out all the excess oil Excess oil will restrict air flow through the foam element and may cause the engine to smoke at startup Do not twist to squeeze oil from the air cleaner element Twisting the element can damage it 5 Reinstall the air cleaner element an...

Page 261: ...ATZ 3 Den Schaumstoffeinsatz in lauwarmem Seifenwasser reinigen dann ausspülen und gründlich trocknen lassen Alternativ kann der Schaumstoffeinsatz in nicht brennbarem Lösungsmittel gereinigt und dann getrocknet werden 4 Den Einsatz in sauberem Motoröl einweichen und das überschüssige Öl herausdrücken Nicht zuviel Öl im Schaumstoffeinsatz belassen da dies zu Rauchbildung beim Anlassen des Motors f...

Page 262: ... electrode 7 Install the spark plug fingertight to seat the washer and then tighten with a plug wrench TORQUE 18 N m 1 8 kgf m 13 Ibf ft If reinstalling the used spark plug tighten 1 8 1 4 turn after the spark plug seats If installing a new spark plug tighten 1 2 turn after the spark plug seats A loose spark plug can become very hot and can damage the engine Overtightening can damage the threads i...

Page 263: ...spricht kann die Einstellung durch vorsichtiges Biegen der Seitenelektrode vorgenommen werden 7 Die Zündkerze fingerfest anziehen bis die Zündkerze auf dem Dichtring aufsitzt dann mit dem Zündkerzenschlüssel festziehen ANZUGSDREHMOMENT 18 N m 1 8 kgf m 1 DICHTRING Bei Wiederverwendung der Zündkerze ist diese nach dem Aufsitzen um 1 8 bis 1 4 Umdrehungen nachzuziehen Bei Verwendung einer neuen Zünd...

Page 264: ...h a brush Be careful to avoid damaging the screen 3 Check the spark arrester screen for damage Replace the spark arrester if it is damaged 4 Clean the tail pipe screen to remove carbon deposit Reinstall the spark arrester and tail pipe and then tighten the two 5 x 16 mm screws to the specified torque TORQUE 3 5 N m 0 4 kgf m 2 6 lbf ft NOTICE 3 6 1 SPARK ARRESTER 3 SPARK ARRESTER SCREEN 2 TAIL PIP...

Page 265: ...x 12 mm Bundschrauben mit den 6 mm Unterlegscheiben entfernen dann die Zylinderkopfdeckel Abschirmung abnehmen 1 ZÜNDKERZENABDECKUNG 2 UNTERLEGSCHEIBE 6 mm 2 3 ENTLÜFTUNGSSCHLAUCH 4 ZYLINDERKOPFDECKEL ABSCHIRMUNG 5 SPEZIALSCHRAUBE 6 mm 4 Die Schraube der Zylinderkopfhaube herausdrehen dann die Zylinderkopfhaube abnehmen 1 SCHRAUBE DER ZYLINDERKOPFHAUBE 2 ZYLINDERKOPFHAUBE HINWEIS 5 PARACHISPAS Lim...

Page 266: ...pivot lock nut b Turn the rocker arm pivot to obtain the specified clearance c Retighten the rocker arm pivot lock nut while holding the rocker arm pivot d Recheck the valve clearance after tightening the rocker arm pivot lock nut TORQUE 10 N m 1 0 kgf m 7 Ibf ft 9 After adjustment reinstall the removed parts in the reverse order of removal TORQUE Head cover bolt 10 N m 1 0 kgf m 7 Ibf ft Head cov...

Page 267: ...des Kipphebel Drehzapfens lösen b Den Kipphebel Drehzapfens entsprechend drehen um das vorgeschriebene Ventilspiel zu erhalten c Den Kipphebel Drehzapfen arretieren dann die Sicherungsmutter des Kipphebel Drehzapfens wieder festziehen d Nach dem Festziehen der Sicherungsmutter des Kipphebel Drehzapfens das Ventilspiel noch einmal überprüfen ANZUGSDREHMOMENT 10 N m 1 0 kgf m 9 Nach der Einstellung ...

Page 268: ...ment cup using a new O ring Tighten the sediment cup 5 After cleaning and reassembly check the sediment cup for leaks Be sure there is no spilled fuel before starting the engine 3 8 1 SEDIMENT CUP 2 O RING Gasoline is highly flammable and explosive You can be burned or seriously injured when handling fuel Keep heat sparks and flame away Wipe up spills immediately Handle fuel only outdoors WARNING ...

Page 269: ...ruptor del motor y la palanca de la válvula del combustible a la posición OFF 2 Abra la cubierta izquierda de mantenimiento y extraiga la taza de sedimentos y la junta tórica 3 Lave la taza de sedimentos en solvente ininflamable o de alto punto de inflamación 4 Instale la taza de sedimentos empleando una junta tórica nueva Apriete la taza de sedimentos 5 Después de haber realizado la limpieza y el...

Page 270: ...Y LEFT MAINTENANCE COVER 1 RIGHT MAINTENANCE COVER RIGHT MAINTENANCE COVER 3 LATCH PIN 6 LOCK PIN 4 LATCH SPRING 5 RETAINER 10 LATCH PIN 4 LOCK PIN 9 LATCH SPRING 3 RETAINER 1 LEFT COVER SEAL 2 LEFT MAINTENANCE COVER 2 RIGHT COVER SEAL 7 HINGE SPRING 5 HINGE HOLDER 6 RIGHT COVER HINGE 5 x 8 8 WASHER 2 cap 04 EU65is 6500is Eu qxd 07 12 17 4 46 PM ページ4 1 ...

Page 271: ...DECKUNG 2 RECHTE ABDECKUNGSABDICHTUNG 3 HALTERING 4 SICHERUNGSSTIFT 5 SCHARNIERHALTER 6 RECHTES ABDECKUNGSSCHARNIER 7 SCHARNIERFEDER 8 UNTERLEGSCHEIBE 2 9 VERRIEGELUNGSFEDER 10 VERRIEGELUNGSSTIFT 4 CUBIERTAS DE MANTENIMIENTO FILTRO DE AIRE CARBURADOR 1 CUBIERTAS DE MANTENIMIENTO a DESMONTAJE MONTAJE CUBIERTA IZQUIERDA DE MANTENIMIENTO 1 SELLO DE LA CUBIERTA IZQUIERDA 2 CUBIERTA IZQUIERDA DE MANTEN...

Page 272: ... 0 1 kgf m 0 5 Ibf ft 2 6 mm FLANGE NUT 2 11 AIR CLEANER CASE INSTALLATION Insert the intake port of the air cleaner case into the separator seal B on the front frame as shown 11 1 SEPARATOR SEAL B 11 2 INTAKE PORT 9 FLAME TRAP 8 5 N m 0 9 kgf m 6 3 Ibf ft 15 AIR CLEANER ELEMENT CLEANING P 3 4 17 4 5 x 8 x 400 mm VINYL TUBE CARBURETOR DRAIN TUBE INSTALLATION P 4 3 16 TUBE CLAMP 3 INSTALLATION P 4 ...

Page 273: ... DEL TUBO DE CONEXIÓN DEL FILTRO DE AIRE DE 54 mm 2 8 TUBO DE CONEXIÓN DEL FILTRO DE AIRE 9 SEPARADOR DEL BASTIDOR 10 TUBO DE GUÍA DEL AIRE DE ENTRADA 11 CAJA DEL FILTRO DE AIRE 12 PERNO DE LA CUBIERTA DEL FILTRO DE AIRE 2 13 CUBIERTA DEL FILTRO DE AIRE 14 SELLO DE LA CUBIERTA DEL FILTRO DE AIRE 15 ELEMENTO DEL FILTRO DE AIRE 16 ABRAZADERA DEL TUBO 3 17 TUBO DE VINILO DE 4 5 x 8 x 400 mm TUBO DE D...

Page 274: ...3 CLAMP OF AIR CLEANER CASE 2 places 2 CLAMP OF AIR CLEANER CASE 4 places 8 4 5 x 8 x 610 mm VINYL TUBE 8 4 5 x 8 x 610 mm VINYL TUBE 7 VIEW A 7 VIEW A 6 4 5 x 8 x 400 mm VINYL TUBE 6 4 5 x 8 x 400 mm VINYL TUBE 5 CLAMP OF UNDER PLATE 2 places 30 mm 1 2 in 4 AIR CLEANER CASE 4 AIR CLEANER CASE 1 TUBE CLAMP 3 1 TUBE CLAMP 3 cap 04 EU65is 6500is Eu qxd 07 12 17 4 46 PM ページ4 3 ...

Page 275: ...ie Schlauchklammern wie in der Abbildung gezeigt anbringen 1 SCHLAUCHKLAMMER 3 2 KLAMMER DES LUFTFILTERGEHÄUSES 4 Stellen 3 KLAMMER DES LUFTFILTERGEHÄUSES 2 Stellen 4 LUFTFILTERGEHÄUSE 5 KLAMMER DER BODENPLATTE 2 Stellen 6 KUNSTSTOFFSCHLAUCH 4 5 x 8 x 400 mm 7 ANSICHT A 8 KUNSTSTOFFSCHLAUCH 4 5 x 8 x 610 mm b INSTALACIÓN DEL TUBO DE DRENAJE DEL CARBURADOR DEL TUBO DE VENTILACIÓN DE AIRE Y DE LAS A...

Page 276: ...SEMBLY P 4 6 and 7 14 CARBURETOR GASKET 12 AIR CLEANER GASKET Do not reuse INSTALLATION P 4 5 11 CARBURETOR SPACER INSTALLATION P 4 5 16 INSULATOR GASKET Do not reuse INSTALLATION P 4 5 15 CARBURETOR INSULATOR INSTALLATION Install with vent groove facing toward the carburetor INSTALLATION When installing the motor cover make sure the control motor harness connector remains connected securely 5 BRE...

Page 277: ... Essuyer immédiatement toute essence renversée Ne manipuler l essence qu à l extérieur Benzin ist extrem feuergefährlich und unter gewissen Bedingungen explosiv Wenn sich Benzin bei der Handhabung entzündet kann dies Verbrennungen und schwere Verletzungen verursachen Wärmequellen Funken und offene Flammen sind fernzuhalten Verschütteten Kraftstoff sofort aufwischen Kraftstoff nur im Freien handhab...

Page 278: ...NECTION Connect the control motor harness connector with white tape to the control motor choke side next to the white dot 4 5 3 WHITE DOT 1 WHITE TAPE 1 INSULATOR GASKET 2 CARBURETOR GASKET 4 AIR CLEANER GASKET 2 CONTROL MOTOR CHOKE SIDE 4 CONTROL MOTOR THROTTLE SIDE 5 Viewed from air cleaner side 2 Viewed from air cleaner side 3 Viewed from carburetor side 1 CARBURETOR SPACER cap 04 EU65is 6500is...

Page 279: ...tung achten 1 VERGASER ABSTANDSSTÜCK 2 Ansicht von der Luftfilter Seite ANSCHLUSS DES STEUERMOTOR KABELS Den Stecker des Steuermotor Kabelbaums mit dem weißen Klebeband am Steuermotor Choke Seite neben dem weißen Punkt befestigen 1 WEISSES KLEBEBAND 2 CHOKE STEUERMOTOR CHOKE SEITE 3 WEISSER PUNKT 4 STEUERMOTOR DROSSELKLAPPEN SEITE INSTALACIÓN DE LAS EMPAQUETADURAS Instale las empaquetaduras del ai...

Page 280: ...sparks and flame away Wipe up spills immediately Handle fuel only outdoors WARNING 6 MOTOR BRACKET 4 FELT SEAL 2 8 LINK LEVER 2 7 COMPRESSION COIL SPRING 2 1 3 x 8 mm SCREW WASHER 4 0 9 N m 0 1 kgf m 0 7 Ibf ft 5 4 x 12 mm SCREW WASHER 2 2 1 N m 0 2 kgf m 1 5 Ibf ft 2 CONTROL MOTOR THROTTLE SIDE INSPECTION P 4 10 INSTALLATION P 4 8 3 CONTROL MOTOR CHOKE SIDE INSPECTION P 4 10 INSTALLATION P 4 8 ca...

Page 281: ...ULA DEL MOTOR 7 RESORTE ESPIRAL DE COMPRESIÓN 2 8 PALANCA DE UNIÓN 2 L essence est très inflammable et explosive Vous risquez de vous brûler ou d être gravement blessé en manipulant de l essence Garder chaleur étincelles et flammes à distance Essuyer immédiatement toute essence renversée Ne manipuler l essence qu à l extérieur Benzin ist extrem feuergefährlich und unter gewissen Bedingungen explos...

Page 282: ...ation 9 MAIN NOZZLE REASSEMBLY Clean thoroughly with compressed air before installation 8 1 VALVE SEAT 8 4 OK 8 3 REPLACE 8 2 FLOAT VALVE 10 FLOAT CHAMBER REASSEMBLY Install the float chamber at the angle shown 20 4 O RING 4 O RING 4 O RING 7 FLOAT PIN 12 DRAIN SCREW 15 FLOAT VALVE SPRING 3 THROTTLE STOP SCREW INSTALLATION P 4 8 14 FLOAT INSPECTION P 4 10 REASSEMBLY Check for smooth movement after...

Page 283: ... Vor dem Einbau die Düse gründlich mit Druckluft durchblasen Den O Ring mit etwas Fett versehen um das Einsetzen in das Vergasergehäuse zu erleichtern 5 1 O RING REMPLACEMENT P 4 9 REPOSE P 4 8 NETTOYAGE P 4 10 REMONTAGE Nettoyer à fond à l air comprimé avant de procéder à la repose REMONTAGE Reposer la cuve à niveau constant à l angle indiqué REMONTAGE Nettoyer à fond à l air comprimé avant de pr...

Page 284: ... or cleaning 1 Install so that the throttle valve is at the fully closed position and screw end does not touch the throttle lever 2 Tighten the throttle stop screw until the screw just reaches the throttle lever Tighten the throttle stop screw an additional 1 1 4 turns when the screw starts to push the throttle lever 3 Install the carburetor P 4 4 and start the engine 4 With the engine at normal o...

Page 285: ...n herausgenommen werden wenn der Vergaser gereinigt oder überholt werden muss 1 Die Anschlagschraube so anbringen dass sich die Drosselklappe in der ganz geschlossenen Position befindet die Schraube aber den Drosselklappenhebel nicht berührt 2 Die Drosselklappen Anschlagschraube nun festziehen bis die Schraube leicht am Drosselklappenhebel anliegt Wenn die Schraube den Drosselklappenhebel nach hin...

Page 286: ... replacement pilot screw and install it on the carburetor 3 Turn the pilot screw in until it is lightly seated then turn the screw out by the required number of turns 4 Apply LOCTITE 638 to the inside of the limiter cap then install the cap so its stop prevents the pilot screw from being turned counterclockwise Be careful to avoid turning the pilot screw while installing the limiter cap The pilot ...

Page 287: ...euen Leerlauf Einstellschraube anbringen dann in den Vergaser einsetzen 1 EINGRIFFSICHERUNGSKAPPE 2 LEERLAUF EINSTELLSCHRAUBE 3 Leerlauf Einstellschraube bricht an der verengten Stelle ab 3 Die Leerlauf Einstellschraube hineindrehen bis diese leicht aufsitzt danach die Schraube um die vorgeschriebene Anzahl Umdrehungen wieder zurückdrehen 4 Die Innenseite der Eingriffssicherungskappe mit LOCTITE 6...

Page 288: ...t use these products to clean Honda carburetors High air pressure may damage the carburetor Use low air pressure 206 kPa 2 11 kgf cm2 30 psi or less when cleaning passages and ports 1 Clean the carburetor body with high flash point solvent 2 Use low air pressure and clean the following passages and ports Vent port Pilot screw hole Pilot jet hole Pilot air jet Main air jet Transition ports Pilot ou...

Page 289: ...n den Abstand zwischen der Schwimmer Oberkante und dem Vergasergehäuse messen wenn der Schwimmer den Ventilsitz leicht berührt ohne die Ventilfeder zusammenzudrücken Wenn die Höhe nicht der Spezifikation entspricht muss der Schwimmer ersetzt werden danach die Schwimmerhöhe noch einmal überprüfen SPEZIALWERKZEUG Schwimmerstandslehre 07401 0010000 1 SCHWIMMERSTANDSLEHRE 07401 0010000 DROSSELKLAPPEN ...

Page 290: ...e negative cable Hydrogen gas from batteries is highly flammable and explosive You can be burned or seriously injured when charging battery Keep heat sparks and flame away WARNING 5 BATTERY MAINTENANCE COVER 8 T42 POSITIVE TERMINAL 7 TERMINAL BOLT 2 1 TERMINAL NUT 2 3 T41 NEGATIVE TERMINAL 6 BATTERY BAND 2 BATTERY YTZ 14S REMOVAL INSTALLATION Remove or install the battery by tipping it as shown In...

Page 291: ...lo que deberá emplear sólo la batería correcta YTZ 14S Cuando extraiga la batería desconecte primero el cable negativo y luego desconecte el cable positivo Cuando instale la batería conecte primero el cable positivo y luego el cable negativo 1 TUERCA DE TERMINAL 2 2 BATERÍA YTZ 14S 3 T41 TERMINAL NEGATIVO 4 PERNO DE LA CUBIERTA DE MANTENIMIENTO DE LA BATERÍA 5 CUBIERTA DE MANTENIMIENTO DE LA BATER...

Page 292: ...nnect the negative terminal of the charger to the negative terminal of the battery Use the battery charger desgined for maintenance free batteries Quick charging should only be done in an emergency slow charging is preferred Wait for approx 30 minutes after charging before measuring the battery voltage NOTICE 5 2 Battery voltage 13 0 13 2 V Fully charged Only use the battery charger in a sufficien...

Page 293: ...de la batería 3 Extraiga la batería del generador P 5 1 4 Mida la tensión de la batería entre los terminales empleando el probador de baterías PROBADOR DE BATERÍAS RECOMENDADO BM 310 YUASA o equivalente Si la tensión de la batería es de menos de 12 3 V cargue la batería c CARGA 1 Extraiga la batería del generador P 5 1 2 Conecte el terminal positivo del cargador al terminal positivo de la batería ...

Page 294: ...COVER COLLAR 2 8 SPRING NUT 9 BATTERY MAINTENANCE COVER 7 6 mm CAP NUT 2 8 5 N m 0 9 kgf m 6 3 lbf ft 6 FRONT COVER INSTALLATION Align the groove of the front vover with the rib of the front frame 6 1 FRONT COVER 6 2 RIB 6 4 GROOVE 6 3 FRONT FRAME 2 6 x 26 mm SPECIAL BOLT 2 8 5 N m 0 9 kgf m 6 3 lbf ft 1 BATTERY MAINTENANCE COVER BOLT 2 3 N m 0 2 kgf m 1 7 lbf ft cap 06 EU65is 6500is Eu qxd 07 12 ...

Page 295: ...RÍA 2 PERNO ESPECIAL DE 6 x 26 mm 2 3 SELLO C DE LA CUBIERTA FRONTAL 4 SELLO A DE LA CUBIERTA FRONTAL 5 COLLAR DE LA CUBIERTA FRONTAL 2 6 CUBIERTA FRONTAL 7 TUERCA DE TAPA de 6 mm 2 8 TUERCA DEL RESORTE 9 CUBIERTA DE MANTENIMIENTO DE LA BATERÍA 1 CACHE AVANT 6 1 2 UNITE D INVERSEUR 6 2 3 PANNEAU DE COMMANDE 6 5 1 VORDERE ABDECKUNG 6 1 2 WECHSELRICHTER EINHEIT 6 2 3 BEDIENTAFEL 6 5 1 CUBIERTA FRONT...

Page 296: ... 4 RED TAPE MARK 5 WIRE HARNESS BAND 2 INVERTER UNIT RUBBER 2 7 INVERTER UNIT CUSHION RUBBER 3 1 6 x 25 mm BOLT WASHER 2 8 INVERTER UNIT INSPECTION P 6 3 and 4 6 CONTROL PANEL REMOVAL INSTALLATION P 6 5 DISASSEMBLY P 6 6 through 10 REASSEMBLY P 6 12 through 17 cap 06 EU65is 6500is Eu qxd 07 12 17 4 51 PM ページ6 2 ...

Page 297: ...AUMKLAMMER 6 BEDIENTAFEL 7 GUMMIDÄMPFER DER WECHSELRICHTER EINHEIT 3 8 WECHSELRICHTER EINHEIT 2 UNIDAD DEL INVERSOR a EXTRACCIÓN INSTALACIÓN 1 Extraiga la cubierta frontal P 6 1 2 Extraiga la batería P 5 1 1 PERNO CON ARANDELA DE 6 x 25 mm 2 2 GOMA DE LA UNIDAD DEL INVERSOR 2 3 COLLAR 2 4 MARCA DE CINTA ROJA 5 BANDA DEL MAZO DE CABLES 6 PANEL DE CONTROL 7 GOMA AMORTIGUADORA DE LA UNIDAD DEL INVERS...

Page 298: ...ity 1 Tester probe 2 Connector 4 Terminal 1 2 1 5 No continuity 5 No continuity 2 5 No continuity 5 No continuity 3 5 No continuity 5 No continuity 4 5 No continuity 5 No continuity 6 0 35 0 8 V 0 35 0 8 V 6 3 2 Connector 3 Tester probe 3 Tester probe 2 Connector 4 Terminal 1 2 1 5 No continuity 5 No continuity 2 5 No continuity 5 No continuity 3 5 No continuity 5 No continuity 4 0 35 0 8 V 0 35 0...

Page 299: ...üfung das Prüfgerät auf die Markierung setzen Die Anzeige für Kein Durchgang ist je nach Prüfgerät Modell verschieden Wenn kein Durchgang besteht ist das Display das gleiche wie bei einem ausgeschalteten Prüfgerät OL OF etc Einige Prüfgeräte weisen eine umgekehrte Polarität auf 1 Prüfgerät Sonde 2 Stecker 3 Prüfgerät Sonde 4 Klemme 5 Kein Durchgang 6 WEISS 7 GRAU 8 BLAU 9 ROT 10 Ansicht von der Kl...

Page 300: ...No continuity 5 No continuity 3 5 No continuity 5 No continuity 4 0 35 0 8 V 0 35 0 8 V 2 Connector 1 Tester probe 3 Tester probe 2 Connector 4 Treminal 1 2 3 6 4 0 35 0 8 V 0 35 0 8 V 0 35 0 8 V 0 7 1 1 V 2 Connector 1 Tester probe 1 Tester probe 2 Connector 4 Treminal 1 2 3 4 5 No continuity 5 No continuity 5 No continuity 2 Connector 3 Tester probe 6 WHITE 7 GRAY 9 RED 8 BLUE 10 Viewed from ter...

Page 301: ...té des bornes 1 Prüfgerät Sonde 2 Stecker 3 Prüfgerät Sonde 4 Klemme 5 Kein Durchgang 6 WEISS 7 GRAU 8 BLAU 9 ROT 10 Ansicht von der Klemmenseite 1 Sonda del probador 2 Conector 3 Sonda del probador 4 Terminal 5 No hay continuidad 6 BLANCO 7 GRIS 8 AZUL 9 ROJO 10 Visto desde el lado de los terminales cap 06 EU65is 6500is 3 qxd 07 12 17 4 52 PM ページ6 4 ...

Page 302: ... 2 4 mm SCREW 5 5 x 8 mm PAN HEAD SCREW 2 RIGHT HANDLE BRACKET 3 R MARK 4 8 mm FLANGE NUT 4 8 LEFT HANDLE BRACKET 9 L MARK 10 WIRE HARNESS BAND 2 14 FUSE BOX 11 15A FUSE 13 1A FUSE 3 12 FUSE COVER INSTALLATION Loosely install the 8 mm flange nuts then pull the bracket up and tighten the 8 mm flange nuts securely INSTALLATION Loosely install the 8 mm flange nuts then pull the bracket up and tighten...

Page 303: ...llar P 16 1 Batería P 5 1 Cubierta frontal P 6 1 Unidad del inversor P 6 2 2 Gire la palanca de la válvula del combustible a la posición OFF 3 Extraiga el tornillo de 4 mm y la palanca de la válvula del combustible 4 La instalación es en el orden inverso a la extracción Tenga en cuenta lo siguiente 5 Instale la palanca de la válvula del combustible y apriete el tornillo de 4 mm a la torsión especi...

Page 304: ... mm PAN HEAD SCREW 2 19 WIRE HARNESS BAND 7 18 MAIN WIRE HARNESS 5 CIRCUIT PROTECTOR 30A 6 CIRCUIT PROTECTOR 20A 2 8 RECEPTACLE 30A 125 250V 7 RECEPTACLE 20A 125V 1 IGNITION SWITCH 4 RECEPTACLE 30A 125V INSPECTION P 6 11 INSPECTION P 6 11 3 CIRCUIT BREAKER 25A INSPECTION P 6 12 21 VOLTAGE SELECTOR SWITCH INSPECTION P 6 11 INSPECTION P 6 11 13 ECO THROTTLE SWITCH INSPECTION P 6 11 REASSEMBLY P 6 12...

Page 305: ... x 8 mm 2 18 HAUPTKABELBAUM 19 KABELBAUM HALTEBAND 7 20 GUMMITÜLLE DES STEUERKABELBAUMS 21 SPANNUNGSWÄHLSCHALTER 22 BUNDMUTTER 4 mm 9 b DESMONTAJE Sólo el tipo C Para ver las conexiones del mazo de cables consulte la P 6 13 1 INTERRUPTOR DE ENCENDIDO 2 UNIDAD DE CONTROL DEL GENERADOR 3 DISYUNTOR DEL CIRCUITO 25 A 4 RECEPTÁCULO 30 A 125 V 5 PROTECTOR DEL CIRCUITO 30 A 6 PROTECTOR DEL CIRCUITO 20 A ...

Page 306: ...TOR CONTROL UNIT 6 CONTROL PANEL 7 5 x 12 mm PAN HEAD SCREW 2 12 WIRE HARNESS BAND 7 11 MAIN WIRE HARNESS 5 RECEPTACLE 30A 125 250V 4 RECEPTACLE 20A 125V 1 IGNITION SWITCH 3 RECEPTACLE 30A 125V 14 VOLTAGE SELECTOR SWITCH INSPECTION P 6 11 INSPECTION P 6 11 8 ECO THROTTLE SWITCH INSPECTION P 6 11 REASSEMBLY P 6 12 cap 06 EU65is 6500is Eu qxd 07 12 17 4 51 PM ページ6 7 ...

Page 307: ...TEUERKABELBAUM 10 FLACHKOPFSCHRAUBE 5 x 8 mm 2 11 HAUPTKABELBAUM 12 KABELBAUM HALTEBAND 7 13 GUMMITÜLLE DES STEUERKABELBAUMS 14 SPANNUNGSWÄHLSCHALTER 15 BUNDMUTTER 4 mm 9 Sólo el tipo L Para ver las conexiones del mazo de cables consulte la P 6 14 1 INTERRUPTOR DE ENCENDIDO 2 UNIDAD DE CONTROL DEL GENERADOR 3 RECEPTÁCULO 30 A 125 V 4 RECEPTÁCULO 20 A 125 V 5 RECEPTÁCULO 30 A 125 250 V 6 PANEL DE C...

Page 308: ...NERATOR CONTROL UNIT 5 CONTROL PANEL 8 5 x 12 mm PAN HEAD SCREW 2 7 4 x 20 mm FLAT SCREW 12 13 WIRE HARNESS BAND 7 12 MAIN WIRE HARNESS 6 RECEPTACLE 15A 250V 3 1 IGNITION SWITCH 4 CONSENT SET PLATE 3 INSPECTION P 6 11 2 4 mm FLANGE NUT 9 ECO THROTTLE SWITCH INSPECTION P 6 11 REASSEMBLY P 6 12 cap 06 EU65is 6500is Eu qxd 07 12 17 4 51 PM ページ6 8 ...

Page 309: ...CHKOPFSCHRAUBE 5 x 12 mm 2 9 ECO DROSSELKLAPPENSCHALTER 10 STEUERKABELBAUM 11 FLACHKOPFSCHRAUBE 5 x 8 mm 2 12 HAUPTKABELBAUM 13 KABELBAUM HALTEBAND 7 14 GUMMITÜLLE DES STEUERKABELBAUMS Sólo el tipo U Para ver las conexiones del mazo de cables consulte la P 6 15 1 INTERRUPTOR DE ENCENDIDO 2 TUERCA DE BRIDA DE 4 mm 3 GCU UNIDAD DE CONTROL DEL GENERADOR 4 PLACA DE AJUSTE DEL RECEPTÁCULO 3 5 PANEL DE ...

Page 310: ... WIRE HARNESS 2 GCU GENERATOR CONTROL UNIT 5 CONTROL PANEL 6 5 x 12 mm PAN HEAD SCREW 2 3 4 mm FLANGE NUT 5 11 WIRE HARNESS BAND 7 10 MAIN WIRE HARNESS 4 RECEPTACLE 20A 250V 2 1 IGNITION SWITCH INSPECTION P 6 11 7 ECO THROTTLE SWITCH INSPECTION P 6 11 REASSEMBLY P 6 12 cap 06 EU65is 6500is Eu qxd 07 12 17 4 51 PM ページ6 9 ...

Page 311: ... x 12 mm 2 7 ECO DROSSELKLAPPENSCHALTER 8 STEUERKABELBAUM 9 FLACHKOPFSCHRAUBE 5 x 8 mm 2 10 HAUPTKABELBAUM 11 KABELBAUM HALTEBAND 7 12 GUMMITÜLLE DES STEUERKABELBAUMS Sólo el tipo R Para ver las conexiones del mazo de cables consulte la P 6 16 1 INTERRUPTOR DE ENCENDIDO 2 GCU UNIDAD DE CONTROL DEL GENERADOR 3 TUERCA DE BRIDA DE 4 mm 5 4 RECEPTÁCULO 20 A 250 V 2 5 PANEL DE CONTROL 6 TORNILLO DE CAB...

Page 312: ...R CONTROL UNIT 5 CONTROL PANEL 9 5 x 12 mm PAN HEAD SCREW 2 8 4 x 16 mm FLAT SCREW 12 14 WIRE HARNESS BAND 7 13 MAIN WIRE HARNESS 7 RECEPTACLE 16A 250V 3 10 ECO THROTTLE SWITCH INSPECTION P 6 11 REASSEMBLY P 6 12 1 IGNITION SWITCH 4 CONSENT SET PLATE 3 6 PACKING 3 INSPECTION P 6 11 2 4 mm FLANGE NUT cap 06 EU65is 6500is Eu qxd 07 12 17 4 51 PM ページ6 10 ...

Page 313: ...9 FLACHKOPFSCHRAUBE 5 x 12 mm 2 10 ECO DROSSELKLAPPENSCHALTER 11 STEUERKABELBAUM 12 FLACHKOPFSCHRAUBE 5 x 8 mm 2 13 HAUPTKABELBAUM 14 KABELBAUM HALTEBAND 7 15 GUMMITÜLLE DES STEUERKABELBAUMS Sólo el tipo SK Para ver las conexiones del mazo de cables consulte la P 6 17 1 INTERRUPTOR DE ENCENDIDO 2 TUERCA DE BRIDA DE 4 mm 3 GCU UNIDAD DE CONTROL DEL GENERADOR 4 PLACA DE AJUSTE DEL RECEPTÁCULO 3 5 PA...

Page 314: ...tween the switch terminals There should be continuity between the terminals with the switch in the ON position and no continuity with the switch in the OFF position If there is any abnormality replace the switch with a new one 6 11 1 Terminal 1 2 3 4 5 7 8 2 Position REM OFF ON ST If there is any abnormality replace the switch with a new one If there is any abnormality replace the switch with a ne...

Page 315: ...ts muss der Schalter durch ein Neuteil ersetzt werden SPANNUNGSWÄHLSCHALTER nur für Typen C und L Entsprechend der untenstehenden Tabelle auf Durchgang zwischen den Klemmen überprüfen Nur für Typ L 1 Klemme 2 Position Nur für Typ C 1 Klemme 2 Position Im Falle eines Defekts muss der Schalter durch ein Neuteil ersetzt werden UNTERBRECHER nur für Typ C Auf Durchgang zwischen den Schalterklemmen über...

Page 316: ...tch so that the ON and OFF mark comes to the bottom d REASSEMBLY Reassemble the control panel in the reverse order of disassembly ECO THROTTLE SWITCH C and L types only Attach the switch so that the ON and OFF mark comes to the right viewed from the front of the panel 6 12 4 ON MARK 5 ECO THROTTLE SWITCH 3 OFF MARK 2 CONTROL PANEL 1 C and L types only 5 ON MARK 2 ECO THROTTLE SWITCH 4 OFF MARK 3 C...

Page 317: ...u der Bedientafel erfolgt in umgekehrter Reihenfolge des Ausbaus ECO DROSSELKLAPPENSCHALTER Nur für Typen C und L Den Schalter so einbauen dass die ON und OFF Markierungen nach rechts weisen von der Vorderseite der Bedientafel her gesehen 1 Nur für Typen C und L 2 BEDIENTAFEL 3 OFF MARKIERUNG 4 ON MARKIERUNG 5 ECO DROSSELKLAPPENSCHALTER Nur für Typen U R und SK Den Schalter so anbringen dass sich ...

Page 318: ... FUSE BOX 13 ECO THROTTLE SWITCH 14 CIRCUIT BREAKER 25A 5 RECEPTACLE 30A 125 250V 16 RECEPTACLE 20A 125V 9 RECEPTACLE 30A 125V GND1 3 CONTROL WIRE HARNESS 15 Connector P 2 60 WIRE CONNECTION C type only 1 Terminal 2 Wire color number GND1 G GND2 G GND9 W C11 W C12 Y C31 Bu C32 R C33 Bu C35 R C36 Bu C37 R C38 Bu C51 Bu 1 Terminal 2 Wire color number C52 R C53 Bu T31 W T32 W T33 Bu T34 W T35 R T36 G...

Page 319: ...E 30 A 125 250 V 6 UNTERBRECHER 20 A 7 KABELBAUM HALTEBAND 7 8 UNTERBRECHER 30 A 9 STECKDOSE 30 A 125 V 10 ZÜNDSCHALTER 11 SICHERUNGSKASTEN 12 SPANNUNGSWÄHLSCHALTER 13 ECO DROSSELKLAPPENSCHALTER 14 UNTERBRECHER 25 A 15 Stecker S 2 60 16 STECKDOSE 20 A 125 V CONEXIÓN DE CABLES Sólo el tipo C 1 Número de terminal 2 Color del cable 3 MAZO DE CABLES DE CONTROL 4 GCU UNIDAD DE CONTROL DEL GENERADOR 5 R...

Page 320: ... SWITCH 4 GCU GENERATOR CONTROL UNIT 4 GCU GENERATOR CONTROL UNIT 11 VOLTAGE SELECTOR SWITCH 10 FUSE BOX 12 ECO THROTTLE SWITCH GND1 GND2 T37 5 WHITE MARKINGS T34 T33 T36 T35 T31 T32 C12 C11 T38 7 WIRE HARNESS BAND 7 14 RECEPTACLE 30A 125 250V 6 RECEPTACLE 20A 125V 8 RECEPTACLE 30A 125V 13 Connector P 2 60 cap 06 EU65is 6500is Eu qxd 07 12 17 4 51 PM ページ6 14 ...

Page 321: ... WEISSE KLEBEBAND MARKIERUNGEN 6 STECKDOSE 20 A 125 V 7 KABELBAUM HALTEBAND 7 8 STECKDOSE 30 A 125 V 9 ZÜNDSCHALTER 10 SICHERUNGSKASTEN 11 SPANNUNGSWÄHLSCHALTER 12 ECO DROSSELKLAPPENSCHALTER 13 Stecker S 2 60 14 STECKDOSE 30 A 125 250 V Sólo el tipo L 1 Número de terminal 2 Color del cable 3 MAZO DE CABLES DE CONTROL 4 GCU UNIDAD DE CONTROL DEL GENERADOR 5 MARCAS BLANCAS 6 RECEPTÁCULO 20 A 125 V 7...

Page 322: ...L UNIT 4 GCU GENERATOR CONTROL UNIT 11 FUSE BOX 12 ECO THROTTLE SWITCH GND1 GND2 8 Brown 8 Brown 8 Brown 6 Yellow Green 6 Yellow Green 6 Yellow Green C12 C11 7 White 7 White 7 White 9 WIRE HARNESS BAND 7 5 RECEPTACLE 15A 250V 3 13 Connector P 2 60 3 CONTROL WIRE HARNESS cap 06 EU65is 6500is Eu qxd 07 12 17 4 51 PM ページ6 15 ...

Page 323: ...KABELBAUM 4 GCU GENERATOR STEUEREINHEIT 5 STECKDOSE 15 A 250 V 3 6 Gelb grün 7 Weiß 8 Braun 9 KABELBAUM HALTEBAND 7 10 ZÜNDSCHALTER 11 SICHERUNGSKASTEN 12 ECO DROSSELKLAPPENSCHALTER 13 Stecker S 2 60 Sólo el tipo U 1 Número de terminal 2 Color del cable 3 MAZO DE CABLES DE CONTROL 4 GCU UNIDAD DE CONTROL DEL GENERADOR 5 RECEPTÁCULO 15 A 250 V 3 6 Amarillo verde 7 Blanco 8 Marrón 9 BANDA DEL MAZO D...

Page 324: ...r T35 W T36 Y G 7 IGNITION SWITCH 4 GCU GENERATOR CONTROL UNIT 4 GCU GENERATOR CONTROL UNIT 8 FUSE BOX 9 ECO THROTTLE SWITCH GND1 GND2 C12 C11 6 WIRE HARNESS BAND 7 5 RECEPTACLE 20A 250V 2 T33 T32 T31 T34 T35 T36 3 CONTROL WIRE HARNESS 10 Connector P 2 60 cap 06 EU65is 6500is Eu qxd 07 12 17 4 51 PM ページ6 16 ...

Page 325: ...abelfarbe 3 STEUERKABELBAUM 4 GCU GENERATOR STEUEREINHEIT 5 STECKDOSE 20 A 250 V 2 6 KABELBAUM HALTEBAND 7 7 ZÜNDSCHALTER 8 SICHERUNGSKASTEN 9 ECO DROSSELKLAPPENSCHALTER 10 Stecker S 2 60 Sólo el tipo R 1 Número de terminal 2 Color del cable 3 MAZO DE CABLES DE CONTROL 4 GCU UNIDAD DE CONTROL DEL GENERADOR 5 RECEPTÁCULO 20 A 250 V 2 6 BANDA DEL MAZO DE CABLES 7 7 INTERRUPTOR DE ENCENDIDO 8 CAJA DE...

Page 326: ...N SWITCH 4 GCU GENERATOR CONTROL UNIT 4 GCU GENERATOR CONTROL UNIT 11 FUSE BOX 12 ECO THROTTLE SWITCH GND1 GND2 6 Brown 6 Brown 6 Brown 7 Yellow Green 7 Yellow Green C12 C11 9 White 9 White 9 White 8 WIRE HARNESS BAND 7 5 RECEPTACLE 16A 250V 3 13 Connector P 2 60 cap 06 EU65is 6500is Eu qxd 07 12 17 4 51 PM ページ6 17 ...

Page 327: ...RKABELBAUM 4 GCU GENERATOR STEUEREINHEIT 5 STECKDOSE 16 A 250 V 3 6 Braun 7 Gelb grün 8 KABELBAUM HALTEBAND 7 9 Weiß 10 ZÜNDSCHALTER 11 SICHERUNGSKASTEN 12 ECO DROSSELKLAPPENSCHALTER 13 Stecker S 2 60 Sólo el tipo SK 1 Número de terminal 2 Color del cable 3 MAZO DE CABLES DE CONTROL 4 GCU UNIDAD DE CONTROL DEL GENERADOR 5 RECEPTÁCULO 16 A 250 V 3 6 Marrón 7 Amarillo verde 8 BANDA DEL MAZO DE CABLE...

Page 328: ...fuel Keep heat sparks and flame away Wipe up spills immediately Handle fuel only outdoors WARNING 4 4 x 19 mm SCREW 2 1 N m 0 2 kgf m 1 5 lbf ft 3 4 x 19 mm SCREW INSTALLATION Set the fuel tank seal with the lip of the seal facing upward 5 FUEL VALVE LEVER 6 x 25 4 2 6 mm WASHER 4 3 2 LIP 3 1 FUEL TANK SEAL 1 FUEL TANK ASSEMBLY DISASSEMBLY REASSEMBLY P 7 2 cap 07 EU65is 6500is Eu qxd 07 12 17 4 53...

Page 329: ...ff sofort aufwischen Kraftstoff nur im Freien handhaben 1 RESERVOIR D ESSENCE 7 1 ATTENTION L essence est très inflammable et explosive Vous risquez de vous brûler ou d être gravement blessé en manipulant de l essence Garder chaleur étincelles et flammes à distance Essuyer immédiatement toute essence renversée Ne manipuler l essence qu à l extérieur ADVERTENCIA La gasolina es muy inflamable y expl...

Page 330: ...TRAINER INSTALLATION Before installation clean the screen and check for damage Replace if necessary 11 FUEL STRAINER INSTALLATION Before installation clean the screen and check for damage Replace if necessary 13 FUEL TUBE INSTALLATION Check the fuel tubes for deterioration cracks or signs of leakage Replace the fuel tube if necessary 7 TANK CUSHION RUBBER 4 REASSEMBLY Install the rubber with the t...

Page 331: ...ué COUPLE DE SERRAGE 23 N m 2 3 kgf m 15 1 ROBINET D ESSENCE 15 2 RESERVOIR D ESSENCE vu d en bas WARNUNG Benzin ist extrem feuergefährlich und unter gewissen Bedingungen explosiv Wenn sich Benzin bei der Handhabung entzündet kann dies Verbrennungen und schwere Verletzungen verursachen Wärmequellen Funken und offene Flammen sind fernzuhalten Verschütteten Kraftstoff sofort aufwischen Kraftstoff nu...

Page 332: ...4 OUTER MUFFLER PROTECTOR SEAL 3 INSULATOR 2 OUTER MUFFLER PROTECTOR 1 REAR COVER SEAL 2 The muffler becomes very hot during operation and remains hot for a while after stopping the engine Be careful not to touch the muffler while it is hot Allow it to cool before proceeding Do not touch the insulator with bare hands The glass wool of the material sticks in the skin and is dangerous 8 6 mm CAP NUT...

Page 333: ...mpfer erhitzt sich während des Betriebs sehr stark und bleibt auch nach dem Abstellen des Motors noch einige Zeit heiß Darauf achten dass der heiße Schalldämpfer nicht berührt wird Vor Beginn der Aus und Einbau Arbeiten daher warten bis sich der Schalldämpfer abgekühlt hat Den Isolator nicht mit bloßen Händen berühren Die Fasern der Isolator Glaswolle können in die Haut eindringen was ein Gesundhe...

Page 334: ...LLAR 2 1 8 mm FLANGE NUT 4 9 5 x 16 mm PAN HEAD SCREW 2 24 N m 2 4 kgf m 18 lbf ft 3 5 N m 0 4 kgf m 2 6 lbf ft 8 x 20 2 27 N m 2 8 kgf m 20 lbf ft The muffler becomes very hot during operation and remains hot for a while after stopping the engine Be careful not to touch the muffler while it is hot Allow it to cool before proceeding 4 EXHAUST PIPE INSTALLATION Remove any carbon deposits 5 EXHAUST ...

Page 335: ...fernen EINBAU Vor dem Einbau mit einem Plastikhammer leicht gegen den Schalldämpfer schlagen um jegliche Verbrennungsrückstände zu entfernen REINIGEN S 3 6 3 5 N m 0 4 kgf m Le silencieux devient très chaud pendant le fonctionnement et le reste pendant un certain temps après avoir arrêté le moteur Faire attention à ne pas toucher le silencieux alors qu il est chaud Le laisser refroidir avant de pr...

Page 336: ... the skin and is dangerous 6 x 12 5 8 8 mm STUD BOLT 2 5 6 mm FLANGE NUT 6 9 STOPPER RUBBER 2 3 6 mm SPECIAL BOLT 3 8 5 N m 0 9 kgf m 6 3 lbf ft 1 INNER MUFFLER PROTECTOR INSTALLATION Install the inner muffler protector by aligning the stopper rubber with the cutout on the frame side channel 1 1 CUTOUT 1 2 STOPPER RUBBER 8 x 16 2 cap 08 EU65is 6500is 07 12 17 4 54 PM ページ8 3 ...

Page 337: ...ßen Händen berühren Die Fasern der Isolator Glaswolle können in die Haut eindringen was ein Gesundheitsrisiko darstellt EINBAU Die innere Schalldämpfer Schutzblende so einbauen dass das Anschlaggummi mit dem Einschnitt auf der rahmenseitigen Nut ausgerichtet ist 1 1 EINSCHNITT 1 2 ANSCHLAGGUMMI 8 5 N m 0 9 kgf m Ne pas toucher l isolant avec les mains nues La laine de verre du matériau colle à la ...

Page 338: ... 3 5 WIRE HARNESS CLIP BRACKET 4 STARTER GRIP 3 GRIP REINFORCEMENT 2 RECOIL STARTER ROPE REMOVAL INSTALLATION Make a knot between the recoil starter case and front frame before removing or installing the starter grip INSTALLATION Align the grooves with the bottom plate 5 1 GROOVES 5 2 BOTTOM PLATE 1 RECOIL STARTER ASSEMBLY DISASSEMBLY P 9 2 REASSEMBLY P 9 3 cap 09 EU65is 6500is 07 12 17 4 55 PM ペー...

Page 339: ... 3 REFUERZO DE LA EMPUÑADURA 4 EMPUÑADURA DEL ARRANCADOR 5 MÉNSULA DEL RETENEDOR DEL MAZO DE CABLES AUS UND EINBAU Bevor der Seilzuganlasser Griff abgenommen oder montiert wird einen Knoten zwischen Seilzuganlasser Gehäuse und vorderem Rahmen anbringen ZERLEGUNG S 9 2 ZUSAMMENBAU S 9 3 EINBAU Die Nuten mit der Bodenplatte ausrichten 5 1 NUTEN 5 2 BODENPLATTE 1 SEILZUGANLASSER 9 1 2 VORDERER RAHMEN...

Page 340: ...w the return spring to come out 9 STARTER CASE 8 RETURN SPRING 7 STARTER REEL 6 RATCHET SPRING 2 5 RATCHET COVER 4 COVER BOLT 3 FRICTION SPRING 2 RATCHET 2 1 RECOIL STARTER ROPE REASSEMBLY Check the rope for fraying or wear before installation cap 09 EU65is 6500is 07 12 17 4 55 PM ページ9 2 ...

Page 341: ...7 CARRETE DEL ARRANCADOR 8 RESORTE DE RETORNO 9 CAJA DEL ARRANCADOR VORSICHT Bei diesen Arbeiten Schutzhandschuhe und eine Schutzbrille tragen Beim Zusammenbau darauf achten dass die Rückzugsfeder nicht herausgeschleudert wird EINBAU Das Seil vor dem Einbau auf Ausfransungen und Verschleiß überprüfen Porter des gants et une protection faciale Pendant le remontage faire attention à ne pas laisser s...

Page 342: ...ply grease to the spring hook and boss of the starter case Align the spring inner hook to the case claw on the case by turning the reel counterclockwise 5 Install the ratchet spring and ratchet as shown 1 ROPE 2 STARTER REEL 1 STARTER REEL 2 RETURN SPRING 1 STARTER CASE 2 STARTER REEL 1 RATCHET 1 RATCHET 2 RATCHET SPRING Wear gloves and eye protection During assembly take care not to allow the ret...

Page 343: ...versehen Den inneren Haken der Feder mit der Klaue am Gehäuse ausrichten indem die Spule im Gegenuhrzeigersinn gedreht wird 1 SEILZUGANLASSER GEHÄUSE 2 SEILZUGANLASSER SPULE 5 Die Sperrklinkenfeder und die Sperrklinke einbauen wie in der Abbildung gezeigt 1 SPERRKLINKE 2 SPERRKLINKENFEDER c MONTAJE 1 Inserte la cuerda del arrancador en el carrete del arrancador de retroceso y ate la cuerda como se...

Page 344: ...Tighten the cover bolt securely 9 Turn the reel three full turns counterclockwise to preload the return spring 10 Pass the rope through the starter case hole and tie the rope as shown 11 Check the operation of the ratchet by pulling the starter rope out several times 2 RATCHET COVER 3 COVER BOLT 1 FRICTION SPRING 1 CASE HOLE cap 09 EU65is 6500is 07 12 17 4 55 PM ページ9 4 ...

Page 345: ...INKEN ABDECKUNG 3 ABDECKUNGSSCHRAUBE 9 Die Spule um drei volle Umdrehungen im Gegenuhrzeigersinn drehen um die Rückzugsfeder zu spannen 10 Das Seilzuganlasser Seil durch die Bohrung des Seilzuganlasser Gehäuses führen dann das Seil verknoten wie in der Abbildung gezeigt 1 GEHÄUSEBOHRUNG 11 Das Seilzuganlasser Seil mehrere Male ziehen um die Sperrklinke auf einwandfreie Funktion zu überprüfen 6 Apl...

Page 346: ...ATTERY BOX RUBBER 4 8 x 12 5 24 N m 2 4 kgf m 18 lbf ft 6 SEPARATOR SEAL RUBBER B REASSEMBLY Install the separator seal rubber to the front frame securely as shown 4 INVERTER UNIT CUSHION RUBBER 3 6 2 SEPARATOR SEAL RUBBER B 6 1 FRONT FRAME 5 SEPARATOR SEAL RUBBER A REASSEMBLY Install the separator seal rubber to the front frame securely as shown 5 2 SEPARATOR SEAL RUBBER A 5 1 FRONT FRAME 5 3 FAN...

Page 347: ...DOR FRONTAL 4 GOMA AMORTIGUADORA DE LA UNIDAD DEL INVERSOR 3 5 GOMA DEL SELLO DEL SEPARADOR A 6 GOMA DEL SELLO DEL SEPARADOR B 7 GOMA DE LA CAJA DE LA BATERÍA 4 8 MAZO DE CABLES DEL GENERADOR 9 RETENEDOR B DEL MAZO DE CABLES EINBAU Die Gummi Trennabdichtung fest in den vorderen Rahmen einschieben wie in der Abbildung gezeigt 5 1 VORDERER RAHMEN 5 2 GUMMI TRENNABDICHTUNG A 5 3 VENTILATORABDECKUNG E...

Page 348: ...uter muffler protector P 8 1 Muffler P 8 2 Inner muffler protector P 8 3 2 Remove the carburetor drain tube and air vent tube from the under plate See page 4 3 for carburetor drain tube and air vent tube routing 3 Open the wire harness band and disconnect the ignition pulse generator wire and engine temperature sensor wire connectors 4 Remove the ground terminal bolt 5 Remove the ground terminal a...

Page 349: ...ENPLATTE 2 VERGASER ABLASSSCHLAUCH UND ENTLÜFTUNGSSCHLAUCH 3 Das Kabelbaum Halteband öffnen dann die Stecker vom Kabel des Zündimpulsgebers und vom Kabel des Motortemperatur Sensors abziehen 1 KABELBAUM HALTEBAND 4 Die Schraube der Masseklemme entfernen 5 Die Masseklemme entfernen dann das Kabelbaum Halteband öffnen 1 KABELBAUM HALTEBAND 2 MASSEKLEMME 3 SCHRAUBE DER MASSEKLEMME 10 MOTOR CONJUNTO D...

Page 350: ...racket 9 Installation is the reverse order of the removal Note the following 10 Install the ground terminal and tighten the ground terminal bolt to the specified torque TORQUE 3 N m 0 3 kgf m 2 2 Ibf ft 2 REAR ENGINE MOUNT BRACKET 1 ENGINE GENERATOR ASSEMBLY 8 x 30 2 3 10 mm FLANGE NUT 4 1 10 mm FLANGE NUT 2 GROUND CABLE cap 10 EU65is 6500is 07 12 17 4 56 PM ページ10 2 ...

Page 351: ...hintere Motorhalterung abnehmen 9 Der Einbau geschieht in umgekehrter Reihenfolge des Ausbaus Dabei sind die folgenden Punkte besonders zu beachten 10 Die Masseklemme anbringen dann das Massekabel mit dem vorgeschriebenen Anzugsdrehmoment festziehen ANZUGSDREHMOMENT 3 N m 0 3 kgf m 1 MOTOR GENERATOR EINHEIT 2 HINTERE MOTORHALTERUNG 3 BUNDMUTTER 10 mm 4 6 Extraiga las cuatro tuercas de brida de 10 ...

Page 352: ...LEFT ENGINE BRACKET 6 BOTTOM RUBBER A 3 6 x 16 2 11 BOTTOM RUBBER B 8 WIRE HARNESS BAND 2 10 UNDER PLATE 9 OIL DRAIN HOLE COVER REASSEMBLY Before installation check for cracks or deformation then install by aligning tab with the hole in the frame 6 1 TAB 6 2 HOLE 3 10 mm FLANGE NUT 4 34 N m 3 5 kgf m 25 lbf ft 13 6 mm LOCK WASHER 1 GROUND CABLE 2 6 mm FLANGE NUT 8 5 N m 0 9 kgf m 6 3 lbf ft cap 10...

Page 353: ...OMAS INFERIORES a DESMONTAJE MONTAJE 1 Extraiga el conjunto del motor generador P 10 1 y 2 2 Extraiga el soporte y las ruedas P 16 3 1 CABLE DE TIERRA 2 TUERCA DE BRIDA DE 6 mm 3 TUERCA DE BRIDA DE 10 mm 4 4 MÉNSULA DEL MOTOR FRONTAL IZQUIERDA 5 BASTIDOR 6 GOMA INFERIOR A 3 7 TUERCA DE BRIDA DE 8 mm 4 8 BANDA DEL MAZO DE CABLES 2 9 CUBIERTA DEL ORIFICIO DE DRENAJE DE ACEITE 10 PLACA INFERIOR 11 GO...

Page 354: ...ted below for other engine shroud removal installation Head cover shroud P 4 4 Upper shroud P 11 1 Right side shroud P 11 1 Lower shroud P 13 1 Engine shroud P 13 1 The engine shrouds listed above can be removed and installed with the engine in the frame Install the shrouds in the numbered sequence shown when the engine is removed from the frame and install the shrouds before installing the engine...

Page 355: ...hirmung S 13 1 Die oben aufgeführten Abschirmungen können bei eingebautem Motor abgenommen und installiert werden Wenn der Motor aus dem Rahmen herausgenommen wurde sind die Abschirmungen in der angegebenen Reihenfolge zu installieren dabei sind die Abschirmungen anzubringen bevor der Motor in den Rahmen eingebaut wird 1 OBERE ABSCHIRMUNG 2 RECHTE ABSCHIRMUNG 3 UNTERE ABSCHIRMUNG 4 BODENABSCHIRMUN...

Page 356: ...onvex on the shroud 6 RIGHT SIDE SHROUD INSULATOR 6 3 RIGHT SIDE SHROUD INSULATOR 6 1 CUTOUT 6 2 CONVEX Do not touch the insulator with bare hands The glass wool of the material sticks in the skin and is dangerous 4 6 mm SPECIAL BOLT 3 8 5 N m 0 9 kgf m 6 3 lbf ft 3 UPPER SHROUD INSTALLATION Insert the flange of the upper shroud into the groove of the right side shroud 3 1 FLANGE 3 2 GROOVE 3 4 UP...

Page 357: ...GE Reposer l isolant sur le bouclier supérieur avec l attache tordue de la manière indiquée 1 1 ISOLANT DE BOUCLIER SUPERIEUR 1 2 ATTACHE REPOSE Insérer la bride du bouclier supérieur dans la rainure du bouclier droit 3 1 BRIDE 3 2 RAINURE 3 3 BOUCLIER DROIT 3 4 BOUCLIER SUPERIEUR 8 5 N m 0 9 kgf m REMONTAGE Reposer l isolant sur le bouclier droit en alignant la découpe sur la partie convexe du bo...

Page 358: ...6 2 GENERATOR HARNESS GROMMET 2 FAN COVER a DISASSEMBLY REASSEMBLY The fan cover can be removed with the engine in the frame 1 Remove the following parts Front cover P 6 1 Battery P 5 1 Inverter unit P 6 2 Control panel P 6 5 Fuel tank P 7 1 Recoil starter P 9 1 2 Remove the 10 mm flange nuts and raise the fan cover until the stud bolt of the bottom rubber is clear from the fan cover by placing wo...

Page 359: ...motor en el bastidor 1 Extraiga las partes siguientes Cubierta frontal P 6 1 Batería P 5 1 Unidad del inversor P 6 2 Panel de control P 6 5 Depósito de combustible P 7 1 Arrancador de retroceso P 9 1 2 Extraiga las tuercas de brida de 10 mm y levante la cubierta del ventilador hasta que el perno prisionero de la goma inferior se haya separado de la cubierta del ventilador poniendo bloques de mader...

Page 360: ...th the holes of the rotor 5 1 LUG 5 2 HOLE 2 5 x 14 mm SOCKET BOLT 2 6 N m 0 6 kgf m 4 4 lbf ft 10 HARNESS CLIP 4 IGNITION PULSE GENERATOR BRACKET 6 x 25 2 INSTALLATION P 11 4 INSPECTION P 11 4 3 IGNITION PULSE GENERATOR 1 10 x 25 DISASSEMBLY REASSEMBLY Remove the ignition pulse generator and hold the rotor with a commercially available strap wrench and loosen or tighten the flange bolt Take care ...

Page 361: ...LE A COURROIE disponible dans le commerce 6 N m 0 6 kgf m REPOSE P 11 4 CONTROLE P 11 4 REMONTAGE Reposer le ventilateur de refroidissement en alignant les quatre pattes sur les trous du rotor 5 1 PATTE 5 2 TROU REMONTAGE Serrer les boulons à collerette de 6 x 25 mm en un modèle croisé à deux ou trois passes AUS UND EINBAU Den Zündimpulsgeber ausbauen dann den Rotor mit einem im Fachhandel erhältl...

Page 362: ...generator and loosely install the ignition pulse generator bracket mounting bolts 6 x 25 mm flange bolt Take care not to pinch the generator wire harness with the ignition pulse generator bracket b INSPECTION Measure the resistance between the terminal and the ignition pulse generator base Resistance 297 363 Ω 0 5 0 2 mm 0 020 0 008 in 2 PROJECTION POINT Air gap at rotor 0 5 0 2 mm 0 02 0 01 in 6 ...

Page 363: ...erlehre zwischen dem Zündimpulsgeber und dem Vorsprung am Rotor einführen 3 Den Zündimpulsgeber fest gegen den Rotor drücken dann die Befestigungsschrauben der Zündimpulsgeber Halterung festziehen Danach die Fühlerlehre herausnehmen 1 FÜHLERLEHRE 2 VORSPRUNG b ÜBERPRÜFUNG Den Widerstand zwischen der Klemme und dem Zündimpulsgeber messen INSTALACIÓN DEL GENERADOR DE PULSOS DE ENCENDIDO 1 Instale el...

Page 364: ...REASSEMBLY P 11 7 7 ROTOR DISASSEMBLY Remove the rotor using a special tool flywheel puller Do not remove the rotor by tapping it with a hammer 6 6 x 78 mm SOCKET BOLT 4 5 STATOR 2 STATOR COLLAR B 2 DOUBLE NOTCHED 4 STATOR COLLAR A 2 SINGLE NOTCHED 3 WOODRUFF KEY 8 1 STRAP WRENCH Commercially available 7 1 FLYWHEEL PULLER 07935 8050004 cap 11 EU65is 6500is 07 12 17 5 03 PM ページ11 5 ...

Page 365: ...ANT MOTEUR 07935 8050004 DEMONTAGE Maintenir le rotor avec une clé à courroie disponible dans le commerce desserrer et serrer l écrou spécial 8 1 CLE A COURROIE disponible dans le commerce REMONTAGE P 11 7 AUSBAU Den Rotor mit Hilfe eines Schwungscheiben Abziehers Spezialwerkzeug ausbauen Nicht versuchen den Rotor durch Hammerschläge zu lösen 7 1 SCHWUNGSCHEIBEN ABZIEHER 07935 8050004 AUSBAU Zum L...

Page 366: ...Install the woodruff key on the crankshaft 3 Install the stator while placing the generator wire harness as shown and tighten the four 6 x 78 mm socket bolts On stator reassembly TORQUE 11 N m 1 1 kgf m 8 lbf ft On crankcase replacement TORQUE 12 N m 1 2 kgf m 9 lbf ft 4 STATOR 5 STATOR COLLAR A 2 1 STATOR COLLAR B 2 2 GENERATOR WIRE HARNESS 6 THREE TERMINAL SIDE 3 RED TAPE 3 6 x 78 mm SOCKET BOLT...

Page 367: ...TE MIT DREI KLEMMEN 2 Jegliche Öl und Fettspuren vom kegelförmigen Bereich der Kurbelwelle und der kegelförmige Bohrung des Rotors restlos entfernen Den Woodruff Keil in die Kurbelwelle einsetzen 3 Den Stator einbauen wobei der Generatorkabelbaum so verlegt werden muss wie in der Abbildung gezeigt danach die vier 6 x 78 mm Innensechskant schrauben festziehen Beim Einbau des Stators ANZUGSDREHMOMEN...

Page 368: ... pinch your fingers during installation c INSPECTION GENERATOR Voltage inspection 1 Remove the inverter unit P 6 2 2 Pull the recoil starter and measure the voltage between the terminals of the and connectors with generator mounted Specified Voltage AC 15V or more 3 If the output voltage is less thasn the standard voltage Measure the resistance between the terminals of the and connectors according...

Page 369: ...trañas adheridas al interior del rotor antes de la instalación Instale el rotor en el cigüeñal alineando la ranura de chaveta con la chaveta de media luna 5 Aplique aceite a las roscas de la tuerca especial de 16 mm Reteniendo el rotor con una llave de cinta de venta en los establecimientos del ramo apriete la tuerca especial de 16 mm a la torsión especificada TORSIÓN 113 N m 11 5 kgf m 1 ROTOR 2 ...

Page 370: ... resistances are OK replace or repaire the generator wire harness If the resistance is out of the standard value replace the stator Coil Terminal number Standard resistance Master N1 U1 N1 V1 0 22 0 31 Ω N1 W1 Slave N2 U2 N2 V2 0 22 0 31 Ω N2 W2 N1 W1 1 STATOR V1 U1 U2 V2 W2 N2 cap 11 EU65is 6500is 07 12 17 5 03 PM ページ11 8 ...

Page 371: ...rt entspricht muss der Stator ersetzt werden 1 STATOR 4 Si la resistencia está fuera del margen estándar compruebe la resistencia de la bobina del estator de acuerdo con la tabla siguiente 5 Si todas las resistencias son satisfactorias reemplace o repare el mazo de cables del generador Si la resistencia está fuera del valor estándar reemplace el estator 1 ESTATOR Bobine Numéro de borne Résistance ...

Page 372: ...IL INSPECTION P 12 7 6 x 45 2 10 N m 1 0 kgf m 7 lbf ft 6 6 6 mm COLLAR 2 5 UPPER SHROUD BRACKET 3 HIGH TENSION CORD HOLDER 10 x 35 2 11 WOODRUFF KEY 8 16 mm SPECIAL NUT REMOVAL INSTALLATION P 12 2 9 FLYWHEEL WASHER 10 FLYWHEEL REMOVAL INSTALLATION P 12 2 1 8 mm NUT WASHER 2 STARTER MOTOR ASSEMBLY DISASSEMBLY REASSEMBLY P 12 3 12 OIL LEVEL SWITCH YELLOW WIRE 13 WIRE HARNESS BAND 4 SPARK PLUG CAP I...

Page 373: ...AUBE 5 x 12 mm 2 12 VOLANTE DE MOTOR MOTOR DE ARRANQUE BOBINA DE ENCENDIDO 1 VOLANTE DE MOTOR MOTOR DE ARRANQUE a EXTRACCIÓN INSTALACIÓN Extraiga las partes siguientes Depósito de combustible P 7 1 Cubierta trasera y protector del silenciador exterior P 8 1 Silenciador P 8 2 Protector del silenciador interior P 8 3 Protector superior y protector del lado derecho P 11 1 1 TUERCA CON ARANDELA DE 8 m...

Page 374: ...aft and tapered hole in the flywheel Install the woodruff key on the crankshaft and then install the flywheel 2 Apply oil to the threads of the 16 mm special nut Holding the flywheel with the crank pulley holder 47 mm tighten the 16 mm special nut TORQUE 113 N m 11 5 kgf m 83 lbf ft TOOL Crank pulley holder 47 mm 07925 6570000 1 CRANK PULLEY HOLDER 47 mm 07925 6570000 1 WOODRUFF KEY 2 FLYWHEEL 1 C...

Page 375: ...NBAU DER SCHWUNGSCHEIBE 1 Jegliche Öl und Fettspuren vom kegelförmigen Bereich der Kurbelwelle und der kegelförmige Bohrung der Schwungscheibe restlos entfernen Den Woodruff Keil in die Kurbelwelle einsetzen dann die Schwungscheibe montieren 1 WOODRUFF KEIL 2 SCHWUNGSCHEIBE 2 Das Gewinde der 16 mm Spezialmutter mit Motoröl versehen Die Schwungscheibe mit Hilfe des Kurbelwellen Riemenscheibenhalter...

Page 376: ...ion drive lever to the overrunning clutch 4 Set the starter solenoid by aligning the solenoid pin with the pinion drive lever 5 Install the front bracket and two 5 x 98 mm through bolts and tighten the 6 mm flange nuts 18 FRONT BRACKET 17 6 mm FLANGE NUT 2 16 PINION DRIVE LEVER 13 BRUSH HOLDER 15 STARTER SOLENOID INSPECTION P 12 4 12 BRUSH SPRING 4 11 BRUSH HOLDER INSULATOR 10 5 x 98 mm THROUGH BO...

Page 377: ...Instale el inducido en la culata 2 Alinee el corte de la ménsula trasera con el anillo protector del terminal de la escobilla e instale la ménsula trasera 3 Instale la palanca de impulsión del piñón en el embrague de sobremarcha 4 Coloque el solenoide del arrancador alineando el pasador del solenoide con la palanca de impulsión del piñón 5 Instale la ménsula frontal y los dos pernos pasantes de 5 ...

Page 378: ...TH Measure the brush length If brush length is less than service limit replace the brush ARMATURE Mica depth When the mica is clogged or its depth is smaller than the service limit recut the grooves using a hacksaw blade or a small file Continuity check commutator segments Check for continuity between the segments If an open circuit no continuity exists between any two segments replace the armatur...

Page 379: ...den ANKER Glimmertiefe Wenn der Zwischenraum zwischen den Segmenten blockiert ist oder der gemessene Wert der Glimmertiefe unter der Spezifikation liegt können die Segmente mit einem Metallsägeblatt oder einer kleinen Feile nachgearbeitet werden Durchgangsprüfung Kollektorsegmente Auf Durchgang zwischen den Kollektorsegmenten überprüfen Wenn ein offener Stromkreis kein Durchgang zwischen zwei beli...

Page 380: ...ositive brushes There should be continuity between both the negative brushes There should be continuity between both the positive and negative brushes If necessary replace the yoke assembly OVERRUNNING CLUTCH 1 Check the overrunning clutch for smooth axial movement If necessary apply oil or replace the overrunning clutch 2 Hold the pinion gear as shown and check that the reduction gear turns clock...

Page 381: ...ischen beiden positiven und negativen Bürsten vorhanden sein Nötigenfalls muss das Anlassergehäuse ersetzt werden FREILAUFKUPPLUNG 1 Sich vergewissern dass sich die Freilaufkupplung einwandfrei in Längsrichtung bewegen lässt Wenn dies nicht der Fall ist muss die Freilaufkupplung ersetzt werden 2 Das Anlasserritzel wie in der Abbildung gezeigt festhalten dann überprüfen ob sich das Untersetzungszah...

Page 382: ...ir of pliers as shown 4 Solder the plate on the terminal Before soldering heat the pressed part of the plate well to make sure the solder reaches the end of the pressed part Prevent the solder from flowing down the brush lead Do not allow the solder to run down onto the field winding of the yoke 1 Cut here 4 TERMINAL 3 BRUSH LEAD 2 BRUSH 2 Press here 1 TERMINAL 2 Press here 3 NEW BRUSH 4 PLATE 1 S...

Page 383: ...gt 1 KLEMME 2 Hier drücken 3 NEUE BÜRSTE 4 PLATTE 4 Die neue Platte mit der Klemme verlöten Vor dem Löten den zusammengedrückten Bereich der Platte gut anwärmen um sich zu vergewissern dass der Lötzinn das Ende des zusammengedrückten Bereichs erreicht Darauf achten dass der Lötzinn nicht am Bürstenkabel entlangläuft Darauf achten dass der Lötzinn nicht auf die Feldwicklung des Anlassergehäuses tro...

Page 384: ...the primary coil by attaching the ohmmeter leads to the ignition coil terminal Black and the other to the spark plug cap end SPARK PLUG CAP Measure the resistance of the spark plug cap by touching one end of a test lead to the wire end and the other to the spark plug cap end Primary side resistance 1 8 2 2 Ω Secondary side resistance 13 2 19 3 kΩ Resistance 7 5 12 5 kΩ 1 SPARK PLUG CAP cap 12 EU65...

Page 385: ...zenstecker verbunden wird ZÜNDKERZENSTECKER Den Widerstand des Zündkerzensteckers messen indem ein Ende der Prüfsonde an das Kabel das andere Ende an den Zündkerzenstecker angelegt wird 1 ZÜNDKERZENSTECKER 3 BOBINA DE ENCENDIDO Para ver los procedimientos de extracción instalación consulte la página 12 1 a INSPECCIÓN Lado primario Mida la resistencia de la bobina primaria conectando los cables del...

Page 386: ...linder compression after reassembly P 2 30 DISASSEMBLY REASSEMBLY P 13 2 15 8 mm SEALING WASHER 9 LOWER SHROUD BRACKET 10 ENGINE SHROUD 6 x 25 6 x 12 2 12 LOWER SHROUD 13 LOWER SHROUD INSULATOR 5 CYLINDER HEAD GASKET 6 DOWEL PIN 2 7 CYLINDER 14 ENGINE TEMPERATURE SENSOR INSPECTION P 13 5 TORQUE 9 N m 0 9 kgf m 6 6 lbf ft Do not reuse 4 CYLINDER HEAD COVER GASKET REASSEMBLY Install the gasket as sh...

Page 387: ...ETZEN DER VENTILFÜHRUNGEN 13 5 3 NACHSCHLEIFEN DER VENTILSITZE 13 6 1 CULASSE 13 1 2 REMPLACEMENT DU GUIDE DE SOUPAPE 13 5 3 REMISE EN ETAT DU SIEGE DE SOUPAPE 13 6 1 CULATA DE CILINDROS 13 1 2 REEMPLAZO DE LAS GUÍAS DE VÁLVULA 13 5 3 REACONDICIONAMIENTO DEL ASIENTO DE LA VÁLVULA 13 6 10 N m 1 0 kgf m DEPOSE Desserrer les boulons en un modèle croisé à 2 3 passes REPOSE Appliquer de l huile sur les...

Page 388: ...KE VALVE REASSEMBLY Do not interchange with the exhaust valve INSPECTION P 13 4 7 EXHAUST VALVE REASSEMBLY Do not interchange with the intake valve INSPECTION P 13 4 6 SPARK PLUG INSPECTION P 3 5 5 VALVE GUIDE 2 REPLACEMENT P 13 5 1 VALVE ROTATOR Exhaust valve only REASSEMBLY If the valve rotator is not installed the exhaust valve may drop into the cylinder when starting the engine 2 VALVE SPRING ...

Page 389: ...LE P 13 3 24 N m 2 4 kgf m REMONTAGE Avant la repose vérifier le degré d usure des surfaces qui entrent en contact avec le boulon de pivot la tige de poussée et le pivot de culbuteur 10 N m 1 0 kgf m ZUSAMMENBAU Wenn vergessen wird die Ventil Drehvorrichtung einzubauen kann das Auslassventil beim Anlassen des Motors in den Zylinder fallen AUSBAU Den Ventilfederteller nach unten drücken und dann se...

Page 390: ...seat P 13 6 and 7 CYLINDER HEAD Remove the carbon deposits from the combustion chamber Clear off any gasket material from the cylinder head surface Check the spark plug hole and valve areas for cracks Check the cylinder head for warpage with a straight edge and a feeler gauge Service limit 0 10 mm 0 004 in Standard Service limit 39 0 mm 1 54 in 37 5 mm 1 48 in Standard Service limit 1 1 mm 0 04 in...

Page 391: ...ylinderkopfs entfernt werden Den Bereich um die Zündkerzenöffnung sowie die Ventilsitze auf Risse kontrollieren Den Zylinderkopf mit Hilfe eines Richtlineals und einer Fühlerlehre auf Verzug überprüfen 1 RICHTLINEAL 2 FÜHLERLEHRE c INSPECCIÓN LONGITUD LIBRE DEL RESORTE DE LA VÁLVULA Mida la longitud libre de los resortes de válvula Reemplace los resortes si son más cortos que el límite de servicio...

Page 392: ...guide clearance exceeds the service limit determine if the new guide with standard dimensions would bring the clearance within tolerance If so replace any guide as necessary and ream to fit If the stem to guide clearance exceeds the service limit with new guides replace the valves as well Recondition the valve seats whenever the valve guides are replaced P 13 6 and 7 1 VALVE GUIDE REAMER 6 612 mm ...

Page 393: ... Standard Größe das vorgeschriebene Spiel erreicht werden kann Wenn dies der Fall ist die Ventilführung ersetzen und auf den korrekten Wert ausreiben Wenn das Spiel zwischen Ventilschaft und Ventilführung die Verschleißgrenze selbst mit neuen Ventilführungen überschreitet müssen die Ventile ebenfalls ersetzt werden Die Ventilsitze müssen bei jedem Ersetzen der Ventilführungen nachgeschliffen werde...

Page 394: ... valve guide until the clip is fully seated as shown Intake side Drive the intake valve guide to the specified height measured from the top of the valve guide to the cylinder casting as shown 4 After installation inspect the valve guide for damage Replace the guide if damaged NOTICE 1 VALVE GUIDE DRIVER 6 45 mm 07742 0010200 2 EXHAUST 3 CLIP 4 INTAKE 9 0 mm 0 36 in ENGINE TEMPERATURE SENSOR Measur...

Page 395: ...r Sicherungsring aufsitzt wie in der Abbildung gezeigt Einlassseite Die Führung des Einlassventils bis zur vorgeschriebenen Tiefe einschlagen der Abstand ist von der Oberkante der Ventilführung bis zum Zylinderkopf zu messen wie in der Abbildung gezeigt 4 Nach dem Einbau die Ventilführungen auf Beschädigungen überprüfen defekte Führungen müssen ersetzt werden 1 VENTILFÜHRUNGSTREIBDORN 6 45 mm 0774...

Page 396: ...e guide to stem clearance P 13 4 3 VALVE SEAT RECONDITIONING 1 Thoroughly clean the combustion chamber and valve seats to remove carbon deposits Apply a light coat of Prussian Blue or erasable felt tipped marker ink to the valve face 2 Insert the valve and snap it closed against its seat several times Be sure the valve does not rotate on the seat The transferred marking compound will show any area...

Page 397: ...ie Führung ersetzt werden 6 Das Spiel zwischen Ventilführung und Ventilschaft überprüfen S 13 4 3 NACHSCHLEIFEN DER VENTILSITZE 1 Die Verbrennungskammer und die Ventilsitze gründlich reinigen um alle Verbrennungsrückstände restlos zu entfernen Eine dünne Schicht Preussischblau oder wasserlösliche Tuschierfarbe auf die Ventilteller Dichtfläche auftragen 2 Die Ventile einsetzen dann anheben und mehr...

Page 398: ... available 8 To avoid severe engine damage be sure to remove all lapping compound from the engine before reassembly 1 VALVE SEAT WIDTH 1 1 m m 0 0 4 i n 3 Using a 45 cutter remove enough material to produce a smooth and concentric seat Turn the cutter clockwise never counterclockwise Continue to turn the cutter as you lift it from the valve seat 4 Use the 30 and 60 cutters to narrow and adjust the...

Page 399: ... Ventilsitzes leicht abschleifen um alle Unebenheiten von der Kante des Ventilsitzes zu entfernen 6 Nach dem Nacharbeiten der Ventilsitze diese auf gleichmäßigen Sitz überprüfen Eine dünne Schicht Preussischblau oder wasserlösliche Tuschierfarbe auf die Ventildichtfläche auftragen Die Ventile einsetzen dann anheben und mehrere Male auf die Ventilsitzringe fallen lassen Sich vergewissern dass das V...

Page 400: ...ssembly apply engine oil to the following parts Crankshaft bearing Camshaft bearing 8 x 60 3 24 N m 2 4 kgf m 18 Ibf ft 9 6202 BALL BEARING INSPECTION P 14 3 REPLACEMENT P 14 2 1 DOWEL PIN 2 3 CRANKCASE GASKET 4 CRANKCASE COVER 7 O RING 8 OIL FILLER CAP DIPSTICK 6 35 x 52 x 8 mm OIL SEAL 5 Apply grease to the lip of the oil seal 2 6207 CRANKSHAFT BEARING INSPECTION P 14 3 REPLACEMENT P 14 2 Do not...

Page 401: ...es Öldichtrings mit Fett versehen 6 ÖLDICHTRING 35 x 52 x 8 mm 7 O RING 8 ÖLEINFÜLLDECKEL ÖLMESSSTAB 9 KUGELLAGER 6202 14 CUBIERTA DEL CÁRTER CIGÜEÑAL EQUILIBRADOR PISTÓN 1 CUBIERTA DEL CÁRTER a DESMONTAJE MONTAJE Extraiga el conjunto del motor generador P 10 1 y luego extraiga las partes siguientes Alternador P 11 5 Volante de motor P 12 1 Culata de cilindros P 13 1 Al efectuar el montaje aplique...

Page 402: ...mover shaft 15 mm 07936 KC10100 Bearing remover head 15 mm 07936 KC10200 2 Drive the bearing into the crankcase cover using the attachment pilot and driver special tools TOOLS Attachment 32 x 35 mm 07746 0010100 Driver 07749 0010000 Pilot 15 mm 07746 0040300 1 ATTACHMENT 72 x 75 mm 07746 0010600 3 PILOT 35 mm 07746 0040800 2 DRIVER 07749 0010000 1 BEARING REMOVER HEAD 15 mm 07936 KC10200 2 REMOVER...

Page 403: ...auen Spezialwerkzeug SPEZIALWERKZEUGE Ausbauwerkzeug Gewicht 07741 0010201 Ausbauwerkzeug Schaft 15 mm 07936 KC10100 Ausbauwerkzeug Kopfstück 15 mm 07936 KC10200 1 AUSBAUWERKZEUG KOPFSTÜCK 15 mm 07936 KC10200 2 AUSBAUWERKZEUG GEWICHT 07741 0010201 3 AUSBAUWERKZEUG SCHAFT 15 mm 07936 KC10100 2 Das Lager mit Hilfe des Aufsatzes der Treibdornspitze und des Treibdorns Spezialwerkzeuge in den Kurbelgeh...

Page 404: ...he bearing by hand and check for play Replace the bearing if it is noisy or has excessive play 1 PLAY 1 PLAY 3 AXIAL 2 RADIAL b INSPECTION CAMSHAFT HOLDER I D Standard Service limit 16 000 16 018 mm 16 05 mm 0 6319 in 0 6299 0 6306 in cap 14 EU65is 6500is 07 12 17 5 05 PM ページ14 3 ...

Page 405: ...d drehen und auf Spiel überprüfen Bei Laufgeräuschen und übermäßigem Spiel muss das Lager ersetzt werden 1 SPIEL 2 RADIAL 3 AXIAL b INSPECCIÓN DIÁMETRO INTERIOR DEL SOPORTE DEL ÁRBOL DE LEVAS JUEGO LIBRE DEL COJINETE DE BOLAS 1 Limpie el cojinete con solvente y séquelo 2 Gire el cojinete con la mano y compruebe el juego libre Reemplace el cojinete si produce ruido o si tiene un juego libre excesiv...

Page 406: ...se to the lip of the oil seal 3 PISTON REASSEMBLY Install with the triangle mark toward the push rod hole DISASSEMBLY REASSEMBLY P 14 5 INSPECTION P 14 6 7 and 8 3 1 TRIANGLE MARK 16 10 mm FLANGE NUT 10 N m 1 0 kgf m 7 lbf ft 4 VALVE LIFTER 2 DISASSEMBLY When removing mark so that the IN and EX sides can be distinguished REASSEMBLY Install the lifters immediately before installing the camshaft 5 6...

Page 407: ...rs le trou de la tige de poussée DEMONTAGE REMONTAGE P 14 5 CONTROLE P 14 6 7 et 8 3 1 REPERE TRIANGULAIRE DEMONTAGE Lors de la dépose marquer pour que les côtés ADM et ECH puissent être distingués REMONTAGE Installer les poussoirs immédiatement avant d installer l arbre à cames CONTROLE P 14 3 REMPLACEMENT P 14 2 CONTROLE P 14 3 REMPLACEMENT P 14 2 CONTROLE P 14 9 et 10 REMONTAGE Enfoncer jusqu à...

Page 408: ... P 14 8 and 9 120 120 120 10 mm 0 4 in 10 mm 0 4 in 5 PISTON PIN 6 PISTON 8 OIL RING 9 SIDE RAIL 2 7 SPACER 10 SECOND RING 11 TOP RING 1 MARK 3 2 PISTON PIN CLIP 2 PISTON RINGS REASSEMBLY Install all rings with the marks facing upward Be sure that the top and second rings are not interchanged Check that the rings rotate smoothly after installation Space the piston ring end gaps 120 apart and do no...

Page 409: ...ing nicht vertauscht werden Sich vergewissern dass sich die Ringe nach dem Einbau einwandfrei drehen lassen Die Kolbenstöße um 120 versetzt anordnen darauf achten dass die Kolbenstöße nicht mit der Kolbenbolzenbohrung ausgerichtet sind 2 1 OBERSTER RING VERCHROMT 2 2 ZWEITER RING 2 3 ÖLABSTREIFRING KOMBIRING ÜBERPRÜFUNG S 14 7 EINBAU Einbau ein Ende des Sicherungsrings in die Nut des Kolbens einse...

Page 410: ...ft and the Y axis parallel to crankshaft Take the maximum reading to deter mine cylinder wear and taper PISTON SKIRT O D Measure and record the piston O D at a point 10 mm 0 4 in from the bottom of the skirt and 90 to the piston pin bore 1 BALANCER 2 BALANCER DRIVE GEAR 3 PUNCH MARKS 1 TIMING GEAR 3 PUNCH MARKS 2 CAMSHAFT 10 mm 0 4 in 90 X Y Standard Service limit 88 00 mm 88 17 mm 3 465 in 3 471 ...

Page 411: ...nd der Y Achse parallel zur Kurbelwelle messen Zur Bestimmung der Zylinderabnutzung und Konizität ist jeweils der maximale Messwert zu verwenden AUSSENDURCHMESSER DES KOLBENMANTELS Den Außendurchmesser des Kolbens an einem Punkt messen der 10 mm von der Kolbenunterkante und um 90 versetzt zur Kolbenbolzenbohrung liegt ALINEACIÓN DE LA MARCA DE DISTRIBUCIÓN Instale primero el equilibrador y luego i...

Page 412: ...second 1 PISTON RING Standard Service limit Top 0 030 0 060 mm 0 15 mm second 0 0012 0 0024 in 0 006 in Standard Service limit 19 994 20 00 mm 19 950 mm 0 7854 in 0 7872 0 7874 in Standard Service limit Top 0 2 0 4 mm 1 0 mm second 0 008 0 016 in 0 04 in Oil 0 2 0 7 mm 1 0 mm 0 008 0 028 in 0 04 in cap 14 EU65is 6500is 07 12 17 5 05 PM ページ14 7 ...

Page 413: ...rd Limite de service Feu 0 2 0 4 mm 1 0 mm Etanchéité Racleur 0 2 0 7 mm 1 0 mm d huile Valeur standard Limite de service 19 994 20 00 mm 19 950 mm Standardwert Verschleißgrenze Oberster 2 0 mm 1 75 mm zweiter Ring Standardwert Verschleißgrenze Oberster 0 030 0 060 mm 0 15 mm zweiter Ring Standardwert Verschleißgrenze Oberster 0 2 0 4 mm 1 0 mm zweiter Ring Ölabstreifring 0 2 0 7 mm 1 0 mm Standar...

Page 414: ...042 mm 0 7891 in 0 7875 0 7877 in Standard Service limit 0 002 0 014 mm 0 08 mm 0 0001 0 0006 in 0 003 in Standard Service limit 20 005 20 020 mm 20 07 mm 0 790 in 0 7876 0 7882 in Standard Service limit 36 025 36 039 mm 36 07 mm 1 420 in 1 4183 1 4189 in Standard Service limit 35 975 35 985 mm 35 93 mm 1 415 in 1 4163 1 4167 in cap 14 EU65is 6500is 07 12 17 5 05 PM ページ14 8 ...

Page 415: ...standard Limite de service 0 002 0 014 mm 0 08 mm Valeur standard Limite de service 20 005 20 020 mm 20 07 mm Valeur standard Limite de service 36 025 36 039 mm 36 07 mm Valeur standard Limite de service 35 975 35 985 mm 35 93 mm Standardwert Verschleißgrenze 20 002 20 008 mm 20 042 mm Standardwert Verschleißgrenze 0 002 0 014 mm 0 08 mm Standardwert Verschleißgrenze 20 005 20 020 mm 20 07 mm Stan...

Page 416: ...place 3 Remove the connecting rod and measure the plastigauge 4 If the clearance exceeds the service limit replace the connecting rod and recheck the clearance CAMSHAFT Inspect for worn and weakened springs and check that the decompressor weight moves smoothly CAMSHAFT O D 1 PLASTIGAUGE 1 DECOMPRESSOR WEIGHT Standard Service limit 0 1 0 7 mm 1 0 mm 0 004 0 028 in 0 04 in Standard Service limit 15 ...

Page 417: ...werden 1 PLASTIGAUGE NOCKENWELLE Das Dekompressionsgewicht auf abgenutzte und erlahmte Federn überprüfen sich vergewissern dass sich das Dekompressionsgewicht einwandfrei bewegen lässt AUSSENDURCHMESSER DER NOCKENWELLE 1 DEKOMPRESSIONSGEWICHT HOLGURA LATERAL DE LA CABEZA DE BIELA HOLGURA DE ACEITE DE LA CABEZA DE BIELA 1 Limpie el aceite del pasador del cigüeñal y de la superficie de la cabeza de ...

Page 418: ...than 100 Ω resistance 2 Hold the switch upside down There should be no continuity 3 Hold the switch in the normal position Check that the continuity stops when completely immersing the switch in a container of oil Standard Service limit IN 32 40 32 80 mm 32 25 mm 1 276 1 291 in 1 270 in EX 31 89 32 29 mm 31 75 mm 1 256 1 271 in 1 250 in cap 14 EU65is 6500is 07 12 17 5 05 PM ページ14 10 ...

Page 419: ...arf kein Durchgang vorhanden sein 3 Den Schalter wieder in der Normalposition halten Sich vergewissern dass kein Durchgang angezeigt wird sobald der Schalter in einen mit Öl gefüllten Behälter getaucht wird ALTURA DE LEVAS INTERRUPTOR DEL NIVEL DE ACEITE Compruebe la continuidad entre el cable del interruptor y el cuerpo del interruptor con un ohmímetro 1 Mantenga el interruptor en su posición nor...

Page 420: ...RTS a REMOVAL INSTALLATION 4 REMOTE CONTROL BOX DISASSEMBLY REASSEMBLY P 15 2 5 REMOTE CONTROL CABLE INSTALLATION Secure the remote control cable to the frame using wire harness band as shown 5 1 WIRE HARNESS BAND 3 WIRE HARNESS BAND 2 GROMMET 1 BATTERY MAINTENANCE COVER cap 15 EU65is 6500is 07 12 17 5 06 PM ページ15 1 ...

Page 421: ...LA BATERÍA 2 ANILLO PROTECTOR 3 BANDA DEL MAZO DE CABLES 4 CAJA DE CONTROL REMOTO 5 CABLE DE CONTROL REMOTO 1 FERNBEDIENUNGSGEHÄUSE SONDER AUSSTATTUNG 15 1 1 BOITIER DE TELECOMMANDE PIECES EN OPTION 15 1 1 CAJA DE CONTROL REMOTO PARTES OPCIONALES 15 1 REPOSE Fixer le câble de télécommande au châssis en utilisant le collier de faisceau de fils de la manière indiquée 5 1 COLLIER DE FAISCEAU DE FILS ...

Page 422: ... RECTIFIER MM8 5 REMOTE CONTROL PANEL 6 REMOTE CONTROL CABLE ASSEMBLY 7 WIRE HARNESS BAND 8 CABLE TIE 2 9 REMOTE CONTROL COVER 10 4 x 8 mm SCREW 2 1 START SWITCH INSPECTION P 15 3 2 LED INSPECTION P 15 3 3 SILICON RECTIFIER 196 cap 15 EU65is 6500is 07 12 17 5 06 PM ページ15 2 ...

Page 423: ...GSKABEL EINHEIT 7 KABELBAUM HALTEBAND 8 KABELBAND 2 9 FERNBEDIENUNGSABDECKUNG 10 SCHRAUBE 4 x 8 mm 2 11 STOPPSCHALTER b DESMONTAJE MONTAJE 1 INTERRUPTOR DE ARRANQUE 2 LED 3 RECTIFICADOR DE SILICIO 196 4 RECTIFICADOR DE SILICIO MM8 5 PANEL DE CONTROL REMOTO 6 CONJUNTO DEL CABLE DE CONTROL REMOTO 7 BANDA DEL MAZO DE CABLES 8 FIJADOR DE CABLES 2 9 CUBIERTA DE CONTROL REMOTO 10 TORNILLO DE 4 x 8 mm 2 ...

Page 424: ...h There should be continuity when the switch button pushed There should be no continuity when the switch button released STOP SWITCH 1 Disconnect the lead connectors from the ignition switch 2 Check for continuity between the terminals of the switch There should be continuity when the switch button pushed There should be no continuity when the switch button released Probe Male terminal Female term...

Page 425: ...abelstecker vom Stoppschalter abziehen 2 Auf Durchgang zwischen den Schalterklemmen überprüfen Wenn der Schalterknopf gedrückt wird muss Durchgang bestehen Bei freigegebenem Schalterknopf darf kein Durchgang vorhanden sein c INSPECCIÓN LED 1 Desconecte el conector del cable rojo y el conector del cable negro 2 Compruebe la continuidad entre los terminales de acuerdo con la tabla siguiente Cuando e...

Page 426: ... 2 WHEELS STAND 16 3 3 HANGER 16 4 1 HANDLE a REMOVAL INSTALLATION 2 12 mm CONCAVE WASHER 2 3 12 mm PLAIN WASHER 2 4 HANDLE DISASSEMBLY REASSEMBLY P 16 2 1 HANDLE HOLDER BOLT 2 21 5 N m 2 2 kgf m 16 lbf m cap 16 EU65is 6500is 07 12 17 5 07 PM ページ16 1 ...

Page 427: ...RUEDAS SOPORTE SOPORTE COLGANTE 1 MANILLAR a EXTRACCIÓN INSTALACIÓN 1 PERNO DEL SOPORTE DEL MANILLAR 2 2 ARANDELA CÓNCAVA DE 12 mm 2 3 ARANDELA PLANA DE 12 mm 2 4 MANILLAR 1 GRIFF 16 1 2 RÄDER STÄNDER 16 3 3 HEBEBÜGEL 16 4 1 MANCHE 16 1 2 ROUES PIED 16 3 3 CROCHET DE LEVAGE 16 4 1 MANILLAR 16 1 2 RUEDAS SOPORTE 16 3 3 SOPORTE COLGANTE 16 4 21 5 N m 2 2 kgf m DEMONTAGE REMONTAGE P 16 2 21 5 N m 2 2...

Page 428: ... LEVER 2 5 HANDLE PIPE 6 RIGHT HANDLE HOLDER 11 LEFT HANDLE HOLDER 7 STOPPER RUBBER 2 8 HANDLE COLLAR 2 9 HANDLE LEVER RUBBER 2 10 HANDLE GRIP RUBBER 2 21 5 N m 2 2 kgf m 16 lbf m 1 8 x 45 mm SOCKET BOLT 2 21 5 N m 2 2 kgf m 16 lbf m 3 1 HANDLE HOLDER 3 2 HANDLE LEVER 3 3 HANDLE LEVER SPRING cap 16 EU65is 6500is 07 12 17 5 07 PM ページ16 2 ...

Page 429: ...CA DE 8 x 22 mm 2 3 RESORTE DE LA PALANCA DEL MANILLAR 2 4 PALANCA DEL MANILLAR 2 5 TUBO DEL MANILLAR 6 SOPORTE DERECHO DEL MANILLAR 7 GOMA DEL TOPE 2 8 COLLAR DEL MANILLAR 2 9 GOMA DE LA PALANCA DEL MANILLAR 2 10 GOMA DE LA EMPUÑADURA DEL MANILLAR 2 11 SOPORTE IZQUIERDO DEL MANILLAR 21 5 N m 2 2 kgf m 21 5 N m 2 2 kgf m REMONTAGE Accrocher le ressort de levier de manche de la manière indiquée 3 1...

Page 430: ...MBLY REASSEMBLY 8 x 25 4 10 STAND 2 1 8 mm WASHER 4 t 6 mm 8 20 mm WASHER 2 6 WHEEL 2 2 LONGER 4 SHORTER 3 REAR 5 8 mm WASHER 4 t 2 3 mm 8 x 25 4 7 WHEEL SHAFT 9 4 0 x 28 mm SPLIT PIN 2 cap 16 EU65is 6500is 07 12 17 5 07 PM ページ16 3 ...

Page 431: ...U 1 UNTERLEGSCHEIBE 8 mm 4 Dicke 6 mm 2 LÄNGER 3 HINTEN 4 KÜRZER 5 UNTERLEGSCHEIBE 8 mm 4 Dicke 2 3 mm 6 RAD 2 7 RADWELLE 8 UNTERLEGSCHEIBE 20 mm 2 9 SPLINT 4 0 x 28 mm 2 10 STÄNDER 2 2 RUEDAS SOPORTE a DESMONTAJE MONTAJE 1 ARANDELA DE 8 mm 4 Espesor 6 mm 2 MÁS LARGO 3 PARTE TRASERA 4 MÁS CORTO 5 ARANDELA DE 8 mm 4 Espesor 2 3 mm 6 RUEDA 2 7 EJE DE LAS RUEDAS 8 ARANDELA DE 20 mm 2 9 PASADOR HENDID...

Page 432: ...nk 2 Slide the hanger and insert another bracket installation part of the hanger into the gap between the frame pipe and fuel tank on the other side 3 Slide the hanger along the frame pipe to the hanger installation position Install the hanger brackets on both ends of the hanger and tighten the 8 mm flange bolts securely Removal is the reverse order of installation 1 PROTECTOR FILMS 2 Align the ce...

Page 433: ...eben 2 Den Hebebügel seitlich verschieben dann die andere Einschublasche des Hebebügels in den Spalt zwischen Rahmenrohr und Kraftstofftank auf der anderen Seite einschieben 3 Den Hebebügel am Rahmenrohr entlang schieben bis die Befestigungsposition erreicht ist Die Hebebügel Halterungen an beiden Enden des Hebebügels anbringen dann die 8 mm Bundmuttern gut festziehen Das Abnehmen erfolgt in umgek...

Page 434: ...NOTE cap 16 EU65is 6500is 07 12 17 5 07 PM ページ16 5 ...

Page 435: ...INTERRUPTOR DEL ACELERADOR ECO 16 1 ACELERADOR ECO 16 2 ON 16 3 OFF 17 UNIDAD DE CONTROL DEL ALTERNADOR 18 INDICADORES 18 1 ALERTA DEL ACEITE 18 2 SOBRECARGA 18 3 PILOTO 19 INTERRUPTOR DE ENCENDIDO 19 1 REMOTE control remoto 19 2 OFF 19 3 ON 19 4 START Arranque 20 CAJA DE CONTROL REMOTO OPCIONAL 21 INTERRUPTOR DE ARRANQUE 22 INTERRUPTOR DE PARADA 23 DIODO MM8 24 DIODO 196 25 LED 26 FUSIBLE 27 MAZO...

Page 436: ...ENSYSTEM 15 2 EIN 15 3 AUS 16 LICHTMASCHINEN STEUEREINHEIT 17 ANZEIGELEUCHTEN 17 1 ÖLWARNANZEIGE 17 2 ÜBERLASTUNGSANZEIGE 17 3 KONTROLLLAMPE 18 ZÜNDSCHALTER 18 1 FERNBEDIENUNG 18 2 AUS 18 3 EIN 18 4 START 19 FERNBEDIENUNGSGEHÄUSE SONDERAUSSTATTUNG 20 ANLASSSCHALTER 21 STOPPSCHALTER 22 DIODE MM8 23 DIODE 196 24 LED 25 SICHERUNG 26 STEUERKABELBAUM 27 MOTORKABELBAUM 28 MASSEKLEMME 29 BATTERIE 30 MASS...

Page 437: ...NZEIGELEUCHTEN 14 1 ÖLWARNANZEIGE 14 2 ÜBERLASTUNGSANZEIGE 14 3 KONTROLLLAMPE 15 Typ R 16 Typ SK 17 ZÜNDSCHALTER 17 1 FERNBEDIENUNG 17 2 AUS 17 3 EIN 17 4 START 18 FERNBEDIENUNGSGEHÄUSE SONDERAUSSTATTUNG 19 ANLASSSCHALTER 20 STOPPSCHALTER 21 DIODE MM8 22 DIODE 196 23 LED 24 SICHERUNG 26 STEUERKABELBAUM 27 MASSEKLEMME 28 BATTERIE 29 ANLASSERMAGNETSCHALTER 30 ANLASSERMOTOR 31 MOTORTEMPERATURSENSOR 3...

Reviews: