17
18
19
20
21
Deburr the hole and install the Swirl Rod
with a finger-tight
8
mm bolt and flange nut
in the rear hole of the rod bracket. The bolt
head should be on the belt-side of the deck;
the nut on the blade-side.
With Swirl Guides A and B and the Swirl Rod
loosely bolted in position by their rear holes,
reinstall the front protector plate. On the 42”
deck, a protector plate stud goes through the
front bracket of Swirl Guide A and then
through the deck. Loosely install 8 mm bolts
and nuts through the front protector plate,
the brackets of Swirl Guide
B
and the Swirl
Rod, and through the deck. The bolts should
be on the bottom for ground clearance. On
the 46” deck, protector plate studs go
through the front brackets of Swirl Guide A
and the Swirl Rod and then through the
deck. Loosely install an 8 mm bolt and nut
through the protector plate, the front bracket
of Swirl Guide B, and through the deck. The
bolt should be on the bottom for ground
clearance.
Install the Discharge Plate and Swirl Guide
C
as in Step 13.
Torque the 8 mm bolts and nuts to 22 N•m
(16.2
ft-lb.) Torque the
10
mm bolt to
40
N•m
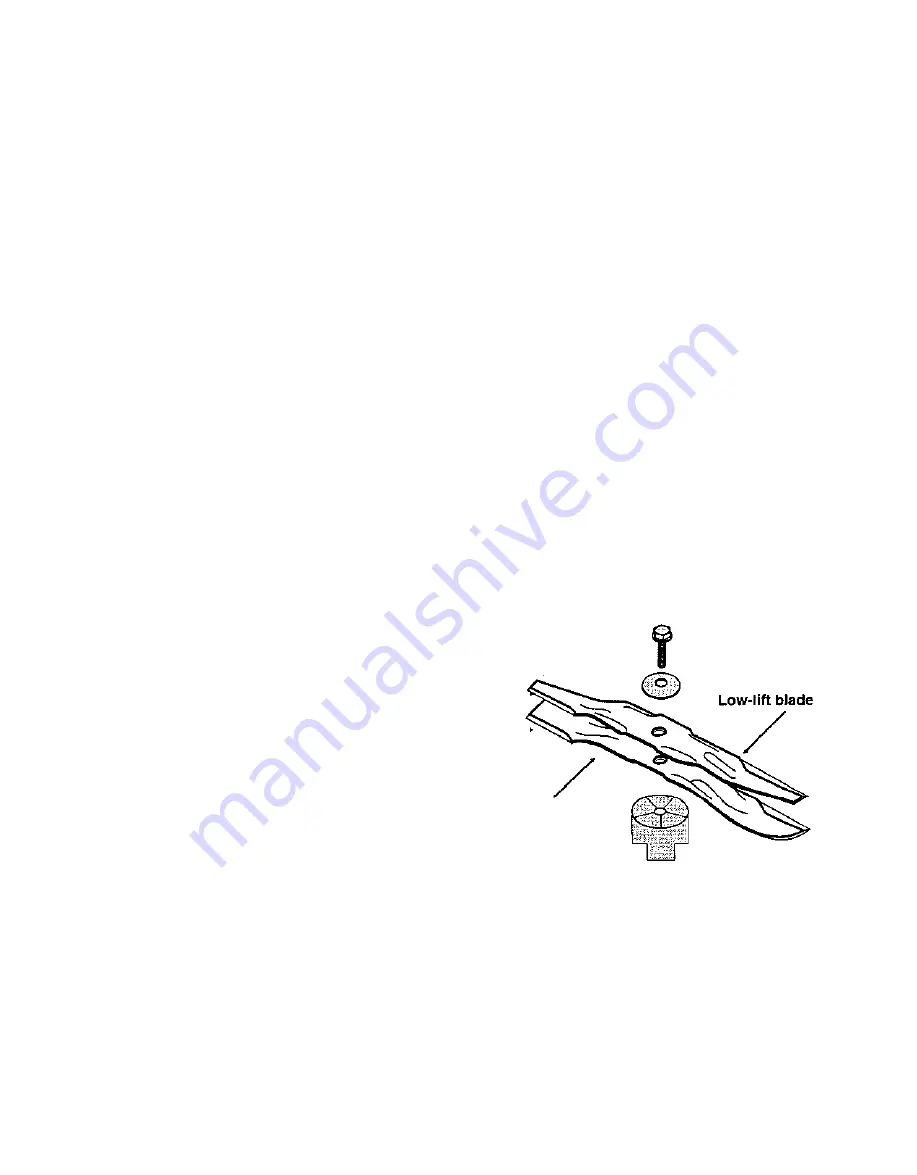
Install a mulching blade and a low-lift blade
on each spindle with the existing bolt and
washer. The blade lifts go toward the deck.
The
INSIDE’S of the washers go toward the
blades.
Do
not use the blade holders. The
mulching blades have integral blade holders
for the low-lift blades. Tighten the blade bolts
to
a
torque of
60 N•m (44.3 ft-lb). Use
wooden boards or wear heavy gloves to
keep the blades from turning when torquing
them.
(29.5
ft-lb.)
Mulching blade
(has integral
blade holder)
22
Follow the instructions in the shop manual to
install the mower deck onto the lawn tractor.
©
1994
American Honda Motor
Co.,
Inc.
All Rights Reserved
Page 5


