3. UNPACKING AND ASSEMBLY
For storage and transport reasons, some components of the machine
are not directly installed in the factory, but have to be assembled af-
ter their removal from the packing.Final assembly is carried out by fol-
lowing these simple instructions.
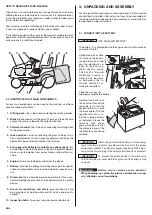
3.1 CONNECTING THE BATTERY
DRY CHARGED BATTERY!
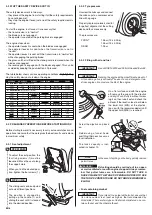
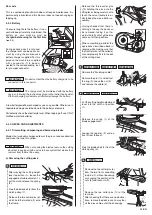
The battery (1) is situated behind the engine and is held in place by
an elastic strap (2).
Unhook the elastic strap
(2), remove the battery,
unscrew the caps (5) and
pour the electrolytic so-
lution (4) (Acid not sup-
plied: specific gravity
1.280 or 31.5° Baumé)
distributing it evenly a-
mong the six elements,
as indicated in the In-
struction Leaflet (3), at-
tached to the battery.
Close the six caps (5)
and begin charging the battery.
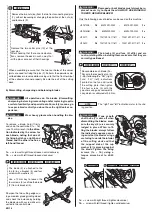
Remount the battery on
the machine.Connect the
red cable (6) to first the
positive terminal (+) then
the black cable (7) to the
negative terminal (–) us-
ing the supplied screws
as indicated. Grease the
terminals with silicon
grease, making sure that
the protective cap of the
red cable (6) is positioned
correctly.
After having activated the battery, continue charg-
ing it completely. Contact your Dealer who has all of the proper
equipment available.The battery charger supplied is NOT able to
carry out the first charging of the battery after it has been activated.
To prevent the safety device in the electronics
card from cutting in, never start the engine until the battery is fully
charged!
Battery acid is corrosive and a pollutant.
When handling, use protective gloves and dispose of prop-
erly following current regulations.
IMPORTANT
WARNING!
IMPORTANT
IMPORTANT
4
EN
HOW TO RECOGNIZE YOUR MACHINE
Preparation, use and maintenance of a range of machines with many
differing features are described in this manual. It is therefore impor-
tant to clearly identify your machine’s model in order to following all
of the information regarding it.
Your machine’s model is indicated on the “identification label” in point
4 and is composed of a series of letters and numbers.
In the following pages of this manual, the model or models to which
operations refer are indicated beforehand.The absence of any indi-
cation means it is valid for all models.
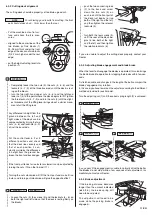
2.2 IDENTIFICATION OF MAIN COMPONENTS
Various main components can be seen on the machine, and these
have the following functions:
1. Cutting deck:
this is the guard enclosing the rotating blades.
2. Blades:
these are what cut the grass.The wings at the ends help
convey the cut grass towards the collector channel.
3. Collector channel:
this is the part connecting the cutting deck
to the grass-catcher.
4. Grass-catcher:
as well as collecting the grass cuttings, this is
also a safety element in that it stops any objects drawn up by the
blades from being thrown outside of the machine.
5. Stone-guard or deflector (available as optional part):
this
can be fitted in place of the grass-catcher and prevents objects
drawn up by the blades from being thrown outside of the ma-
chine.
6. Engine:
this moves the blades and drives the wheels.
7. Battery:
provides the energy for starting the engine. Its specifi-
cations and regulations for use are described in a specific man-
ual.
8. Driver seat:
this is where the machine operator sits.It has a sen-
sor for detecting the presence of the operator which is a safety
device.
9. Decals for regulations and safety:
give reminders on the
main provisions for working safely, each of which is explained in
chapter 1.
10. Inspection hatch:
for access to make several adjustments.
1
2
7
6
5
3
4
1

