background image

Summary of Contents for HR195

Page 1: ......

Page 2: ......

Page 3: ...symbols and any instructions that follow B Indicates serious injury or death WILL result if instructions are not followed B Indicates a strong possibility that serious personal injury or death may result if instructions are not followed m Indicates a possibility that equipment or property damage could result if instructions are not followed 1 NoTlCE 1 Indicates that equipment or property damage co...

Page 4: ...2 Shift Lever 13 Handlebar Locking Knobs 13 Cutting Height Adjustment Levers 14 4 ATTACHMENTS 15 Grass Bag standard 15 Side Discharge Chute optional 16 5 PRE OPERATION CHECK 17 Blade 17 Grass Bag 18 Engine Oil 19 Fuel 2 0 Air Cleaner 22 SHandlebar Height 23 Cutting Height 23 6 OPERATION 24 Starting the Engine 24 Clearing a Flooded Engine 26 Mower Operation 28 Stopping the Engine 29 High Altitude O...

Page 5: ...nce optional equipment 41 ROTO STOP Cable Adjustment 42 Drive Clutch Cable Adjustment 43 Throttle Cable Adjustment 44 Shift Cable Adjustment 45 Carburetor Adjustment 46 Grass Bag Cleaning and Replacement 47 Blade Removal and Installation 48 10 STORAGE 5 0 Preparation for Storage 50 Storage 5 2 Removal from Storage 53 11 TROUBLESHOOTING 54 12 SPECIFICATIONS 56 13 WARRANTY SERVICE 57 3 ...

Page 6: ... PLACE BAG REPLACEMENT THIS BAG CONFORMS n READ OWNER S MANUAL BEFORE OPERATING TO ANY REPLACEMENTMUST MEET THIS STANDARD I DISCONNECT THE SPARK PLUG CAP BEFORE CUTTER DECK AND CUTTER BLADE SERVICING l DO NOT ALLOW ANYONE TO STAND IN FRONT OF MOWER TO PREVENT INJURY FROM THROWN OBJECTS CLCAR AREA OF DEBRIS KEEP OTHERS AWAY I TO PREVENT SERIOUS INJURY W NOT REACH INSIDE WHEN ENGINE IS RUNNING DO NO...

Page 7: ...eep your hands and feet away from the cutter deck while the engine is running l Stop the engine before adjusting cutting height or performing any inspection or maintenance l Wear heavy gloves to protect your hands from the blade when cleaning out the mower deck or when inspecting or replacing the blade Disconnect the spark plug cap to prevent any possibility of accidental starting Thrown Object Ha...

Page 8: ...lippings are a fire hazard l Honda HR195 mowers are not factory equipped with spark arresters It is illegal in some areas to operate an engine without a USDA qualified spark arrester Check local laws and regulations An optional spark arrester is available from authorized Honda lawn mower dealers The engine and exhaust system become very hot during operation and remain hot for a while after stoppin...

Page 9: ...ONSIBILITY to safely operate this mower Does the young person think through problems and come to logical solutions Be honest Anyone who takes unnecessary risks and doesn t obey rules should not operate this lawn mower If you decide that your son or daughter can handle the mower safely CAREFULLY READ THE OWNER S MANUAL with your youngster Make sure you both understand all instructions and warnings ...

Page 10: ...EVER FRAME SERIAL NUMBER SERIAL NUMBER OIL I MUFFLER on back FILLER of engine CAP OIL DRAIN BOLT Record the frame and engine serial numbers for your reference Refer to the serial numbers when ordering parts and when making technical or warranty inquiries see page 57 Frame serial number Engine serial number GXV140 __ __ __ ...

Page 11: ...FICATION ROTO STOP LEVER ROM STOP RI Il rnN HANDLEBAR DRIVE CLUTCH SHIFT LEVER iHR07 r L RECOIL STARTER CUlTlNG HEIGHT ADJUSTMENT LEVER LEVER WI J HANDLEBAR ADJUSTMENT AIR CLEANER SPARK PLUG FiJEL VALVE CAP CARBURETOR 9 ...

Page 12: ... OFF position to prevent the possibility of carburetor flooding and to reduce the possibility of fuel leakage M Gasoline is extremely flammable and gasoline vapor can explode causing injury or death Turn the fuel valve to the OFF position when the mower is not in use FUEL VALVE THROTTLE LEVER CHOKE position For starting FAST position 1 For mowing SLOW position L 1 For idling STOP position Stops th...

Page 13: ...e the ROTO STOP lever with a quick and complete motion so the blade drive is always either fully engaged or stopped This will help to prevent stalling the engine and it will also extend the service life of the ROTO STOP mechanism 1 NoTKE 1 If you move the ROTO STOP lever slowly or partially the blade brake clutch mechanism will wear out prematurely NOTE Always release the ROTO STOP lever before st...

Page 14: ...e lever to disengage the drive To propel the mower and operate the blade at the same time press the button on top of the ROTO STOP lever push the ROTO STOP lever forward then push the drive clutch lever forward NOTE Always release the drive clutch lever before starting the engine If the drive clutch is engaged the mower will move forward when you operate the starter ROTO STOP LEVER _ DRIVE CLUTCH ...

Page 15: ...l To avoid incomplete gear engagement be sure the shift lever is centered in one of the three detent positions MAXIMUM SPEED Position 1 SLOW 2 6 f sec 0 8 m set Position 2 MEDIUM 3 9 ft sec 1 2 m set Position 3 FAST 4 6 ft sec 1 4 m set SHIFT LEVER HANDLEBAR KING KNOBS HANDLEBAR LOCKING KNOBS The handlebar locking knobs must be tightened to secure the handlebar in the mowing position These knobs c...

Page 16: ...e cutting height position 314 in i 2 0 cm l 114 in 3 3 cm l 314 in 4 5 cm 2 114 in 5 6 cm 2 5 B in 6 7 cm 3 in 7 7 cm ADJUSTING LEVERS ADJUSTINdl LEVER Select the correct cutting height for your mowing requirements Cutting height settings of l l 4 in 3 2 cm to 2 l 4 in 5 5 cm are appropriate for most lawns during cool weather A higher cut may be needed to protect the lawn during hot summer months ...

Page 17: ...ck may clog when mowing grass that is thick or tall If clogging occurs mow more frequently cut a narrower swath and or select a slower drive speed You may also need to raise the mower s cutting height l If you wish to leave the grass clippings on the lawn we recommend using the optional side discharge chute see page 16 GRASS BAG standard equipment Installation Raise the discharge guard and hook th...

Page 18: ...4 ATTACHMENTS A side discharge chute is available from authorized Honda lawn mower dealers It attaches to the cutter deck in place of the standard grass bag SIDE DISCHARGE CHUTE optional CHUTE 16 ...

Page 19: ...e mower m A worn or damaged blade may cause serious injury Always inspect the blade before using the mower When the blade needs sharpening or replacement take the lawn mower to an authorized Honda lawn mower dealer Or if you have a torque wrench you can remove and install the blade yourself see page 48 l Blade sharpening To avoid weakening the blade or causing imbalance or poor cutting the blade s...

Page 20: ...n hose and allow it to dry thoroughly before use a wet bag will clog quickly The grass bag wears during normal use and will eventually require replacement If you operate the mower with a damaged or worn out bag objects picked up by the blade may be thrown through the bag material m Objects thrown through a worn or damaged grass bag may cause serious injury Install a new grass bag when required 18 ...

Page 21: ...evel will cause engine damage Use high detergent premium quality 4 stroke engine oil certified to meet or exceed U S automobile manufacturers requirements for API Service Classification SG SF CC CD pzEiEq Using nondetergent oil can shorten the engine s service life and using 2 stroke oil will damage the engine SAE low 30 is recommended for _ general all temperature use Other 1 I I 1 1 4 30 20 10 0...

Page 22: ...por can explode causing serious injury or death Use extreme care when handling gasoline KEEP OUT OF REACH OF CHILDREN Refuel in a well ventilated area with the engine stopped Do not smoke or allow flames or sparks in the area where the engine is refueled or where gasoline is stored Avoid repeated or prolonged contact with skin or breathing of vapor After refueling tighten the fuel tank cap securel...

Page 23: ... containing alcohol gasohol be sure its pump octane rating is 86 or higher There are two types of gasohol one containing ethanol and the other containing methanol 1 NoTtCE 1 Using gasohol that contains more than 10 ethanol or gasoline containing methanol methyl or wood alcohol that does not also contain cosolvents and corrosion inhibitors for methanol can cause serious fuel system damage and poor ...

Page 24: ...screws then remove the air cleaner cover 2 Inspect the paper and foam elements of the air filter Replace the filter if either of the filter elements are damaged Clean or replace the filter if the filter elements are dirty See page 38 for cleaning instructions 3 Reinstall the air filter and air cleaner cover Tighten the cover screws securely 1 NOTICE 1 Operating the engine with no air filter or a d...

Page 25: ...lower handlebar locking knobs This will allow the height adjusters to move more easily 3 Adjust the handlebar to a comfortable height 4 Tighten the locking knobs then tighten the locking bolts CUTTING HEIGHT Check the cutting height settings and make any necessary adjustments see page 14 serious injury Stop the engine before adjusting cutting height LOCKING BOLT HANDiEBAR HEIGHT LOCKING ADJUSTER K...

Page 26: ...ss of consciousness and may lead to death To keep exhaust gas from building up provide adequate ventilation I FUEL VALVE 1 2 Turn the fuel valve to the ON position FOR STARTING A COLD ENGINE Move the throttle lever to the CHOKE position FOR RESTARTING A WARM ENGINE Move the throttle lever to the FAST 1 position NOTE Use the CHOKE position unless the engine was recently running and is still thoroug...

Page 27: ...the drive clutch lever before starting the engine If the drive clutch is engaged the mower will move forward when you operate the starter Place your foot on the step of the cutter deck Pull the starter grip lightly until you feel resistance then pull briskly When the engine starts return the starter rope gently pi icq If you let the starter grip snap back against the engine it may damage the start...

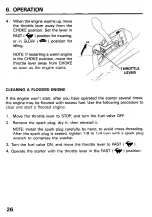
Page 28: ... operated the starter several times the engine may be flooded with excess fuel Use the following procedure to clear and start a flooded engine 1 Move the throttle lever to STOP and turn the fuel valve OFF 2 Remove the spark plug dry it then reinstall it NOTE Install the spark plug carefully by hand to avoid cross threading After the spark plug is seated tighten l 8 to l 4 turn with a spark plug wr...

Page 29: ... the blade before reaching any area with loose objects Operate the ROTO STOP lever with a quick and complete motion so the blade is always either fully engaged or disengaged This will help to prevent stalling the engine and it will also extend the service life of the ROTO STOP mechanism 1 NOTICE 1 If you move the ROTO STOP lever slowly or partially the blade clutch brake mechanism will wear out pr...

Page 30: ...XIMUM SLOPE 20 Use extra care when mowing over objects imbedded in the lawn such as sprinkler heads paving edging etc Avoid anything that sticks up above the surface of the lawn Striking objects may damage the blade bend the crankshaft and or break the cutter deck or other mower components M A damaged blade may break Broken pieces can be thrown by the blade and may cause serious injury Stop the en...

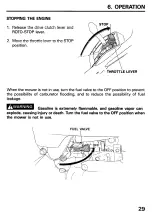
Page 31: ...EVER When the mower is not in use turn the fuel valve to the OFF position to prevent the possibility of carburetor flooding and to reduce the possibility of fuel leakage w Gasoline is extremely flammable and gasoline vapor can explode causing injury or death Turn the fuel valve to the OFF position when the mower is not in use i FUEL VALVE 29 ...

Page 32: ...wer dealer perform this carburetor modification Even with carburetor modification engine horsepower will decrease about 3 5 for each 1 000 foot increase in altitude The effect of altitude on horsepower will be greater than this if no carburetor modification is made A reduction in engine horsepower will reduce mowing performance When the carburetor is modified for good high altitude operation the a...

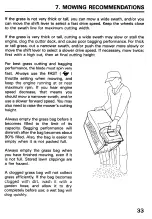
Page 33: ...retor air filter reducing engine performance If dust is a problem water your lawn the day before mowing allowing the grass to dry while the soil remains moist Always wait for wet grass to dry Wet grass may clog the cutter deck and it does not bag well Grass clippings may be left on the lawn or removed whichever you prefer Clippings return nutrients to the soil but they don t look neat when left on...

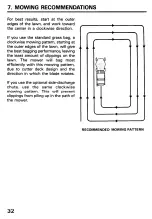
Page 34: ...awn will give the best bagging performance leaving the least amount of clippings on the lawn The mower will bag most efficiently with this mowing pattern due to cutter deck design and the direction in which the blade rotates If you use the optional side discharge chute use the same clockwise mowing pattern This will prevent clippings from piling up in the path of the mower RECOMMENDED MOWING PATTE...

Page 35: ...t spin very fast Always use the FAST throttle setting when mowing and keep the engine running at or near maximum rpm If you hear engine speed decrease that means you should mow a narrower swath and or use a slower forward speed You may also need to raise the mower s cutting height Always empty the grass bag before it becomes filled to the limit of its capacity Bagging performance will diminish aft...

Page 36: ...e mower is not in use Remove the grass bag Loading Unloading To reduce the possibility of fuel leakage keep the mower level while transporting and avoid tilting the mower excessively when loading and unloading l If a suitable loading ramp is not available two people should lift the mower on and off the vehicle while holding the mower level l Position the mower so all 4 wheels are on the bed of the...

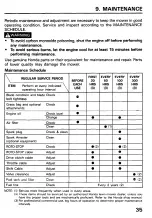
Page 37: ... least 15 minutes before performing maintenance Use genuine Honda parts or their equivalent for maintenance and repair Parts of lower quality may damage the mower Maintenance Schedule NOTE 1 Service more frequently when used in dusty areas 2 These items should be serviced by an authorized Honda lawn mower dealer unless you have the proper tools and are mechanically proficient Refer to the Honda sh...

Page 38: ...box or socket wrench The used oil will flow along the cutter deck channel to the drain hole near the front of the deck OIL DRAIN BOLT NOTE l An alternative procedure is to tilt the mower on its side so the used oil will drain out through the oil filler neck For this procedure do not remove the oil drain bolt Be sure to turn the fuel valve OFF before tilting the mower l Please dispose of used motor...

Page 39: ... reduce dirt build up when the mower is used DRAIN BOLT NOTE Used motor oil may cause skin cancer if repeatedly left in contact with the skin for prolonged periods Although this DIPSTICK FILLER CAP DIPSTICK is unlikely unless you handle used oil on a daily basis it is still advisable to thoroughly wash your hands with soap and water as soon as possible after handling used oil UPPER OIL LEVEL LOWER...

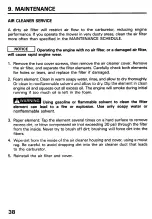
Page 40: ...o dry thoroughly Or clean in nonflammable solvent and allow to dry Dip the element in clean engine oil and squeeze out all excess oil The engine will smoke during initial running if too much oil is left in the foam B Using gasoline or flammable solvent to clean the filter element can lead to a fire or explosion Use only soapy water or nonflammable solvent 3 Paper element Tap the element several ti...

Page 41: ...SCREWS WA COVER Im AIR CLEANER COVER AIR FILTER PAPER ELEMENT AIR FILTER FOAM ELEMENT AIR CLEANER 39 ...

Page 42: ... spark plug with a wire brush if you are going to reuse it 4 5 6 Measure the spark plug electrode gap with a feeler gauge The gap should be 0 024 0 028 in 0 6 0 7 mm Correct the gap as necessary by carefully bending the side electrode Install the spark plug carefully by hand to avoid cross threading After the spark plug is seated tighten with a spark plug wrench to compress the washer 1 NOTICE 1 A...

Page 43: ...wrench 2 Remove the muffler shield identification plate muffler and gasket 3 Remove the spark arrester from the muffler 4 Check for carbon deposits on the spark arrester and the exhaust port Brush carbon deposits away Be careful to avoid damaging the spark arrester screen 5 Install the spark arrester in the muffler 6 Install the muffler components on the engine and tighten the two nuts securely SP...

Page 44: ...ecessary loosen the lock nuts with a 10 mm wrench and move the adjuster up or down as required Tighten the lock nuts and recheck free play NOTE When mowing check that the ROTO STOP lever operates properly If the blade does not start or stop as it should and lever free play is correctly adjusted take the mower to an authorized Honda lawn mower dealer for repair ROTO STOP 42 ...

Page 45: ... a 10 mm wrench and move the adjuster up or down as required Tighten the lock nuts and recheck free play 3 Start the engine and operate the drive clutch lever Check to be sure the drive clutch engages and releases properly If the drive clutch does not operate properly and lever free play is correctly adjusted take the mower to an authorized Honda lawn mower dealer for repair DRIVE CLUTCH 43 ...

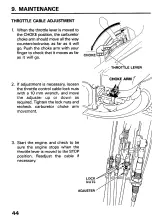
Page 46: ... to check that it moves as far as it will go THROTiLE LEVER A If adjustment is necessary loosen the throttle control cable lock nuts with a 10 mm wrench and move the adjuster up or down as required Tighten the lock nuts and recheck carburetor choke arm movement 3 Start the engine and check to be sure the engine stops when the throttle lever is moved to the STOP position Readjust the cable if neces...

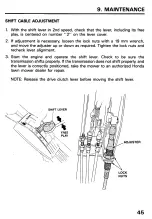
Page 47: ...9 mm wrench and move the adjuster up or down as required Tighten the lock nuts and recheck lever alignment 3 Start the engine and operate the shift lever Check to be sure the transmission shifts properly If the transmission does not shift properly and the lever is correctly positioned take the mower to an authorized Honda lawn mower dealer for repair NOTE Release the drive clutch lever before movi...

Page 48: ...death To keep exhaust gas from building up provide adequate ventilation 2 Set the throttle lever in the SLOW 1 position 3 Turn the pilot screw in or out to the setting that produces the highest idle rpm The correct setting will usually be approximately 2 turns out from the fully closed position 4 After the pilot screw is correctly adjusted turn the throttle stop screw to obtain the standard idle s...

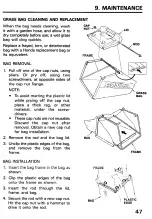
Page 49: ...E l To avoid marring the plastic lid while prying off the cap nut place a thick rag or other material under the screw drivers l These cap nuts are not reusable Discard the cap nut after removal Obtain a new cap nut for bag installation 2 Remove the rod and the bag lid 3 Unclip the plastic edges of the bag and remove the bag from the frame BAG INSTALLATION 1 2 3 4 Insert the bag frame in the bag as...

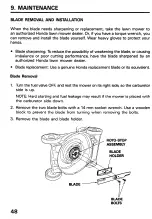
Page 50: ... or poor cutting performance have the blade sharpened by an authorized Honda lawn mower dealer l Blade replacement Use a genuine Honda replacement blade or its equivalent Blade Removal 1 Turn the fuel valve OFF and rest the mower on its right side so the carburetor side is up NOTE Hard starting and fuel leakage may result if the mower is placed with the carburetor side down 2 Remove the two blade ...

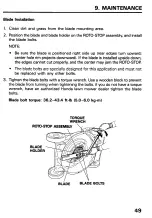
Page 51: ...e down the edges cannot cut properly and the center may jam the ROTO STOP l The blade bolts are specially designed for this application and must not be replaced with any other bolts 3 Tighten the blade bolts with a torque wrench Use a wooden block to prevent the blade from turning when tightening the bolts If you do not have a torque wrench have an authorized Honda lawn mower dealer tighten the bl...

Page 52: ...for at least half an hour before spraying water on it Never spray water on hot engine l Wash the mower using low water pressure and keep water away from controls cable ends wheel hubs and all other places that are difficult to dry if water enters l After washing start the engine outdoors and let it run until it reaches normal operating temperature to evaporate any water remaining on the engine Ope...

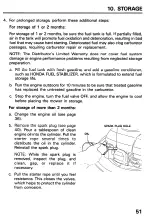
Page 53: ... as HONDA FUEL STABILIZER which is formulated to extend fuel storage life b Run the engine outdoors for 10 minutes to be sure that treated gasoline has replaced the untreated gasoline in the carburetor c Stop the engine turn the fuel valve OFF and allow the engine to cool before placing the mower in storage For storage of more than 2 months a Change the engine oil see page 36 b Remove the spark pl...

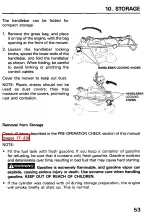
Page 54: ...all the gasoline from the carburetor Install the carburetor drain bolt and tighten it securely Connect the fuel line Turn the fuel valve OFF FUEL VALVE Storage CARBURiTOR DRAIN BOLT Select a storage area away from appliances water heater or clothes dryer that use an open flame as a heat source Power tools and some battery operated toys have electric motors that produce sparks that can ignite gasol...

Page 55: ...rs promoting rust and corrosion HANDLEBAR LOCKING KNOBS Removal from Storage Check all items described in the PRE OPERATION CHECK section of this manual pages 17 23 NOTE l Fill the fuel tank with fresh gasoline If you keep a container of gasoline for refueling be sure that it contains only fresh gasoline Gasoline oxidizes and deteriorates over time resulting in bad fuel that may cause hard startin...

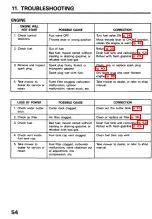
Page 56: ...Drain fuel tank and carburetor fp 52 treating or draining gasoline or Refuel with fresh gasoline p 20 refueled with bad gas Spark plug faulty fouled or improperly gapped Spark plug wet with fuel Clean gap or replace spark plug P 40 Dry spark plug and clear flooded engine fp 26 Take mower to dealer or refer to shop manual POSSIBLE CAUSE I CORRECTION Cutter deck clogged Clean out the cutter deck p 3...

Page 57: ... is dull worn or damaged Empty grass bag and wash the bag if necessary Clean out cutter deck Check blade installation Sharpen or replace blade if necessary fp 17 48 GRASS BAGGING POOR GRASS BAGGING 1 Check grass bag POSSIBLE CAUSE Grass bag is overfilled or cloaaed CORRECTION Empty grass bag and wash the bag if necessarv 2 Check cutter deck and blade Cutter deck is clogged Blade Clean out cutter d...

Page 58: ...ight 88 2 lb 40 0 kg including grass bag Grass Bag Capacity 2 07 bushels 19 3 US gal 73 PI Cutting Width 18 5 in 47 cm Cutting Height adjustable 3 4 in 2 0 cm l l 4 in 3 2 cm l 3 4 in 4 4 cm 2 l 4 in 5 5 cm 2 5 8 in 6 6 cm 3 in 7 7 cm ENGINE Engine Model Engine Type GXV140 4 stroke overhead valve single cylinder forced air cooled Displacement Bore and Stroke 8 2 cu in 135 cc 2 52 x 1 65 in 64 x 42...

Page 59: ...satisfaction contact the Power Equipment Division of American Honda Motor Co Inc American Honda Motor Co Inc Power Equipment Division P O Box 100021 Duluth Georgia 30136 9421 Telephone 404 497 6400 We will need the following information in order to assist you Your name address and telephone number Product model and serial number see page 8 Date of purchase Dealer name and address Nature of problem...

Page 60: ...his way If you are dissatisfied with the decision made by the dealership s management contact the Honda Power Equipment Customer Relations Office You can write American Honda Motor Co Inc Power Equipment Division Customer Relations Office 4900 Marconi Drive Alpharetta GA 30005 8847 Or telephone 770 497 6400 M F 8 30 am 7 00 pm EST When you write or call please provide the following information Mod...

Page 61: ......

Page 62: ......

Page 63: ......

Page 64: ......

Page 65: ......

Reviews: