background image

4

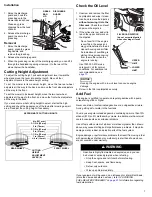
Adjust the Handlebar

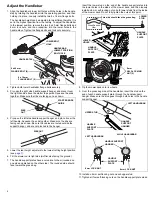
1. Align the handlebar’s lower bolt holes with the holes in the handle 

stay by rotating the handlebar into the operating position, and then 

holding it in place. Loosely install the two 8 x 16 mm flange bolts. 
The handlebar height can be adjusted to two different heights. It is

set in the highest position from the factory. To adjust the handlebar

to the lowest position, remove the two 8 x 40 mm flange bolts and

8 mm lock nuts, and then reposition into the lower holes in the

handle stays. Tighten the flange bolts and lock nuts securely.

2. Tighten both lower handlebar flange bolts securely.
3. Pry open the right side handle support hanger, and place it over 

the right handle above the starter rope guide. Squeeze the ends 

together. Make sure the ribs are facing out, as shown.

4. Pry open the left side handle support hanger, and place it over the 

left handle. Squeeze the ends together. Make sure the ribs are 

facing out, as shown. Be sure the cables are routed outside the 

support hanger, and are not pinched in the hanger. 

5. Lower the rear height adjusters to the lowest cutting height position 

(see 

page 7

).

6. Tilt the mower on its right side (muffler side facing the ground).
7. The handle support plates have a curvature to them (rounded on 

one side and dished on the other side). The rounded side should 

face toward the grass bag. 

Insert the lower stud on the end of the handle support plates into

the lower holes in the sides of the mower deck, and then loosely

install an 8 mm self-locking nut on both lower studs from the inside

of the mower deck. Do not fully tighten the nuts at this point.

8. Tip the mower back onto its wheels.
9. From the grass bag side of the handlebar, insert the stud on the 

end of each handle support plate through the handle support 

hanger. Make sure the stud goes through both holes in the handle 

support hanger.

10.Install an 8 mm self-locking nut on each upper stud.
11.Tighten all four self-locking nuts on the handle support plate studs.

8 x 16 mm 
FLANGE BOLT (2)

HANDLE STAY

LOWER BOLT 
HOLE

8 x 40 mm 
FLANGE BOLT (2)

HANDLEBAR 
LOWEST POSITION 
BOLT HOLE

RIBS 
OUT

STARTER ROPE 
GUIDE

RIBS OUT

8 mm 
SELF-LOCKING 
NUT (2)

HANDLE 
SUPPORT 
PLATE

This side should face the grass bag.

HANDLE 
SUPPORT 
PLATE

Cross Section 

View

LOWER 
HOLES

LOWER
STUD 

LEFT HANDLEBAR

RIGHT HANDLEBAR

HANDLE SUPPORT 
HANGER

HANDLE 
SUPPORT 
PLATE

8 mm LOCK NUT

LEFT HANDLEBAR

HANDLE 
SUPPORT 
HANGER

HANDLE 
SUPPORT 
PLATE

UPPER STUD

8 mm LOCK NUT

Summary of Contents for HRC216HXA

Page 1: ...heck Your Mowing Area 6 Drive Clutch Cable Adjustment 15 AVOIDING FUEL RELATED PROBLEMS 20 Rear Shield 6 Throttle Lever Cable Inspection 15 CUSTOMER INFORMATION 21 Mulching Plug 6 Transmission Fluid L...

Page 2: ...wn mowers are tools not toys As with any equipment bad judgments can result in serious injuries Your child must be big enough strong enough and have the coordination necessary to comfortably reach and...

Page 3: ...Blade Inspection 12 Vibration 17 Adjust the Handlebar 4 Blade Mounting Bolt Inspection 12 Mowing and Bagging Problems 17 Add Engine Oil 5 Blade Replacement 12 TECHNICAL INFORMATION 18 Assemble the Gra...

Page 4: ...6 Tilt the mower on its right side muffler side facing the ground 7 The handle support plates have a curvature to them rounded on one side and dished on the other side The rounded side should face tow...

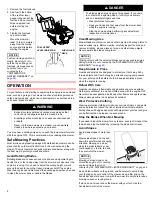
Page 5: ...ar the recoil starter grip that says The engine has no oil Assemble the Grass Bag 1 Insert the grass bag joint through the lid and grass bag frame Secure with a push nut on each end of the grass bag j...

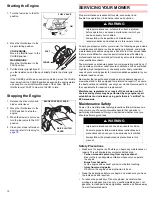
Page 6: ...e struck by thrown objects Clear the area of pets and people especially children Their safety is your responsibility Check the condition of the grass Adjust your lawn mower ground speed and mowing swa...

Page 7: ...is white or blue smoke coming from the muffler when the engine is running Use 10W 30 API Service category SJ oil for normal conditions For additional oil recommendations see page 13 NOTICE Running the...

Page 8: ...ing hit by thrown objects and from hot engine parts and moving components For your safety and the safety of others keep all shields in place when the engine is running Refuel With Care Gasoline is ext...

Page 9: ...s from turning Drive Clutch Lever With the engine running push the drive clutch lever forward to propel the mower forward Release the drive clutch lever to stop the mower s forward movement You can co...

Page 10: ...aler knows your mower best and is fully equipped to maintain and repair it To ensure the best quality and reliability use only new Honda Genuine parts or their equivalents for repair and replacement M...

Page 11: ...es Item 1 Action Before each use First 20 hours of use Every 50 hours of use Every 100 hours of use Every 200 hours of use Every 1000 hours of use See page Rear shield Check O 6 Blades Inspect O 12 Bl...

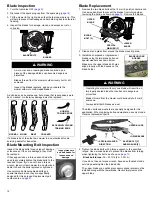
Page 12: ...ment blades using the two blade bolts and special washers as shown below Make sure the upper blade bolt holes align properly with the bosses on the blade holder The blade bolts and washers are special...

Page 13: ...urs of use Thereafter clean the filter every 50 hours of use Clean the filter more often when used in dusty areas Replace the filter every 200 hours of use A properly maintained air filter will help p...

Page 14: ...k plug cap on the spark plug Spark Arrester optional part The spark arrester must be serviced every 100 hours to keep it functioning as designed Your lawn mower engine is not factory equipped with a s...

Page 15: ...should move counterclockwise until it contacts the stop post on the carburetor Push the choke arm with your finger to verify that it has moved as far as it will go 2 Move the throttle lever to the FAS...

Page 16: ...side so the fuel cap side is up This will help to prevent fuel leakage and hard starting due to carburetor flooding Wear heavy gloves to protect your hands from the blades Be careful to avoid getting...

Page 17: ...r filter page 13 Bad fuel mower stored without treating gasoline or refueled with bad gasoline Refuel with fresh gasoline page 7 Fuel filter clogged carburetor malfunction ignition malfunction valves...

Page 18: ...ze components and control technologies to reduce evaporative emissions U S and California Clean Air Acts and Environment and Climate Change Canada ECCC U S EPA California and Canadian regulations requ...

Page 19: ...r than 80 cc Intermediate 125 hours 0 80 cc 250 hours greater than 80 cc Extended 300 hours 0 80 cc 500 hours greater than 80 cc 1000 hours 225 cc and greater HRC2163HXA HRC2163HXPH Hydrostatic transm...

Page 20: ...re each use A properly maintained air filter will help prevent dirt from entering the carburetor The small passages inside the carburetor can become blocked 3 to 4 Weeks Before Next Use Reason Keep yo...

Page 21: ...specifications included in this publication were in effect at the time of approval for printing American Honda Motor Co Inc reserves the right however to discontinue or change specifications or desig...

Page 22: ...how long an implied warranty lasts and or do not allow the exclusion or limitation of incidental or consequential damages so the above exclusions and limitations may not apply to you This warranty giv...

Page 23: ...nd must be provided without charge to the owner A list of warranted parts is on the adjacent column of this warranty statement All emission related parts are under warranty for the remainder of the wa...

Page 24: ...NOTES...

Page 25: ...25 NOTES...

Page 26: ...26 NOTES...

Page 27: ...to any other company or organization Failure to register your lawn mower does not diminish your warranty rights Please complete and mail the postage paid card scan the QR code or register online at po...

Page 28: ...American Honda Motor Co Inc 4900 Marconi Dr Alpharetta GA 30005 9956 NO POSTAGE NECESSARY IF MAILED IN THE UNITED STATES Product Registration BUSINESS REPLY MAIL FIRST CLASS MAIL ALPHARETTA GA PERMIT...

Reviews: