MAINTENANCE
HRR216PKA
3-4
REMOVAL
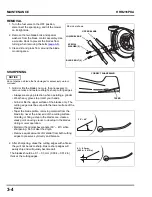
1. Turn the fuel valve to the OFF position,
disconnect the spark plug, and tilt the mower
on its right side.
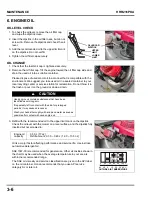
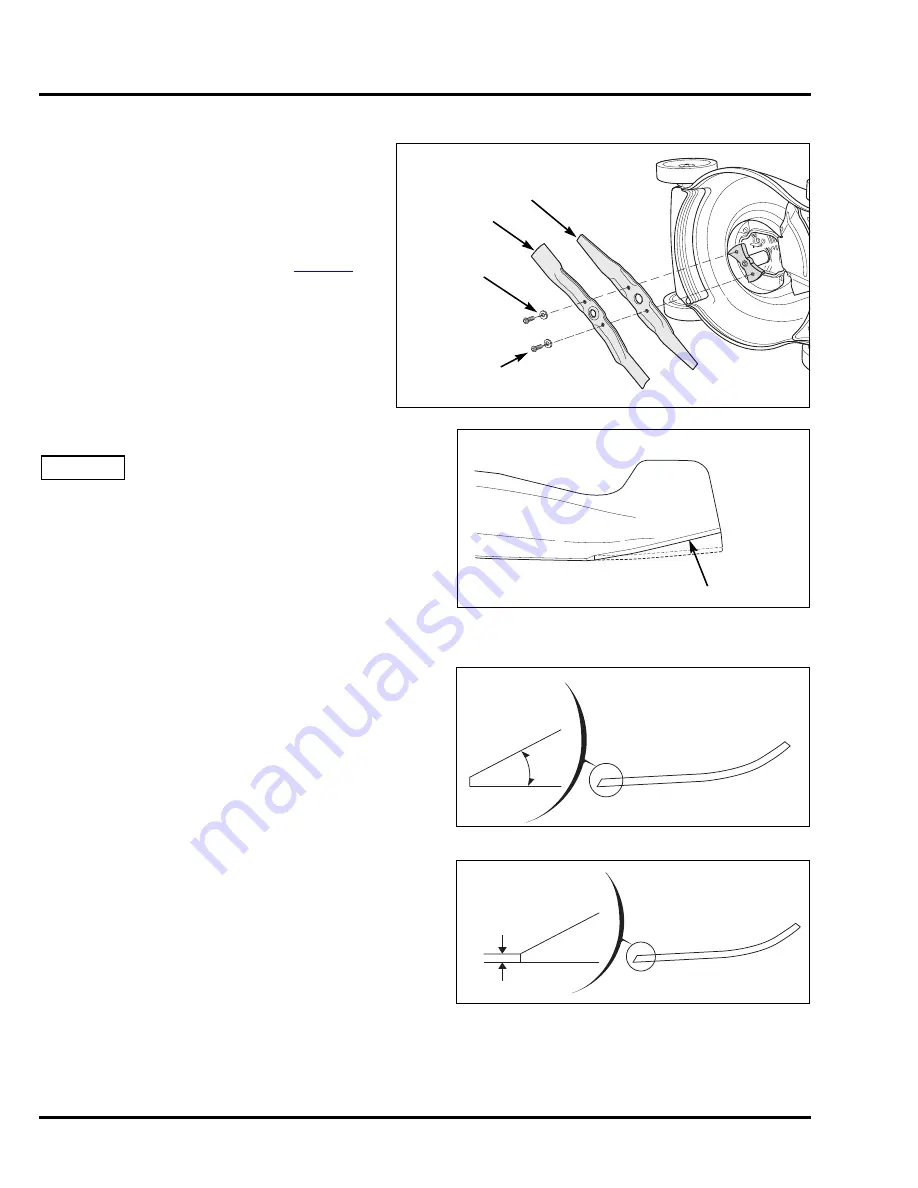
2. Remove the two blade bolts and special
washers from the blade control assembly. Use
a wooden block to prevent the blades from
turning when removing the bolts (
).
3. Clean dirt and grass from around the blade
mounting area.
SHARPENING
NOTICE
Do not sharpen a blade that is damaged or excessively worn or
corroded.
1. Grind or file the blades no more than necessary to
remove nicks and restore straight, sharp cutting edges.
• Always wear eye protection when operating a grinder.
• Wear heavy gloves to protect your hands.
• Grind or file the upper surface of the blades only. The
cutting edge must be even with the lower surface of the
blades.
• Taper the blade profile, removing material from the
blade tip, never the inner end of the cutting surface.
Grinding or filing a step in the blades can create a
weak point, causing cracks to develop in the blades
during mower operation.
• Maintain the original bevel angle (30° ~ 40°) while
sharpening. Do not alter the angle.
• Remove equal amounts of material from both cutting
edges to preserve symmetry and balance.
2. After sharpening, dress the cutting edges with a file so
they will not be razor-sharp. Razor-sharp edges will
easily chip and will quickly become dull.
The blades should be 0.1 ~ 0.3 mm (0.004 ~ 0.012 in)
thick at the cutting edges.
UPPER BLADE
LOWER BLADE
SPECIAL
WASHER (2)
BLADE BOLT (2)
K8 model shown
CORRECT SHARPENING
TAPER
30° ~ 40°
0.1 ~ 0.3 mm
(0.004 ~ 0.012 in)
Summary of Contents for HRR216PKA
Page 5: ...iv HRR216PKA NOTES...
Page 9: ...SPECIFICATIONS HRR216PKA 1 4 NOTES...
Page 45: ...MUFFLER HRR216PKA 5 2 NOTES...
Page 49: ...RECOIL STARTER HRR216PKA 6 4 NOTES...


