

6
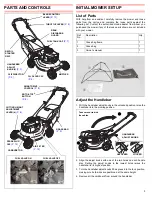
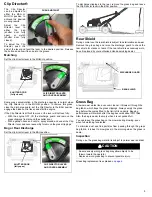
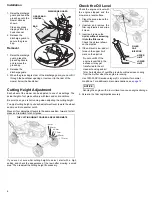
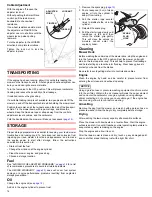
Installation
1. Raise the discharge
guard and hook the
grass bag onto the
mower deck as
shown.
Clean any grass
clippings from the
hook channel.
2. Release the
discharge guard to
secure the grass
bag.
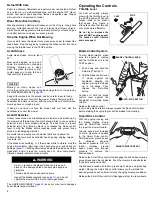
Removal
1. Raise the discharge
guard, grasp the
grass bag handle,
and remove the
grass bag.
2. Release the
discharge guard.
3. When the grass bag is clear of the discharge guard, you can lift it
through the handlebar opening or remove it to the rear of the
mower below the handlebar.
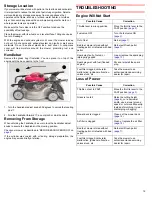
Cutting Height Adjustment
Each wheel of the mower can be adjusted to one of six settings. The
actual height of cut grass will vary with lawn and soil conditions.
Be sure the engine is not running when adjusting the cutting height.
To adjust cutting height, pull each adjustment lever toward the wheel,
and move it into another notch.
Move all four adjustment levers to the same position, forward for tall
grass and rearward for short grass.
If you are not sure what cutting height to select, start with a high
setting and check the appearance of the lawn after mowing a small
area. Then readjust the cutting height if necessary.
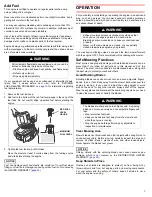
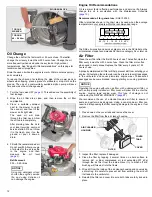
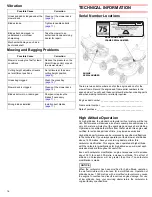
Check the Oil Level
Check the engine oil level with
the engine stopped and the
mower on a level surface.
1. Clean the area around the
oil filler cap.
2. Unscrew and remove the
filler cap/dipstick and wipe
it clean.
3. Insert and remove the
dipstick
without screwing
it into the filler neck
.
Check the oil level shown
on the dipstick.
4. If the oil level is low, add oil
to reach the upper limit
mark on the dipstick.
Do not overfill. If the
engine is overfilled, the
excess oil may get
transferred to the air
cleaner housing and air
filter. An indication of overfilling is white or blue smoke coming
from the muffler when the engine is running.
Use 10W-30 API Service category SJ or later oil for normal
conditions. For additional oil recommendations, see
NOTICE
Running the engine with a low oil level can cause engine damage.
5. Screw in the filler cap/dipstick securely.
GRASS BAG
HANDLE
BAG
DISCHARGE GUARD
HONDA
HONDA
44mm
60mm
75mm
90mm
102mm
28mm
THE CUTTING HEIGHT FIGURES ARE APPROXIMATE
HONDA
HONDA
FILLER
CAP
/DIPSTICK
LOWER
LIMIT
UPPER
LIMIT
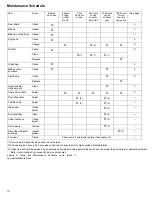
Summary of Contents for HRR216VYUA
Page 23: ...23 ...
Page 24: ...24 www hondampe com au HPE 2014 06 Printed in U S A ...


