background image

Operational Procedures

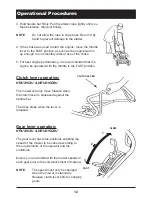
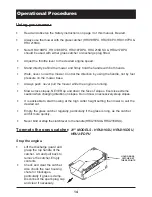
3. Hold handle bar firmly. Pull the starter rope lightly until you

feel resistance, then pull briskly.

NOTE

Do not allow the rope to snap back. Return it by
hand to prevent damage to the starter.

4. If the choke was used to start the engine, move the throttle

lever to the FAST position as soon as the engine warms
up enough to run smoothly without use of the choke.

5. For best engine performance, it is recommended that the

engine be operated with the throttle in the FAST position.

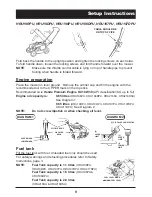
Clutch lever operation:

HRU216SU & HRU216DSU

The mower will only move forward when
the clutch lever is squeezed against the
handle bar.

The drive stops when the lever is
released.

Gear lever operation: 

HRU216SU & HRU216DSU

The gear lever has three positions enabling the
speed of the mower to be varied according to
the requirements of the operator and the
conditions. 

Ensure you are familiar with the mower speeds in
each gear prior to the commencement of mowing.

NOTE

:

The speed must only be changed
when the mower is stationary.
Release clutch lever before changing
gears.

12

1

2

3

CLUTCH LEVER

SLOW

FAST

Summary of Contents for HRU196DPU

Page 1: ...LAWNMOWER OWNER S MANUAL Service Record Booklet Models HRU196PU HRU196DPU HRU216SU HRU216DSU HRU19RPU HRU19DPU HRU217DPU HRU197PU HRU197DPU ...

Page 2: ...based on the latest product information available at the time of publication Honda Australia Motorcycle and Power Equipment Pty Ltd reserves the right to make changes at any time without notice No part of this publication may be reproduced stored in a retrieval system or transmitted in any form by any means electronic mechanical photocopying recording or otherwise without the prior written permiss...

Page 3: ...or inadequate maintenance or improper storage Repairs rendered necessary by or arising from the use of other than genuine Honda parts Normal maintenance items including but not limited to adjustment and cleaning of carburettor fuel strainer and air filter Normal replacement of service items including but not limited to spark plug air filter and cutting blades Deterioration of any item due to norma...

Page 4: ...learing blockages checking or working on the mower 6 Before using your mower always visually inspect it to see that blades blade bolts and cutter assembly are not worn or damaged Replace worn or damaged blades and bolts in sets to preserve balance DAMAGED BLADES AND WORN BOLTS ARE MAJOR HAZARDS 7 Check all nuts bolts screws and blades often Always be sure the mower is in safe operating condition U...

Page 5: ...unsuitable 22 Stop the engine disconnect the spark plug cap and inspect the mower a If the mower begins to vibrate abnormally or b after striking a foreign object 23 Never cut grass while walking backwards 24 Stop the engine before pushing a mower across gravel drives walks or roads 25 Walk while mowing never run 26 Mow across the face of a slope NEVER up and down the face of slopes Exercise extre...

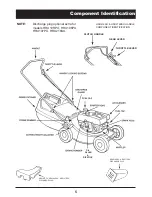
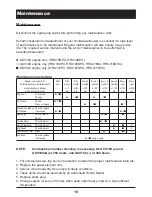
Page 6: ...PU DISCHARGE PLUG HRU216DSU HRU217DPU DISCHARGE PLUG HRU216SU HRU216DSU HANDLE COMPONENT IDENTIFICATION NOTE Discharge plug optional extra for models HRU19RPU HRU196PU HRU197PU HRU216SU CLUTCH HANDLE FUEL CAP OIL FILLER DIPSTICK GEAR LEVER THROTTLE LEVER ...

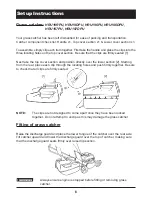
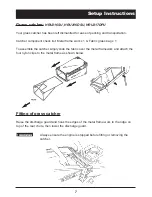
Page 7: ...nd position directly over the lower section 2 Starting from the rear place each clip through the locating holes and push firmly together Be sure to check that all clips are firmly seated NOTE The clips are not designed to come apart once they have been locked together Do not attempt to unclip as this may damage the grass catcher Fitting of grass catcher Raise the discharge guard and place the lowe...

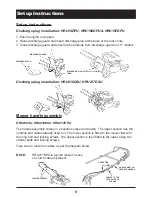
Page 8: ...c grass bag x 1 To assemble the catcher simply slide the fabric over the metal framework and attach the four nylon clips to the metal frame as shown below Fitting of grass catcher Raise the discharge guard and hook the edges of the metal frame work to the ridge on top of the rear chute then lower the discharge guard Always ensure the engine is stopped before fitting or removing the catcher WARNING...

Page 9: ...SU HRU217DPU The handle assembly comes in 2 sections upper and lower The upper section has the controls and cables already fixed to it The lower section is fitted to the mower first with the long bolt and locking screws The upper section is then fitted to the lower using the shorter bolts and locking screws Take care to route the cables as per the diagram below NOTE HRU217DPU is a push mower hence...

Page 10: ... SJ Engine oil capacity is 0 65 litres HRU196PU HRU196DPU HRU216SU HRU216DSU See Diagram 1 0 55 litres HRU19RPU HRU19DPU HRU197PU HRU197DPU HRU217DPU See Diagram 2 NOTE Do not screw dipstick in when checking oil level Fuel tank Fill the fuel tank with fuel Unleaded fuel only should be used For safety warnings and refuelling procedures refer to Safety Instructions page 3 NOTE Fuel Tank capacity is ...

Page 11: ...the engine stopped Do not smoke or allow flames or sparks in the area where the mower is refuelled or where fuel is stored Be careful not to spill fuel when refuelling Fuel vapour or spilled fuel may ignite Make sure that any spilled fuel is dry before starting the engine Do not overfill fuel tank and make sure the filler cap is securely closed after refuelling Refuel only when engine is cold Add ...

Page 12: ...nt warnings and procedures refer to Maintenance Section page 22 Operational Procedures Starting and stopping the engine Starting the engine 1 Turn the fuel tap to the ON position 2 Place the mower on firm level ground Move the throttle lever to the CHOKE position NOTE Use of the CHOKE may not be necessary when the engine is warm or the air temperature is high Move the throttle lever to LOW positio...

Page 13: ... be operated with the throttle in the FAST position Clutch lever operation HRU216SU HRU216DSU The mower will only move forward when the clutch lever is squeezed against the handle bar The drive stops when the lever is released Gear lever operation HRU216SU HRU216DSU The gear lever has three positions enabling the speed of the mower to be varied according to the requirements of the operator and the...

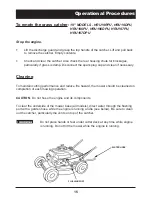
Page 14: ...he FAST position Turn on the fuel tap and repeat step 3 for Starting the engine page 12 Stopping the engine 1 Slowly move the throttle lever to the STOP position 1 2 Turn the fuel tap to the OFF position lever vertical HRU196 and 216 push fuel tap towards the front of the mower Cutting height adjustment Eleven height settings are available to suit your requirements To adjust the height Stop the en...

Page 15: ...oss slopes NEVER up and down the face of slopes Exercise extreme caution when changing direction on slopes Do not mow on excessively steep slopes It is advisable to start mowing at the high cutter height setting then lower to suit the desired cut Empty the grass catcher regularly particularly if the grass is long as the catcher will fill more quickly Never bind or strap the clutch lever to the han...

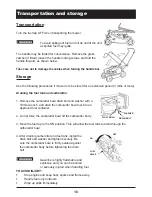
Page 16: ...an if necessary Cleaning To maintain cutting performance and reduce fire hazard the mower should be cleaned on completion of each mowing operation CAUTION Do not hose the engine and its components To clear the underside of the mower base all models direct water through the flushing port with a garden hose while the engine is running at idle see below Be sure to clean out the catcher particularly t...

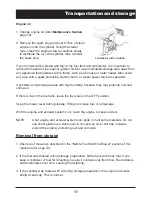
Page 17: ... bolt and washer with a 10mm wrench and drain the carburettor bowl fuel into an approved fuel container 2 Do not force the carburettor bowl off the carburettor body 3 Move the fuel tap to the ON position This will allow the fuel tank to drain through the carburettor bowl 4 After draining carburettor and fuel tank install the drain bolt and washer and tighten securely Be sure the carburettor bowl i...

Page 18: ...d corrosion If there is fuel in the fuel tank leave the fuel valve in the OFF position Keep the mower level during storage Tilting can cause fuel or oil leakage With the engine and exhaust system cool cover the engine to keep out dust NOTE A hot engine and exhaust system can ignite or melt some materials Do not use sheet plastic as a dust cover A non porous cover will trap moisture around the engi...

Page 19: ...nterval or 5 or 20 or 25 or 50 or 100 or 150 or 200 or 300 which ever occurs first hrs hrs hrs hrs hrs hrs hrs hrs Engine oil Check Level Change 6 Air Cleaner Check 3 3 3 Clean or replace2 3 3 3 2 3 Blade Bolts Blades Check replace Washers if necessary Spark Plug Check Clean 5 Adjust Throttle Cable Check Adjust 4 4 4 Valve Clearance Check Adjust 4 4 4 Idle Speed Check Adjust 4 4 4 Fuel tank and fi...

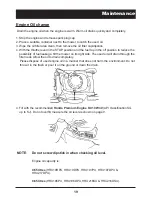
Page 20: ...uel leakage tilt the mower on its right side The used oil will drain through the filler neck Allow the oil to drain completely Please dispose of used engine oil in a manner that does not harm the environment Do not throw it in the trash or pour it on the ground or down the drain 4 Fill with the recommended Honda Premium Engine Oil 10W 30 API classification SG up to SJ Do not overfill measure the o...

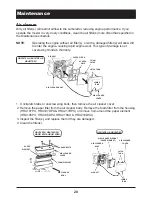
Page 21: ... then remove the air cleaner cover 2 Remove the paper filter from the air cleaner body Remove the foam filter from the housing HRU197PU HRU197DPU HRU217DPU or remove from around the paper element HRU196PU HRU196DPU HRU216SU HRU216DSU 3 Inspect the filter s and replace them if they are damaged 4 Clean the filter s HRU19RPU HRU19DPU HRU196PU HRU196DPU HRU216PU HRU216DPU HRU197PU HRU197DPU HRU217DPU ...

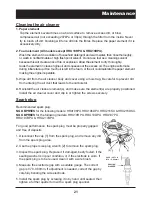
Page 22: ...dirt from entering the air duct that leads to the carburetor 4 Reinstall the air cleaner element s and make sure the element s are properly positioned Install the air cleaner cover and clip in or tighten the screws securely Spark plug Recommended spark plug NGK BPR5ES for the following models HRU196PU HRU196DPU HRU216SU HRU216DSU NGK BPR6ES for the following models HRU19RPU HRU19DPU HRU197PU HRU19...

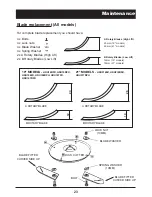
Page 23: ...ove fuel from tank Use only genuine Honda replacement blades Always ensure that blades are fitted as opposing pairs and always replace blades in sets using new bolts each time blades are replaced Tilt mower onto the right hand side with carburettor facing up Holding the cutter disc securely loosen the cutter blade nuts and remove blade bolts and blades If for any reason you are unable to undo cutt...

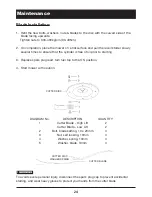
Page 24: ... BLADE WASHER SPRING WASHER 10MM BOLT DISK CUTTER BLADE FITTED CURVED SIDE UP BLADE FITTED CURVED SIDE UP Maintenance 23 23 12 A ROTARY BLADE B ROTARY BLADE 26 10 A ROTARY BLADE B ROTARY BLADE 19 MODELS HRU19RPU HRU19DPU HRU196PU HRU196DPU HRU197PU HRU197DPU 21 MODELS HRU216SU HRU216DSU HRU217DPU A Rotary Blades High Lift 23mm 19 models 26mm 21 models B Rotary Blades Low Lift 12mm 19 models 10mm 2...

Page 25: ... oil prior to starting 3 Replace spark plug lead turn fuel tap to the ON position 4 Start mower with caution DIAGRAM No DESCRIPTION QUANTITY 1 Cutter Blade High Lift 2 Cutter Blade Low Lift 2 2 Bolt blade setting 10 x 20mm 4 3 Nut self locking 10mm 4 4 Washer spring 10mm 4 5 Washer blade 10mm 4 To avoid severe personal injury disconnect the spark plug cap to prevent accidental starting and wear he...

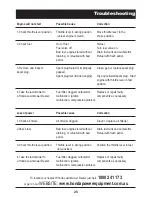
Page 26: ...uel filter clogged carburettor Replace or repair faulty a Honda Lawnmower Dealer malfunction ignition components as necessary malfunction compression problem Loss of power Possible cause Correction 1 Check air filters Air filter s clogged Clean or replace air filter s 2 Check fuel Bad fuel engine stored without Drain fuel tank and carburettor draining or refuelled with bad Refuel with fresh petrol...

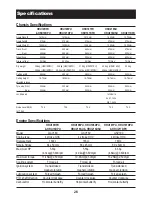
Page 27: ...Front 200mm 200mm 200mm 200mm 200mm Rear 200mm 200mm 200mm 200mm 200mm Land Speed 1st 0 8m s 2nd 1 1m s 3rd 1 4m s Noise Level dB A 72 4 72 4 72 4 74 0 74 0 at 7 5m Engine Specifications HRU19RPU HRU196PU HRU196DPU HRU197PU HRU197DPU HRU19DPU HRU216SU HRU216DSU HRU217DPU Model GCV160 GXV160 GSV190 Engine type 4 stroke OHC 4 stroke OHV 4 stroke OHC Displacement 160cc 163cc 187cc Bore Stroke 64 x 50...

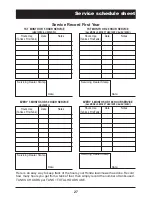
Page 28: ... Use Date Notes Tanks x Hrs Tank EVERY 3 MONTHS OR 50 HOUR SERVICE HRU19DPU Servicing Dealer Stamp Date Here is an easy way to keep track of the hours your Honda lawnmower has done Record how many hours you get from a tank of fuel then simply record the number of tanks used TANKS X HOURS per TANK TOTAL HOURS USE Service Record First Year Hours Use Date Notes Tanks x Hrs Tank EVERY 6 MONTHS OR 100 ...

Page 29: ... NEXT SERVICE Servicing Dealer Stamp Date Hours Use Date Notes Tanks x Hrs Tank NEXT SERVICE Servicing Dealer Stamp Date Here is an easy way to keep track of the hours your Honda lawnmower has done Record how many hours you get from a tank of fuel then simply record the number of tanks used TANKS X HOURS per TANK TOTAL HOURS USE Refer to maintenance schedule on page 18 THIS PAGE CAN BE PHOTOCOPIED...

Page 30: ...HMA C90310 Part No C9031 Printed August 2004 by Kenmark Press 03 9555 6075 ...

Reviews: