background image

13

ENGLISH

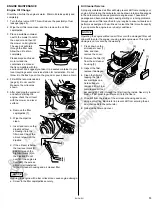
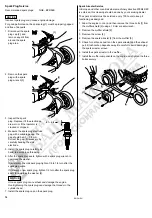
ENGINE MAINTENANCE
Engine Oil Change 

Drain the oil while the engine is warm. Warm oil drains quickly and 

completely.
1. Turn the fuel valve OFF. This will reduce the possibility of fuel 

leakage (page 5).

2. Wipe the oil filler area clean, and then remove the oil filler 

cap/dipstick.

3. Place a suitable container 

next to the mower to catch 

the used oil, and then tilt 

the mower on its right side. 

The used oil will drain 

through the filler neck. 

Allow the oil to drain 

completely.
Please dispose of used 

motor oil and the 

containers in a manner 

that is compatible with the 

environment. We suggest you take it in a sealed container to your 

local recycling center or service station for reclamation. Do not 

throw it in the trash, pour it on the ground or pour it down a drain.

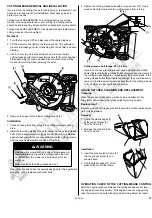
4. Fill with the recommended oil 

(page 6). Do not overfill. 

Measure the oil level as 

shown.

5. After changing the engine oil 

and before starting the 

engine, check the oil level 

with the mower on a level 

surface:

a. Remove the filler 

cap/dipstick [1].

b. Wipe the dipstick 

clean.

c. Insert and remove the 

dipstick without 

screwing it into the 

filler neck. Check the 

oil level shown on the 

dipstick.

d. If the oil level is below 

the low level mark [3], 

add oil to reach the 

high limit mark [2] on 

the dipstick. Do not 

overfill. If the engine is 

overfilled, the excess 

oil may get transferred 

to the air cleaner housing and air cleaner filter.

NOTICE

Running the engine with a low oil level can cause engine damage.

e. Screw in the filler cap/dipstick securely.

Air Cleaner Service

A properly maintained air filter will help prevent dirt from entering your 

engine. Dirt entering the carburetor can be drawn into small passages 

in the carburetor and cause premature engine wear. These small 

passages can become blocked, causing starting or running problems. 

Always use an air filter specified for your engine to ensure it seals and 

performs as designed. You will need to clean the filter more frequently 

if you operate the engine in very dusty conditions.

NOTICE

Operating the engine without an air filter, or with a damaged filter, will 

allow dirt to enter the engine, causing rapid engine wear. This type of 

damage is not covered by the warranty.

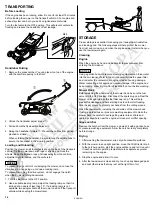
1. Press down on the 

air cleaner cover [1] 

tabs, and then 

remove the cover.

2. Remove the filter [2] 

from the air cleaner 

housing [3].

3. Inspect the filter; 

replace if damaged.

4. Clean the filter by 

tapping the filter 

several times on a 

hard surface to 

remove dirt, or blow 

compressed air (not 

exceeding 207 kPa) through the filter from the inside. Never try to 

brush off dirt; brushing will force dirt into the fibers.

5. Wipe dirt from the inside of the air cleaner housing and cover, 

using a moist rag. Be careful to prevent dirt from entering the air 

duct that leads to the carburetor.

6. Reinstall the filter and cover.

[1]

[2]

[3]

[1]

[2]

[3]

Summary of Contents for HRX537VKEA

Page 1: ...what can happen and what you can do to avoid or reduce injury DAMAGE PREVENTION MESSAGES You will also see other important messages that are preceded by the following word The purpose of these messages is to help prevent damage to your lawnmower other property or the environment CONTENTS DANGER You WILL be KILLED or SERIOUSLY HURT if you don t follow instructions WARNING You CAN be KILLED or SERIO...

Page 2: ...means control and drive clutch control before starting the machine Start the engine carefully according to the instructions and with feet well away from the cutting means Do not tilt the lawnmower when starting the engine Start the lawnmower on a level surface free of high grass or obstacles Keep hands and feet away from rotating parts Do not start the engine when standing in front of the discharg...

Page 3: ... Meaning C 1 Guaranteed sound power level according to Directive 2000 14 EC 2 Conformity mark according to the EC Directive 3 Optional conformity mark 4 Nominal power in kilowatts 5 Maximum engine speed 6 Weight in kilograms 7 Year of manufacture 8 Serial number 9 Model 10 Manufacturer s name and address 11 Authorized representative name and address Name and address of manufacturer and authorized ...

Page 4: ...e the grass catcher frame 1 into the grass catcher 2 and install the plastic clips 3 as shown Lift the discharge guard and install the grass catcher ENGINE OIL The mower is shipped WITHOUT OIL in the engine Add enough SAE 10W 30 API service category SJ or later oil to bring the oil level between the upper limit 2 and lower limit 3 marks on the dipstick 1 as shown Do not overfill the engine with oi...

Page 5: ...er obstacles Push the mower around obstacles for better directional control Adjusting The Select Drive Control Knob The Select Drive control knob allows you to adjust the maximum ground speed when the Select Drive lever is fully engaged Adjustment is from MIN to MAX With the Select Drive lever fully engaged MIN will propel the lawnmower at its slowest speed MAX will propel the lawnmower at its fas...

Page 6: ...y SJ or later Always check the API SERVICE label on the oil container to be sure it includes the letters SJ or later SAE 10W 30 is recommended for general use Other viscosities shown in the chart may be used when the average temperature in your area is within the indicated range NOTICE Running the engine with a low oil level can cause engine damage Using nondetergent oil can shorten the engine s s...

Page 7: ...k cap and check the fuel level Refill the tank if the fuel level is low Refuel carefully to avoid spilling fuel Do not overfill there should be no fuel in the filler neck 1 After refueling tighten the fuel tank cap securely Move the mower at least 3 meters away from the fueling source and site before starting the engine Fuel Storage Container Store your gasoline in a clean plastic sealed container...

Page 8: ...ht settings and be sure that all four adjustment levers 1 are set to the same cutting height position To adjust cutting height pull each adjustment lever 1 toward the wheel and move it into another notch If you are not sure what cutting height to select start with a high setting and check the appearance of the lawn after mowing a small area Then readjust cutting height if necessary Clip Direction ...

Page 9: ...isk of injury from thrown objects Wear footwear that protects your feet and won t let you slip if you mow on slopes or uneven ground OPERATION MOWING PRECAUTIONS Before operating the mower for the first time please review SAFETY INSTRUCTIONS page 2 and PRE OPERATION CHECKS page 5 Even if you have operated other mowers take the time to become familiar with how this mower works and practice in a saf...

Page 10: ... periods of inactivity that exceed 4 weeks SAFE MOWING PRACTICES For your safety keep all four wheels on the ground and be careful to avoid losing your footing and your control of the mower Keep a firm grip on the handlebar and walk never run with the mower Be very careful when mowing uneven or rough ground If stuck do not kick or shove the mower with your foot Use the handlebar to control the mow...

Page 11: ...tch large amounts of fallen leaves and not for mowing set the cutting height adjustment levers so the front of the mower deck is one or two settings higher than the rear To start position the Clip Director knob in the 9 position not quite full mulching This setting will allow the leaves to be recirculated and recut until the particles are small enough to pass though the sliding door opening and in...

Page 12: ...s away from all fuel related parts MAINTENANCE SCHEDULE Perform at every indicated month year or operating hour interval whichever comes first 1 Service more frequently when used in dusty areas 2 These items should be serviced by an authorized Honda servicing dealer unless you have the proper tools and are mechanically proficient Refer to the Honda shop manual for service procedures 3 In Europe an...

Page 13: ...illed the excess oil may get transferred to the air cleaner housing and air cleaner filter NOTICE Running the engine with a low oil level can cause engine damage e Screw in the filler cap dipstick securely Air Cleaner Service A properly maintained air filter will help prevent dirt from entering your engine Dirt entering the carburetor can be drawn into small passages in the carburetor and cause pr...

Page 14: ... 1 2 turn after the spark plug seats to compress the washer 4 NOTICE A loose spark plug can overheat and damage the engine Overtightening the spark plug can damage the threads in the cylinder head 7 Install the spark plug cap on the spark plug Spark Arrester Service In Europe and other countries where machinery directive 2006 42 EC is enforced this cleaning should be done by your servicing dealer ...

Page 15: ...other bolts 3 Tighten the cutting means bolts with a torque wrench 7 Use a wooden block 6 to prevent the cutting means from turning Cutting means bolt torque 49 59 N m If you do not have a torque wrench have an authorized Honda dealer tighten the cutting means bolts before you use the mower If the cutting means bolts are overtightened they could break If the cutting means bolts are not tightened e...

Page 16: ...lowing steps will help protect the mower from rust and corrosion and make the engine easier to start when you use the lawnmower again Cleaning Engine Wash the engine by hand and be careful to prevent water from entering the air cleaner NOTICE Using a garden hose or pressure washing equipment can force water into the air cleaner Water in the air cleaner will soak the paper filter and can enter the ...

Page 17: ...han 3 minutes Long Term or Seasonal Storage greater than 90 days Start the engine and allow it to run long enough to empty all the gasoline from the entire fuel system including the fuel tank Do not allow gasoline to remain in your engine for more than 90 days of inactivity The DISTRIBUTOR S LIMITED WARRANTY does not cover fuel system damage or engine performance problems resulting from neglected ...

Page 18: ...ause Correction Mower is moving too fast for lawn conditions Move the Select Drive to a slower speed page 9 or push slower Cutting height adjustment levers set at different positions Set all levers at the same cutting height position page 8 Grass catcher overfilled or clogged Empty the grass catcher Wash the grass catcher if it is clogged with dirt page 15 Cutting means enclosure is clogged Clean ...

Reviews: