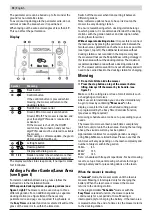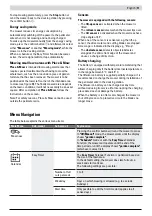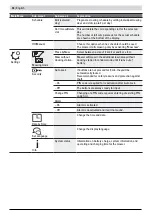
English |
15
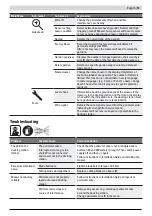
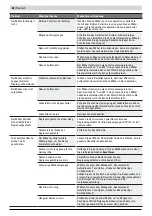
Problem
Possible Cause
Corrective Action
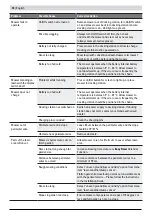
Mower gets stuck in
garden
Objects/obstacles not marked
out
Use the perimeter wire to mark off obstacles where the
mower often gets stuck .
Newly laid turf
Allow a few weeks for the soil to settle before using the
mower .
Change setting in menu item "lawn condition/bump
sensor" .
After watering, wait as long as possible until you start
the mower .
Mower
unintentionally cuts
flowers, etc . or
runs over certain
obstacles
Objects/obstacles below 5 cm
not marked out
Mark obstacle using perimeter wire leaving 30 cm from
object or remove objects/obstacles .
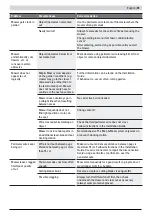
Mower does not
appear to cut
logically
Map & Mow system depends
on the garden conditions (e .g .
mower may go to the closest
unmowed area rather than to
the last mowed spot) . Mower
does not necessarily have to
continue in the next uncut area .
Further information can be found on the Installation
Guide .
If behaviour re-occurs often, remap garden .
Mower does not always go in
a straight line when travelling
between areas
No corrective action needed .
Mower frequently does not
find right position or turns on
the spot
Change wire ID .
Wire crossed while marking an
object
Check that laid perimeter wire does not cross .
Follow instructions in the Installation Guide .
Mower runs in random paths in
an additional lawn area without
docking station .
Normal behavior . The Map & Mow system only works in
areas with docking station .
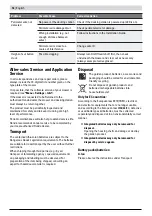
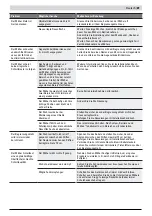
Perimeter wire keeps
being cut
Wire is not taut between pegs
Distance between pegs is more
than 75 cm
Make wire taut and ensure distance between pegs is
maximum 75 cm . Follow instructions in the Installation
Guide . Use wire connectors to repair the disconnection .
Avoid using a verticutter, scarifier, etc . over the
perimeter wire .
Mower leaves ragged
finish/poor quality
of cut
The mower does not mow often
enough
Mow more frequently for a good result (e .g . by means of
more/longer slots in schedule) .
Cutting blades blunt
Reverse or replace cutting blades (see figure
K
) .
Possible clogging
Always turn On/Off switch off first, then check
underneath the mower and clear out as necessary
(always wear protective gloves) .
Summary of Contents for Miimo HRM40
Page 1: ...MIIMO HRM40 ORIGINAL INSTRUCTIONS ...
Page 3: ...2 ...
Page 109: ...108 C 2 m 5 m 125 m 180 x B ...
Page 110: ... 109 1cm 3 0 c m 3 cm 3 cm 3 cm 3 cm E D ...
Page 111: ...110 MAX 50 mm 40 mm MIN 30 mm MAX 50 mm MIN 30 mm STOP G F Mi im o HR M4 0 ...
Page 112: ... 111 H I ...
Page 113: ...112 STOP STOP K J ...
Page 114: ...EN PP xx xxxx xx Printed in Europe 3RY0E600 00X3R Y0E 6000 Honda Motor Europe Ltd 2019 ...

