background image

40

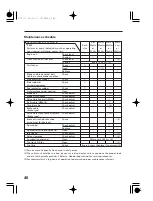
Maintenance schedule

ITEM

REGULAR SERVICE PERIOD

Perform at every indicated month or operating
hour interval, whichever comes first.

Every 1000 hrs. (2)

Each

Use

(1)

Check level
Change
Check level
Change
Check
Clean
Replace
Check

Check
Check

Check
Clean
Check-adjust
Check-adjust
Check-adjust
Check-adjust
Check-adjust
Check-adjust

Check-adjust

Check

Check-adjust
Replace
Clean
Check-adjust
Check-adjust
Clean
Clean
Check

After every 250 hrs. (2)

(2)

(2)

(2)

These items should be serviced by your servicing dealer, unless you have the proper tools
and are mechanically proficient. Refer to Honda shop manual for service procedures.

Service more frequently when used in dusty areas.

For commercial use, log hours of operation to determine proper maintenance intervals.

(2)

(2)

(2)
(2)

(2)

Every 2 years (Replace if necessary)(2)

Engine oil

Transmission oil (UM616)

Air cleaner

Blade and blade holder bolt
tightness check blade condition
Side protector rubber
Side rubber &
discharge adaptor
Rear protector rubber
Outer surface under housing
Blade belt
Blade clutch cable
Drive clutch cable (UM536)
Shift cable (UM616)
Throttle cable
Brake cable
(Brake type)
Drive clutch lever cancel system
(Brake type)
Brake drum and brake shoe
lining wear (Brake type)
Spark plug

Spark arrester (optional parts)
Idle speed
Valve clearance
Combustion chamber
Fuel tank & filter
Fuel line

(3)

(1)
(2)

(3)

First

Month

or

20 Hrs.

Every 3

Months

or

50 Hrs.

Every 6

Months

or

100 Hrs.

Every

Year

or

200 Hrs.

05/10/11 18:20:27 3CVD8620_044

Summary of Contents for UM536

Page 1: ...ER S MANUAL MANUEL DE L UTILISATEUR BEDIENUNGSANLEITUNG MANUAL DE EXPLICACIONES UM536 UM616 36VD8626 00X36 VD8 6260 Black DIC649 00X36 VD8 6260 UM536 616 K3 oHonda Motor Co Ltd 2002 efgsY1500 2007 06 Printed in Japan ...

Page 2: ...TION 12 4 CONTROLS 14 5 PRE OPERATION CHECKS 20 6 STARTING THE ENGINE 27 High altitude operation 7 OPERATION 30 8 MOWING 35 9 STOPPING THE ENGINE 38 10 MAINTENANCE 39 11 TRANSPORTING STORAGE 54 12 TROUBLESHOOTING 57 13 SPECIFICATIONS 58 14 MAJOR Honda DISTRIBUTOR ADDRESSES 59 05 10 11 18 15 51 3CVD8620_006 ...

Page 3: ...Honda UM536 UM616 The e SPEC mark symbolizes environmentally responsible technologies applied to Honda power equipment which contains our wish to preserve nature for generations to come 05 10 11 18 15 48 3CVD8620_003 ...

Page 4: ...vers the operation and maintenance of the Honda WEED MOWER Honda Motor Co Ltd reserves the right to make changes at any time without notice and without incurring any obligation No part of this publication may be reproduced without written permission This manual should be considered a permanent part of the weed mower and should remain with it if it is resold Pay special attention to statements prec...

Page 5: ...d and understand the Owner s Manual before operating the weed mower Failure to do so could result in personal injury or equipment damage Keep all persons and pets away from the weed mower area Stop the engine and disengage the blade clutch before inspection or maintenance of blade Keep your hands and feet away from the blade while engine is running The rotating blade are sharp and turns at high sp...

Page 6: ...s and eye protection Do not operate the equipment when barefoot or wearing open sandals Keep in mind that the operator or user is responsible for accidents or hazards occurring to other people or their property Never allow children or people unfamiliar with this owner s manual to use the weed mower Local regulations may restrict the age of the operator Use the weed mower for the purpose it is inte...

Page 7: ...rting the engine Do not change the engine governor settings or overspeed the engine Never operate the weed mower with defective guard or housings or without safety devices such as deflectors Stop the blade if the weed mower has to be tilted for transportation when crossing surfaces other than grass and when transporting the weed mower to and from the area to be mowed Use extreme caution when pulli...

Page 8: ...ediately release the drive clutch lever and stop the engine Then remove the climbing plant or the foreign object Operating the weed mower without removing the climbing plant or foreign object could result in a damaged transmission and or ratchet Do not raise the weed mower by the foot guard bar Do not step on the foot guard bar Always keep children indoors and supervised when power equipment is be...

Page 9: ...s inspect the blade before using the weed mower Gasoline is extremely flammable and gasoline vapor can explode Use extreme care when handling gasoline Keep gasoline out of reach of children Store fuel in containers specifically designed for this purpose Refuel outdoors only and do not smoke while refuelling or handling fuel Add fuel before starting the engine Never remove the cap of the fuel tank ...

Page 10: ...gasoline storage areas Do not leave containers of vegetable matter in or near a building If the fuel tank has to be drained this should be done outdoors with a cold engine Exhaust contains poisonous carbon monoxide a colorless and odorless gas Breathing exhaust can cause loss of consciousness and may lead to death If you run the engine in an area that is confined or even partially enclosed the air...

Page 11: ...d intervals rather than up and down it Be very careful when changing the direction of the weed mower on a slope Do not mow slopes of more than 20 Before starting the engine check that the weed mower is not damaged and in good condition For your safety and the safety of others exercise extreme care when using the weed mower up or down hill 05 10 11 18 17 15 3CVD8620_013 ...

Page 12: ...ith care Therefore decals have been placed on the machine to remind you pictorially of main precautions to take during use Their meaning is explained below see page These decals are considered as a part of the weed mower Should one become detached or unreadable contact your Honda dealer for its replacement 3 04 08 12 17 02 42 3CVD8620_014 ...

Page 13: ...NOISE LABEL and CE mark location NOISE LABEL and CE MARK Manufacturer and address NOISE LABEL Frame serial number Year of manufacture Machine mass Description code Net power 07 05 31 15 50 24 3CVD8620_015 ...

Page 14: ... OIL DRAIN BOLT SIDE RUBBER DISCHARGE ADAPTER STARTER GRIP FRONT WHEEL LOCK PIN FUEL VALVE FOOT GUARD BAR REAR WHEEL AIR CLEANER CUTTING HEIGHT ADJUSTING LEVER FRONT FRONT WHEEL CUTTING HEIGHT ADJUSTING LEVER REAR GEAR SHIFT LEVER BRAKE LEVER EBE type THROTTLE LEVER REAR SHIELD FUEL FILLER CAP UM536 04 08 12 17 02 57 3CVD8620_016 ...

Page 15: ...BOLT SIDE RUBBER DISCHARGE ADAPTER STARTER GRIP FRONT WHEEL LOCK PIN FUEL VALVE FOOT GUARD BAR REAR WHEEL AIR CLEANER CUTTING HEIGHT ADJUSTING LEVER FRONT FRONT WHEEL CUTTING HEIGHT ADJUSTING LEVER REAR SHIFT LEVER BRAKE LEVER EBE type THROTTLE LEVER REAR SHIELD FUEL FILLER CAP UM616 04 08 12 17 03 03 3CVD8620_017 ...

Page 16: ...H CHOKE CHOKE UM536 UM616 LOW CHOKE HIGH STOP CHOKE HIGH LOW STOP The throttle lever controls engine speed from LOW idle to HIGH max speed Use when starting the engine while operating the weed mower or when stopping the engine CHOKE is for starting a cold engine 05 10 11 18 17 46 3CVD8620_018 ...

Page 17: ...queezed while squeezing the lock lever yellow mark Releasing the clutch lever will cause the blade to stop rotating allowing the lock lever to return to the LOCK position automatically When the drive clutch lever is gripped the blade clutch lever is locked up If the blade clutch lever is operated single it is disengaged when the hand is removed from it UM616 04 08 12 17 03 36 3CVD8620_019 ...

Page 18: ...P STOP DRIVE CLUTCH LEVER MOVE FUEL VALVE MOVE O OF FF F O ON N The mower will start to move when the drive clutch lever is squeezed and will stop when the lever is released The fuel valve is used to open or close the fuel passage from the fuel tank to the carburetor Always move the lever completely to either the ON or OFF position 04 08 12 17 03 44 3CVD8620_020 ...

Page 19: ...LEVER Rear Front WHEEL LOCK PIN FRONT WHEEL LOCKED NORMAL FREE Cutting height can be adjusted in 4 stages by changing the height of the front and rear wheels Adjust the cutting height by operating these levers before mowing This pin is used to lock the front wheel when mowing on slopes see page 35 04 08 12 17 04 11 3CVD8620_021 ...

Page 20: ...r controls the mower s maximum drive speed Move the shift lever to select the pace at which you normally mow in open areas If you wish to momentarily slow the mower during operation partially release the drive clutch lever then resume your normal speed by squeezing the drive clutch lever It is not necessary to move the shift lever for momentary speed reduction SLOW 0 4 m sec FAST 1 0 m sec 04 08 1...

Page 21: ...Brake lever 9 EBE type BRAKE LEVER The brake is provided to aid in changing direction or adjusting speed when mowing up and down the face of the grade or driving down a slope 04 08 12 17 04 50 3CVD8620_023 ...

Page 22: ... level shown on the dipstick If near the lower level fill to the upper level with the recommended oil Insert the dipstick into the oil filler neck but do not screw it in Remove the oil filler cap and wipe the dipstick clean Place the weed mower on a level surface Use 4 stroke motor oil that meets or exceeds the requirements for API service classification SE or later or equivalent Always check the ...

Page 23: ...ny fuel is spilled make sure the area is dry before starting the engine Avoid repeated or prolonged contact with skin or breathing of vapor KEEP OUT OF REACH OF CHILDREN Gasoline substitutes are not recommended they may be harmful to fuel system components 2 FUEL TANK CAP FUEL LEVEL UPPER LIMIT Remove the fuel tank cap and check that the fuel tank is filled to the upper limit of fuel level If the ...

Page 24: ...rmance problems resulting from the use of fuels that contain alcohol is not covered under the warranty Honda cannot endorse the use of fuels containing methanol since evidence of their suitability is as yet incomplete If you decide to use a gasoline containing alcohol gasohol be sure it s octane rating is at least as high as that recommended by Honda There are two types of gasohol one containing e...

Page 25: ...r securely Failure to tighten the cover securely may cause the cover to come out of position or some sort of engine malfunction 3 AIR CLEANER COVER WING NUTS FOAM ELEMENT PAPER ELEMENT Remove the air cleaner elements If the elements are dirty follow the cleaning procedure described on page Remove the wing nuts to remove the air cleaner cover 1 2 44 05 10 11 18 18 16 3CVD8620_027 ...

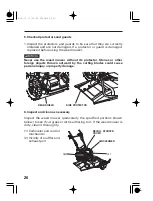
Page 26: ...g the handle securely Do not leave the mower tilted for an extended period of time or the engine may not be started easily 4 BLADE BLADE BOLTS Before each use check the cutter blade for damage or excessive wear Stop the engine and set the fuel valve in the OFF position Remove the spark plug cap from the spark plug Set the rear cutting height adjusting lever in the HIGHEST position then tilt the mo...

Page 27: ...ELY WORN CRACKED Inspect the blade for signs of wear or damage A dull blade can be sharpened but a blade that is worn out bent cracked or otherwise damaged must be replaced If the blade needs sharpening or replacement take the cutter deck to your authorized Honda weed mower dealer Or if you have the proper tools you can remove and install the blades yourself see blade removal and installation inst...

Page 28: ... CLEANER 1 2 SIDE PROTECTOR Inspect the protectors and guards to be sure that they are correctly installed and are not damaged If a protector or guard is damaged replace it before using the weed mower Inspect the weed mower particularly the specified portions shown below to see if cut grass or dirt is adhering to it If the weed mower is dirty clean it thoroughly 1 2 1 Carburetor and control mechan...

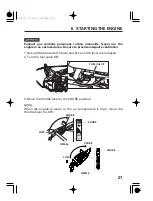
Page 29: ...quate ventilation FUEL VALVE O ON N LOW CHOKE UM536 UM616 CHOKE CHOKE CHOKE LOW Be sure the blade clutch lever and drive clutch lever are released Turn the fuel valve ON When the engine is warm or the air temperature is high move the throttle lever to LOW Move the throttle lever to the CHOKE position 3 1 2 04 08 12 17 06 16 3CVD8620_031 ...

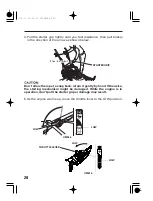
Page 30: ...e starter grip or damage may result LOW THROTTLE LEVER LOW UM536 UM616 LOW LOW D Di ir re ec ct ti io on n t to o p pu ul ll l STARTER GRIP As the engine warms up move the throttle lever to the LOW position Pull the starter grip lightly until you feel resistance then pull briskly in the direction of the arrow as shown below 4 5 07 05 31 15 51 15 3CVD8620_032 ...

Page 31: ... consumption will increase High altitude performance can be improved by specific modifications to the carburetor If you always operate the rotary mower at altitude higher than 1 500 m 5 000 feet above sea level have your authorized Honda dealer perform these carburetor modifications Even with suitable carburetor jetting engine horsepower will decrease approximately 3 5 for each 300 m 1 000 foot in...

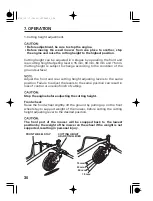
Page 32: ...m 50 mm 30 mm 15 mm Cutting height adjustment Cutting height can be adjusted in 4 stages by operating the front and rear cutting height adjusting levers 15 mm 30 mm 50 mm and 75 mm Cutting height is subject to change according to the condition of the ground surface Adjust the front and rear cutting height adjusting levers to the same position Failure to adjust the levers to the same position can r...

Page 33: ...ld by hand Do not perform this operation on slopes or on loose or uneven surfaces 2nd GEAR SHIFT LEVER UM536 SHIFT LEVER UM616 SLOW FAST FAST SLOW 1st 75 mm 50 mm 30 mm 15 mm Move the handle up or down until the correct cutting height is obtained while pressing down on the cutting height adjusting lever fully Move the shift lever to the desired shift lever position 2 05 10 11 18 19 39 3CVD8620_035...

Page 34: ... 32 HIGH HIGH HIGH HIGH UM536 UM616 Move the throttle lever to the HIGH position 3 04 08 12 17 07 50 3CVD8620_036 ...

Page 35: ...drive mechanism squeeze the blade clutch only Do this if you wish to maneuver the machine manually while mowing To move the machine without engaging the cutting blade mechanism squeeze the drive clutch lever only Do this when moving the machine to and from the area to be moved By squeezing the drive clutch lever the blade clutch lever will be fixed and you can operate it without holding the blade ...

Page 36: ...multaneously On EBE type the driver clutch will be disengaged automatically when the brake lever is operated Should the drive clutch be disengaged automatically release the drive clutch lever once then squeeze it to drive again Be sure to disengage the drive clutch before the mower starts to go down a slope Then adjust speed by operating the brake lever carefully Severe damage to the transmission ...

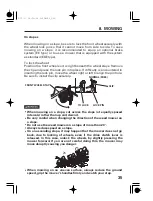
Page 37: ...eed mower on a slope When mowing on a slope cut across the slope at equally spaced intervals rather than up and down it FRONT WHEEL STAY NORMAL FREE TO LOCK LOCK PIN CLIP When mowing on a slope be sure to lock the front wheel securely with the wheel lock pin so that it cannot move from side to side To ease mowing on a slope it is recommended to equip an optional brake system EE type or to use a mo...

Page 38: ...e mower will begin to discharge the cuttings more efficiently after it has cleared the central area Cutting width When mowing under a tree or near a fence or hedge only grip the blade clutch lever and push the mower by hand CLOCKWISE The mower will cut well up to a point 50 mm from the rid on the housing Use this point as a guideline for lining up the mower with the area you want to cut thoroughly...

Page 39: ...electing engine speed and transmission settings If the engine slows down while mowing use one of the following procedures Release the drive clutch lever and wait for the engine to regain operating speed before proceeding Push the mower by hand at a speed that will not cause the engine to slow down Reduce the width of the cutting path Increase the cutting height See page 30 31 04 08 12 17 08 37 3CV...

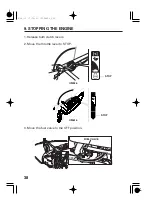
Page 40: ...38 STOPPING THE ENGINE 9 UM536 UM616 O OF FF F FUEL VALVE STOP STOP Release both clutch levers Move the throttle lever to STOP Move the fuel valve to the OFF position 1 2 3 04 08 12 17 09 00 3CVD8620_042 ...

Page 41: ...and adjustment of the Honda UM536 UM616 are essential if high level performance is to be maintained Regular maintenance will also help to extend service life The required service intervals and the kind of maintenance to be performed are described in the chart on the following page For longer service and efficiency keep the underside of the mower housing clean and free of accumulated grass clipping...

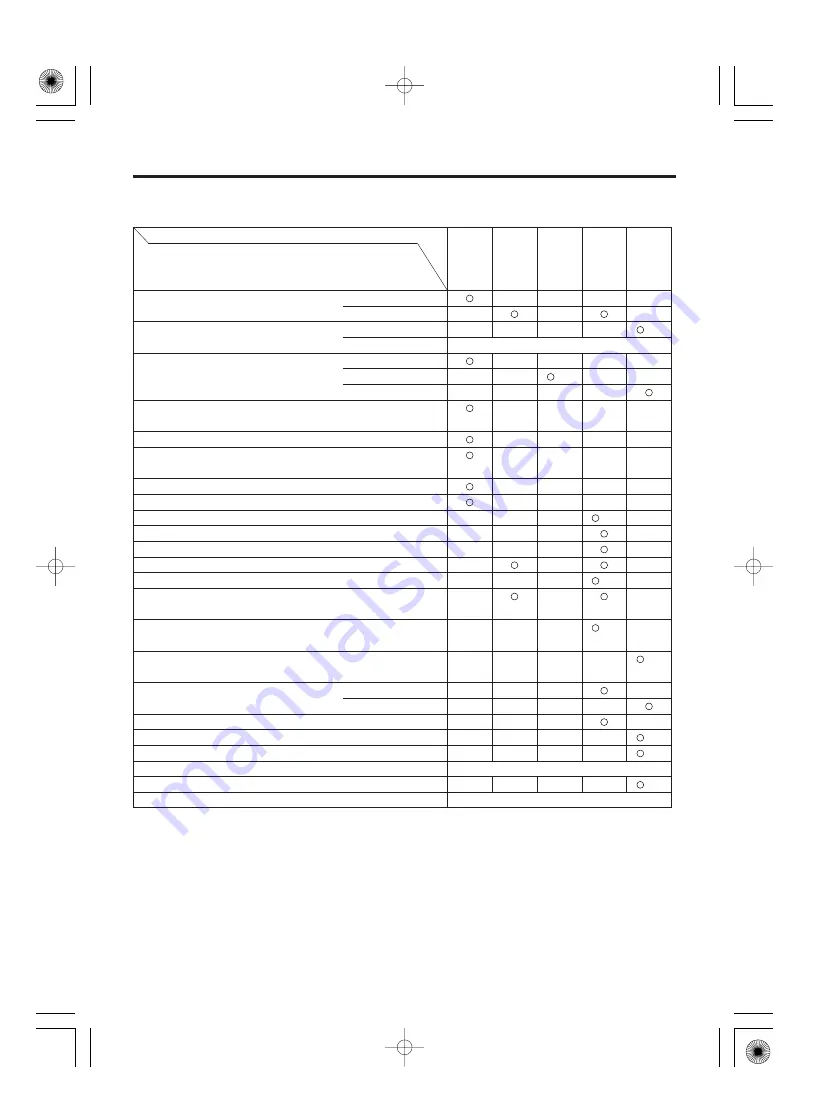
Page 42: ...re frequently when used in dusty areas For commercial use log hours of operation to determine proper maintenance intervals 2 2 2 2 2 Every 2 years Replace if necessary 2 Engine oil Transmission oil UM616 Air cleaner Blade and blade holder bolt tightness check blade condition Side protector rubber Side rubber discharge adaptor Rear protector rubber Outer surface under housing Blade belt Blade clutc...

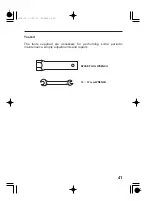
Page 43: ... 41 Tool kit SPARK PLUG WRENCH 10 12 mm WRENCH The tools supplied are necessary for performing some periodic maintenance simple adjustments and repairs 04 08 12 17 09 25 3CVD8620_045 ...

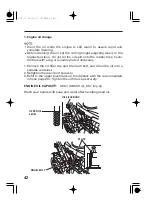
Page 44: ...not let the oil spill onto the rubber tires Cover the tires with a rag or wooden plate if necessary Retighten the drain bolt securely Refill to the upper level mark on the dipstick with the recommended oil see page Tighten the oil filler cap securely 0 65 0 69 US qt 0 57 Imp qt Wash your hands with soap and water after handling used oil Remove the oil filler cap and the drain bolt and drain the oi...

Page 45: ... oil in a manner that is compatible with the environment We suggest you take it in a sealed container to your local service station for reclamation Do not throw it in the trash or pour it on the ground 04 08 12 17 09 39 3CVD8620_047 ...

Page 46: ...the foam and paper elements of the engine side filter Carefully check the elements for holes or tears and replace if damaged Cleaning Foam element Clean in warm soapy water rinse and allow to dry thoroughly Or clean in high flashpoint solvent and allow to dry Dip the element in clean engine oil and squeeze out all the excess The engine will smoke during initial startup if too much oil is left in t...

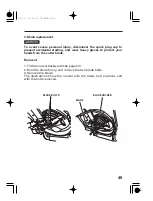
Page 47: ...vy gloves to protect your hands from the cutter blade Removal 3 BLADE HOLDER BLADE BOLTS BLADE Tilt the mower backward see page Hold the blade firmly and remove the two blade bolts Remove the blade The illustrations show the mower with the blade bolt positions and with the bolts removed 1 2 3 24 05 10 11 18 20 55 3CVD8620_049 ...

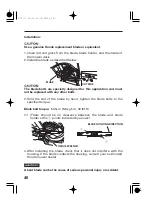
Page 48: ...ean dirt and grass from the blade blade holder and the inside of the mower deck Install the blade as described below After installing the blade check that it does not interfere with the housing If the blade contacts the housing consult your authorized Honda mower dealer Hold the end of the blade by hand tighten the blade bolts to the specified torque 54 N m 5 5 kgf m 40 lbf ft There should be no c...

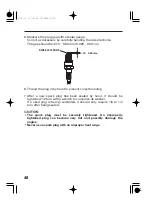
Page 49: ...e spark plug must be properly gapped and free of deposits Clean any dirt from around the spark plug base Use a spark plug wrench to remove the spark plug Visually inspect the spark plug Discard it if there is apparent wear or the insulator is cracked or chipped Clean the spark plug with a wire brush if it is to be reused Remove the spark plug cap BPR5ES NGK W16EPR U DENSO 1 2 3 4 04 08 12 17 10 21...

Page 50: ...with a feeler gauge Correct as necessary by carefully bending the side electrode The gap should be 0 70 0 80 mm 0 028 0 031 in Thread the plug in by hand to prevent cross threading After a new spark plug has been seated by hand it should be tightened 1 2 turn with a wrench to compress its washer If a used plug is being reinstalled it should only require 1 8 to 1 4 turn after being seated 5 6 7 04 ...

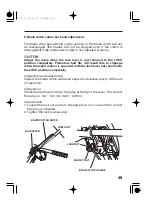
Page 51: ... slip on the pulleys or the blade clutch will not be disengaged the blades will not be stopped even if the clutch is disengaged if the blade clutch cable is not adjusted properly Inspection and adjustment Inspect the blade clutch cable and adjust as necessary every 100 hours of operation Inspection Check the blade clutch lever free play at the tip of the lever The correct free play is Adjustment L...

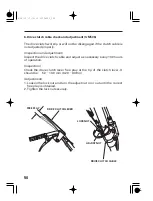
Page 52: ...d properly Inspection and adjustment Inspect the drive clutch cable and adjust as necessary every 100 hours of operation Inspection Check the drive clutch lever free play at the tip of the clutch lever It should be 5 0 10 0 mm 0 20 0 39 in Adjustment Loosen the lock nut and turn the adjust nut in or out until the correct free play is obtained Tighten the lock nut securely 1 2 04 08 12 17 10 50 3CV...

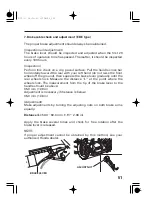
Page 53: ...k for free rotation after the brake lever is released 50 0 60 0 mm 1 97 2 36 in Make adjustments by turning the adjusting nuts on both brake arms equally Adjustment 35 0 mm 1 38 in Adjustment is necessary if distance is below 35 0 mm 1 38 in Perform this check on a dry paved surface Pull the handle cross bar horizontally toward the rear with your left hand do not raise the front wheel off the grou...

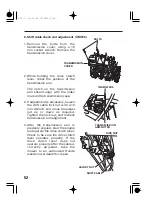
Page 54: ...index mark on the transmission case If adjustment is necessary loosen the shift cable lock nut with a 10 mm wrench and move the adjust nut up or down as required Tighten the lock nut and recheck transmission arm alignment After the transmission arm is precisely aligned start the engine and operate the drive clutch lever Check to be sure the drive clutch lever operates properly If the drive clutch ...

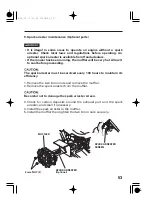
Page 55: ...00 hours to maintain its efficiency Be careful not to damage the spark arrester screen Spark arrester maintenance Optional parts 9 SPARK ARRESTER SCREEN MUFFLER 6 mm NUT 2 SPARK ARRESTER Optional Remove the two 6 mm nuts and remove the muffler Remove the spark arrester from the muffler Check for carbon deposits around the exhaust port and the spark arrester and clean if necessary Install the spark...

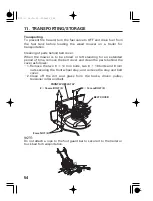
Page 56: ...ws Remove the two 8 14 mm bolts two 8 16 bolts and 8 mm nuts securing the front wheel stay and remove the stay and belt cover Do not attach a rope to the foot guard bar to secure it to the trailer or truck bed for transportation To prevent fire hazard turn the fuel valve to OFF and drain fuel from the fuel tank before loading the weed mower on a trailer for transportation Clean off the dirt and gr...

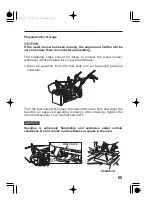
Page 57: ...ks in the area FUEL VALVE O OF FF F DRAIN BOLT The following steps should be taken to protect the weed mower whenever it will be stored for longer than 30 days Drain all gasoline from the fuel tank into an approved gasoline container Turn the fuel valve ON loosen the carburetor drain bolt and drain the fuel into an approved gasoline container After draining tighten the drain bolt securely Turn the...

Page 58: ...he spark plug Clean the air cleaner see page Clean the cutting blades and the various other parts of the weed mower then check nuts and bolts etc for tightness Coat the cutting blade with engine oil If the paint has come off the inside of the blade cover remove rust from such portions and apply a coating of rust prevention Pull the starter grip until resistance is felt Place a cover over the weed ...

Page 59: ...es not rotate or stop Blade belt worn or broken See your authorized Honda dealer See your authorized Honda dealer Retighten blade bolts or engine mounting hardware Replace blade as a set Regap plug or replace see p See your authorized Honda dealer Regap plug or replace see p Fill with recommended oil see p Clean air cleaner elements see p Shift to lower speed Regap plug or replace see p Check the ...

Page 60: ...0 in 1 780 mm 70 1 in 970 mm 38 2 in 1 080 mm 42 5 in 15 75 mm 0 6 3 0 in 15 75 mm 0 6 3 0 in Direct change SB 42 Remote change SB 40 Slow 0 4 m sec Fast 1 0 m sec 62 kg 137 lbs 66 kg 146 lbs 72 kg 159 lbs 76 kg 168 lbs 85 dB 85 dB 98 dB 98 dB 5 3 m s 5 0 m s 1st 0 5 m sec 2nd 0 8 m sec Tested by EN836 At 3 600 rpm MODEL Sound Pressure Level L Tested by EN836 At 3 600 rpm Guaranteed sound power le...

Page 61: ...10 Sintra Portugal Västkustvägen 17 202 15 Malmö Sweden Honda Strasse 1 A 2351 Wiener Neudorf Austria Nikkelstraat 17 2984 AM Ridderkerk Netherlands Route des Mouliéres 10 Case Postale Ch 1214 Vernier Geneve Switzerland Via della Cecchignola 5 7 00143 ROMA Wijngaardveld 1 9300 Aalst Belgium Sprendlinger Landstraße 166 D 63069 Offenbach Main Germany Pole 45 Rue des Chataigniers 45140 Ormes France 4...

Page 62: ...0 Tel 93 871 84 50 Fax 93 871 81 80 Tel 922 61 13 50 Fax 922 61 13 44 Tel 356 333001 Fax 356 340473 P O Box 1200 101 73 Athens Greece Tel 346 5321 Fax 346 7329 OY Brandt AB Tuupakantie 4 SF 01740 Vantaa Finland Tel 90 895 501 Fax 90 878 5276 BG Technik s r o Radlická 117 520 158 01 Praha 5 Czech Republic Tel 2 5694 573 Fax 2 5694 571 Aries Power Equipment Ltd 01 493 Warszawa ul Wroclawska 25a Pola...

Page 63: ...ER S MANUAL MANUEL DE L UTILISATEUR BEDIENUNGSANLEITUNG MANUAL DE EXPLICACIONES UM536 UM616 36VD8626 00X36 VD8 6260 Black DIC649 00X36 VD8 6260 UM536 616 K3 oHonda Motor Co Ltd 2002 efgsY1500 2007 06 Printed in Japan ...

Reviews: