


15
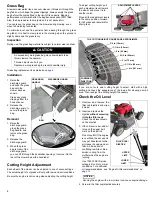
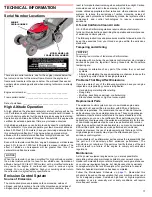
Select Drive Cable Adjustment
With the engine off, loosen the jam nut
one revolution.
With the Select Drive control released,
TIGHTEN the adjuster by turning
clockwise 1 revolution by hand, and
then pull the lawn mower rearward to
check resistance.
If no wheel resistance exists, repeat
the above procedure until the wheels
lock when pulling rearward. It will
usually take more than 8 turns for the
wheels to lock up.
Next, mark the adjuster and LOOSEN
the adjuster counterclockwise 8
complete revolutions.
Hold the adjuster and tighten the lock
nut against the adjuster. Push the
lawn mower forward and pull backward and check for little or no
resistance.
Start the engine to ensure the lawn mower does not move forward
without pushing the Select Drive control.
TRANSPORTING
If the engine has been running, allow it to cool before loading the
mower on the transport vehicle. A hot engine and exhaust system can
burn you and can ignite some materials.
Turn the fuel valve to the OFF position. This will prevent carburetor
flooding and reduce the possibility of fuel leakage.
If installed, remove the grass bag.
If a suitable loading ramp is not available, two people should lift the
mower on and off the transport vehicle while holding the mower level.
Position the mower so all four wheels are on the bed of the transport
vehicle. Tie the mower down with rope or straps, and block the
wheels. Keep the tie-down rope or straps away from the controls,
adjustment levers, cables, and the carburetor.
Fold the handlebar so the mower will take up less space. See
.
STORAGE
Proper storage preparation is essential for keeping your lawn mower
trouble free and looking good. To help keep rust and corrosion from
impairing your lawn mower’s function and appearance, and to make
the engine easier to start after storage, follow the instructions
described in this section to:
• Drain or treat the fuel
• Change the oil and coat the engine cylinder
• Clean the mower, engine, and grass bag
• Choose a storage location
Fuel
See “AVOIDING FUEL-RELATED PROBLEMS” on
of recommended procedures to avoid fuel related problems.
The
DISTRIBUTOR’S LIMITED WARRANTY
) does not
cover fuel system damage or engine performance problems resulting
from neglected storage preparation.
Cleaning
Mower Deck
Allow the engine to cool before washing.
Before washing the underside of the mower deck, stop the engine and
turn the fuel valve to the OFF position. Rest the mower on its right
side, so the fuel cap side is up. This will help to prevent fuel leakage
and hard starting due to carburetor flooding. Wear heavy gloves to
protect your hands from the blades.
Be careful to avoid getting water into controls and cables.
Engine
Allow the engine to cool, and then wash the engine by hand. Be
careful to prevent water from entering the air cleaner and exhaust
opening.
NOTICE
Using a garden hose or pressure washing equipment can force water
into the air filter. Water in the air cleaner will soak the paper element
and can enter the carburetor or engine cylinder, causing damage.
Water contacting a hot engine can cause damage. If the engine has
been running, allow it to cool before washing.
Grass Bag
Remove the bag from the mower, and wash it with a garden hose or
pressure washer. Allow the bag to dry completely before storage.
Drying
After washing the lawn mower, wipe dry all accessible surfaces.
Place the mower with its wheels on a level surface. Start the engine
outdoors and let it run until it reaches normal operating temperature to
evaporate any water remaining on the engine. Stop the engine and
allow it to cool.
After the lawn mower is clean and dry, touch up any damaged paint,
and coat other areas that may rust with a light film of oil.
Oil
Change the engine oil (
) if planned storage is 3 months or
longer or when storing in a high humidity environment.
Add oil in the engine cylinder to prevent corrosion.
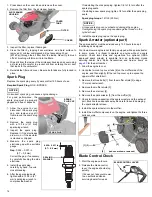
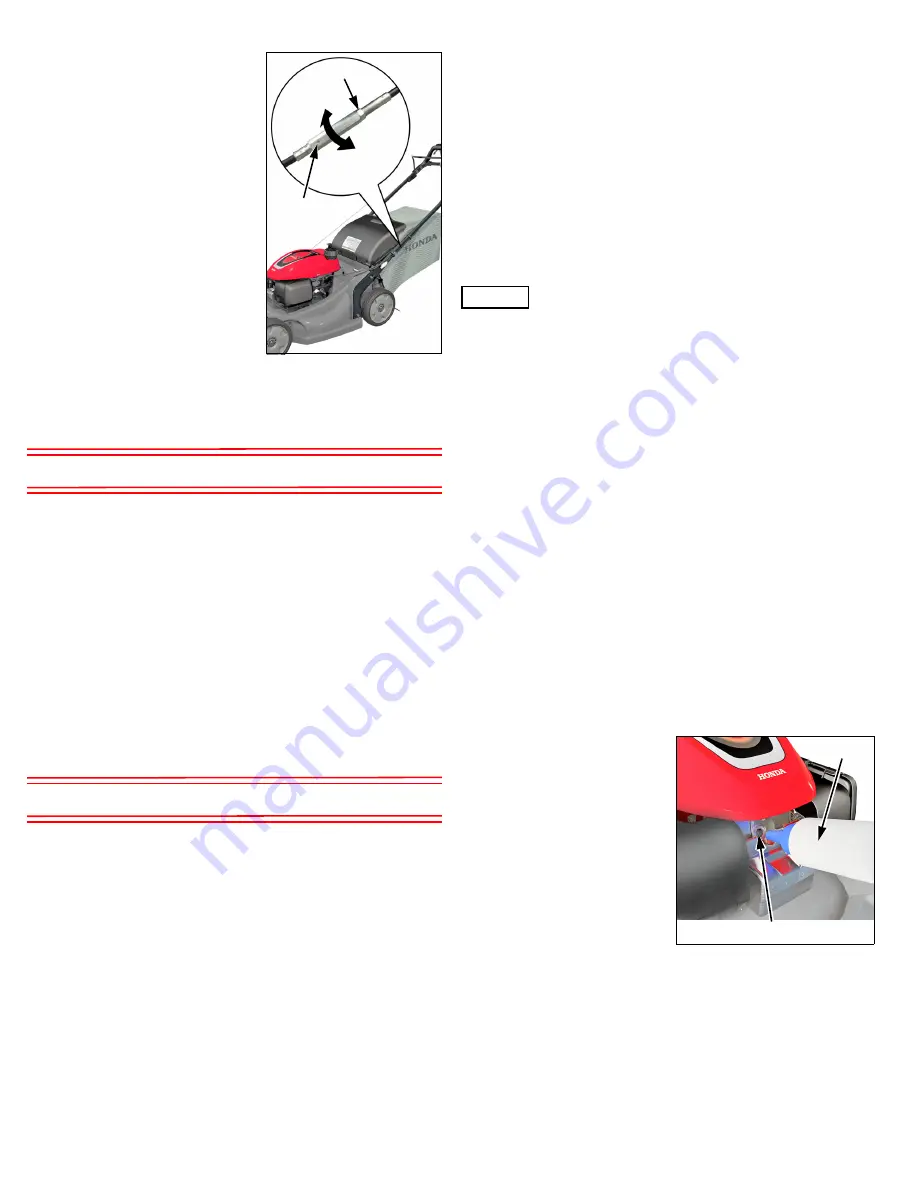
1. Remove the spark plug (
).
2. Pour a teaspoon (5 cc) of clean
engine oil into the cylinder to
keep it from rusting.
3. Pull the starter rope several
times to distribute the oil in the
cylinder.
4. Reinstall the spark plug.
5. Pull the starter rope slowly until
resistance is felt, and then
return the starter grip gently.
This will close the valves so
moisture cannot enter the
engine cylinder.
Storage Location
If your mower will be stored with gasoline in the fuel tank and
carburetor, it is important to reduce the hazard of gasoline vapor
ignition. Select a well-ventilated dry storage area away from any
appliance that operates with a flame, such as a furnace, water heater,
or clothes dryer. Also avoid any area with a spark-producing electric
motor, or where power tools are operated.
Make sure the fuel valve is in the OFF position to reduce the
possibility of fuel leakage.
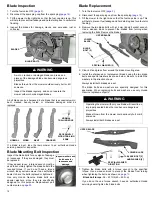
JAM NUT
LOOSEN
TIGHTEN
ADJUSTER
MARK
SPARK PLUG HOLE
OIL


