Configuring Storage Settings
105
Auto Delete Old Files
: Select
Never
or
Customized
. If
Customized
is selected, in the
Days
Ago
box, enter the amount of time to elapse before the files are automatically deleted.
Configuring the Recording Schedule
Configuring the Video Recording Schedule
1.
Go to
Main Menu
SETTING
STORAGE
SCHEDULE
Rec
.
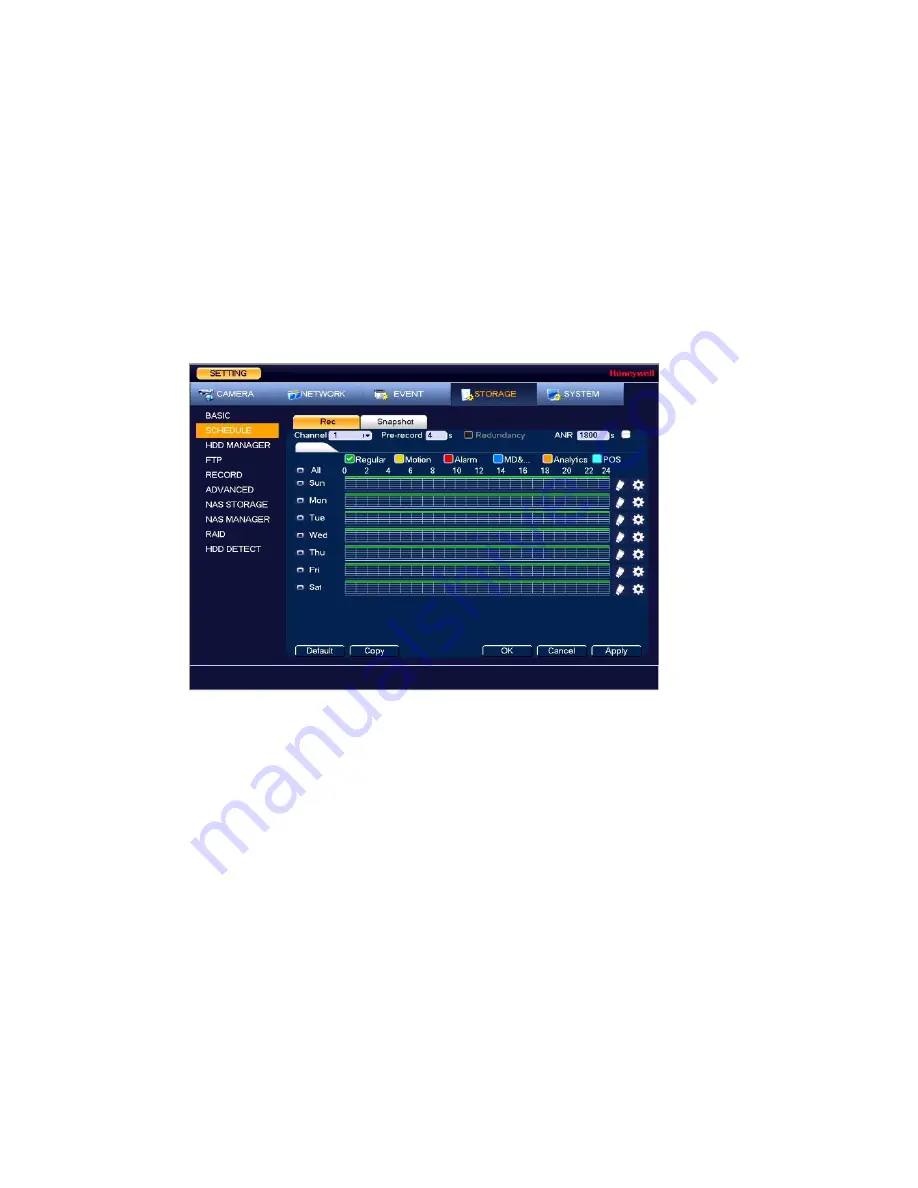
Figure 9-2 Recording Schedule Configuration Tab
2.
On the
Rec tab
, in the
Channel
box, select the channel (camera) for which you want to
configure a recording schedule.
3.
In the
PreRecord
box, enter a time between
0
and
30
seconds. The default setting is
4
seconds. The pre-record time sets how long the NVR records before the scheduled
recording start time. For example, if the NVR is scheduled to start recording at 12:00 and
the pre-record time is set to 4 seconds, the NVR will start recording at 11:59:56.
4.
If the NVR has two HDDs, select the
Redundancy
check box to enable redundant
recording
on the second HDD. This HDD must first be configured as redundant on the
HDD Manager
page (see
Configuring HDD Manager Settings
5.
In the
ANR
box, enter a time between 0s
~
43200s. It is to save video to the SD card of the
network camera in case the network connection fails. After the network connection
resumed, the system can get the video from the SD card and there is no risk of record loss.
6.
At the top of the scheduling table, select the check box(es) of the recording type(s) that
you want to schedule:
Regular:
The regular recording schedule is indicated by a green bar.
Motion:
The motion detection recording schedule is indicated by a yellow bar.
Alarm:
The alarm recording schedule is indicated by a red bar.
Summary of Contents for 2450Cm Series
Page 2: ......
Page 27: ...Getting Started 13 ...
Page 28: ...Performance Series Network Video Recorder User Guide 14 ...
Page 29: ...Getting Started 15 ...


