LXL-1010 Installation and Setup Guide
12–2
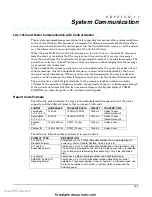
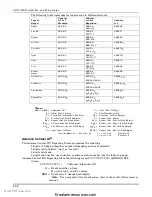
Refer to the user guide for detailed procedures on adding/deleting security codes and
changing user attributes.
The following is a brief description of how to add user codes.
Adding a User Code:
Master code + [8] + 2-digit user no. + user’s code
Deleting a User Code:
Master code + [8] + 2-digit user no. + [#] [0]
Assigning Attributes:
Master code + [8] + 2-digit user no. + [#] [attribute no.] + value
Attributes: Values
1 =
Authority Level
0-3 (see Authority Level table above)
2 =
Access Group
0-8 (0 = not assigned to a group)
3 =
not used
4 =
RF Zone No.
Assigns user number to button type zone for
arm/disarm (
keyfob must be enrolled in
system first
; see
Wireless Key Templates
section).
5 =
Open/Close Paging 1 for yes, 0 for no
Keypad Functions
The following is a brief list of system commands. For detailed information concerning system
functions, refer to the User's Manual.
Voice Keypads
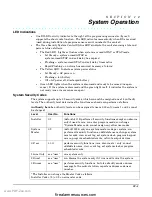
The 5828V Voice Keypad provides the following features:
•
Message Center, which lets the user record and playback one message.
•
Voice Status, which can announce system status by using the STATUS key.
•
Voice Chime, which can alert users to the opening of doors/windows while the system
is disarmed.
Refer to the User Guide for specific procedures for activating and using these features.
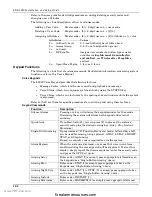
Keypad Commands
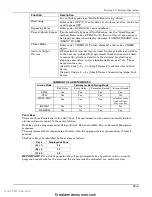
Function Description
Silence Alarms
Pressing any key will silence the keypad sounder for 10 seconds.
Disarming the system will silence both keypad and external
sounders.
Quick Arm
If enabled (field
∗
21), you can press [#] in place of the system's
security code, plus the desired arming key (Away, Stay, Instant,
Maximum)
Single-Button arming
If programmed (*57 Function Key menu mode), lettered keys A-D
can be used for arming, using options 3-AWAY, 4-STAY, 5-NIGHT-
STAY, or 6-Step-Arming
If used, no security code is required to arm the system.
Alarm Memory
When the system is disarmed, any zones that were in an alarm
condition during the armed period will be displayed. To clear this
display, simply repeat the disarm sequence (enter the security code
and press the OFF key) again.
Arming Away
Enter code + AWAY [2] or simply press appropriate lettered key on
the keypads (see “Single-Button Arming” above).
Arming Stay
Enter code + STAY [3] or simply press appropriate key on the
keypads (see “Single-Button Arming” above).
Arming Night-Stay
Enter code + STAY [3] + STAY [3] or simply press appropriate key
on the keypads (see “Single-Button Arming” above).
Arming Instant
Enter code + INSTANT [7].
Arming Maximum
Enter code + MAXIMUM [4] or simply press appropriate lettered
www.PDF-Zoo.com
firealarmresources.com
Summary of Contents for ADEMCO LYNX XL Series
Page 8: ...LXL 1010 Installation and Setup Guide 1 4 www PDF Zoo com firealarmresources com ...
Page 18: ...LXL 1010 Installation and Setup Guide 2 10 www PDF Zoo com firealarmresources com ...
Page 44: ...LXL 1010 Installation and Setup Guide 6 2 www PDF Zoo com firealarmresources com ...
Page 50: ...LXL 1010 Installation and Setup Guide 8 2 www PDF Zoo com firealarmresources com ...
Page 60: ...LXL 1010 Installation and Setup Guide 11 4 www PDF Zoo com firealarmresources com ...
Page 66: ...LXL 1010 Installation and Setup Guide 12 6 www PDF Zoo com firealarmresources com ...
Page 70: ...LXL 1010 Installation and Setup Guide 13 4 www PDF Zoo com firealarmresources com ...
Page 74: ...LXL 1010 Installation and Setup Guide 14 4 www PDF Zoo com firealarmresources com ...


