background image

 
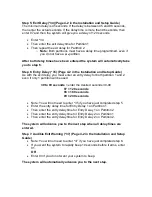
Step 5: Exit Delay (*34) (Page 4-2 in the Installation and Setup Guide)


The minimum delay is 45 seconds. If the delay is between 45 and 96 seconds, 
then enter the actual seconds. If the delay time is more than 96 seconds, then 
enter 97 and then the system will give you a delay of 120 seconds. 


  Enter *34  

  Then enter the exit delay time for Partition 1  

  Then repeat the exit delay for Partition 2 

o


Note: 

Both partitions must have a delay time programmed, even if 

you do not have a 2

nd 

partition. 


After both delay times have been entered the system will automatically take 
you to step 6. 
 
Step 6:


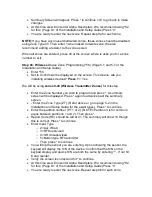
Entry Delay (*35) (Page 4-2 in the Installation and Setup Guide)


As with the exit delay, you must enter an entry delay for both partition 1 and 2 
even if only 1 partition will be used. 
 

30 to 90 seconds 

= enter the desired seconds 30-90 

97 = 120 seconds


98 = 180 seconds


99 = 240 seconds 


  Note: You will not need to enter *35 if you have just completed step 5. 

  Enter the entry delay time for Entry Delay 1 on Partition 1 

  Then enter the entry delay time for Entry Delay 1 on Partition 2 

  Then enter the entry delay time for Entry Delay 2 on Partition 1 

  Then enter the entry delay time for Entry Delay 2 on Partition 2. 

 
The system will advance you to the next step when all delay times are 
entered. 
 
Step 7:


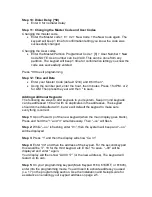
Audible Exit Warning (*37) (Page 4-2 in the Installation and Setup 

Guide)


  Note: You will not need to enter *37 if you have just completed step 6. 

  If you want the system to rapidly beep 10 seconds before it arms, enter 

01.  

OR 

  Enter 00 if you do not want your system to beep. 

 
The system will automatically advance you to the next step. 


Summary of Contents for Ademco VISTA-20P

Page 1: ...n each additional keypad you will need to enter a unique address 17 18 etc o Do Not Duplicate Keypad Addresses Keypads have to be addressed 16 to 23 no duplicates but come defaulted at 31 and will not work until they are re addressed Step 2 Enter Programming After the keypad is addressed you will need to enter programming Enter 4112 800 Field 20 Installer Code will be displayed on the screen We ca...

Page 2: ... for both partition 1 and 2 even if only 1 partition will be used 30 to 90 seconds enter the desired seconds 30 90 97 120 seconds 98 180 seconds 99 240 seconds Note You will not need to enter 35 if you have just completed step 5 Enter the entry delay time for Entry Delay 1 on Partition 1 Then enter the entry delay time for Entry Delay 1 on Partition 2 Then enter the entry delay time for Entry Dela...

Page 3: ...e Types 00 Not Used 04 Interior follower 08 24 Hr Aux 21 Arm Away 01 Entry Exit 1 05 Trouble Day Alarm Night 09 Fire no delay 22 Disarm 02 Entry Exit 2 06 24 Hr Silent 10 Interior delay 23 No Alarm Response 03 Perimeter 07 24 Hr Audible 20 Arm Stay 24 Silent Burglary Enter the Zone Number you wish to program and press A summary screen will be displayed Press again to advance past the summary scree...

Page 4: ...umber you wish to program and press A summary screen will be displayed Press again to advance past the summary screen Enter the Zone Type ZT Refer above or go to page 5 2 in the Installation and Setup Guide for the exact types Press to continue Enter the partition number PT 1 or 2 NOTE Partition 3 is for common areas between partitions 1 and 2 Then press Report Code RC should be left at 01 The sum...

Page 5: ...o your system Keep in mind keypads can be addressed 16 to 23 with no duplicates in the addresses The keypad should come defaulted at 31 but we will default the keypad to make sure everything is correct Step 1 Upon Power Up of the new keypad when the main display goes blank Press and hold the 1 and 3 simultaneously Then oo will flash Step 2 While oo is flashing enter 91 then the system will beep an...

Page 6: ...isplay shows Function Key chosen for next for previous menu Step 3 Choose Function for this Key for next for previous menu 00 A Zone 95 B Zone 99 C Zone 96 D Single Button Page 01 Single Button Page sends 999 9999 message to Pager 02 Display Time 03 Arm Away 04 Arm Stay 05 Arm Night Stay any Zone in User List 3 06 Step Arming Stay then Night Stay then Away 07 Device A Activation Type 66 Function i...

Reviews: