Phone Line Connections
VISTA-48E
Connect incoming phone line and handset wiring to the
main terminal block (via an RJ31X jack) as shown in the
Summary of Connections diagram. Wire colors represent
the colors of the cable to the RJ31X jack.
VISTA-48A
Plug the phone line plug into the modular phone
connector mounted on the PC board.
Notes
•
If you are using an Audio Alarm Verification
(AAV) unit, refer to
Audio Alarm Verification
(AAV)
section for special wiring connections.
CAUTION:
To reduce the risk of fire, use only
0.6mm O.D. or larger telecommunication line cord
for phone line connections.
Alternative Communications Media (ACM)
Connections
Connect the data in/data out terminals and voltage input
terminals of the ACM to the control's keypad connection
points.
Set the ACM’s address to “03” following the instructions
provided with the ACM.
Notes
•
Use compatible ACMs (e.g., 7845i, AI4164RS,
AI4164ETH).
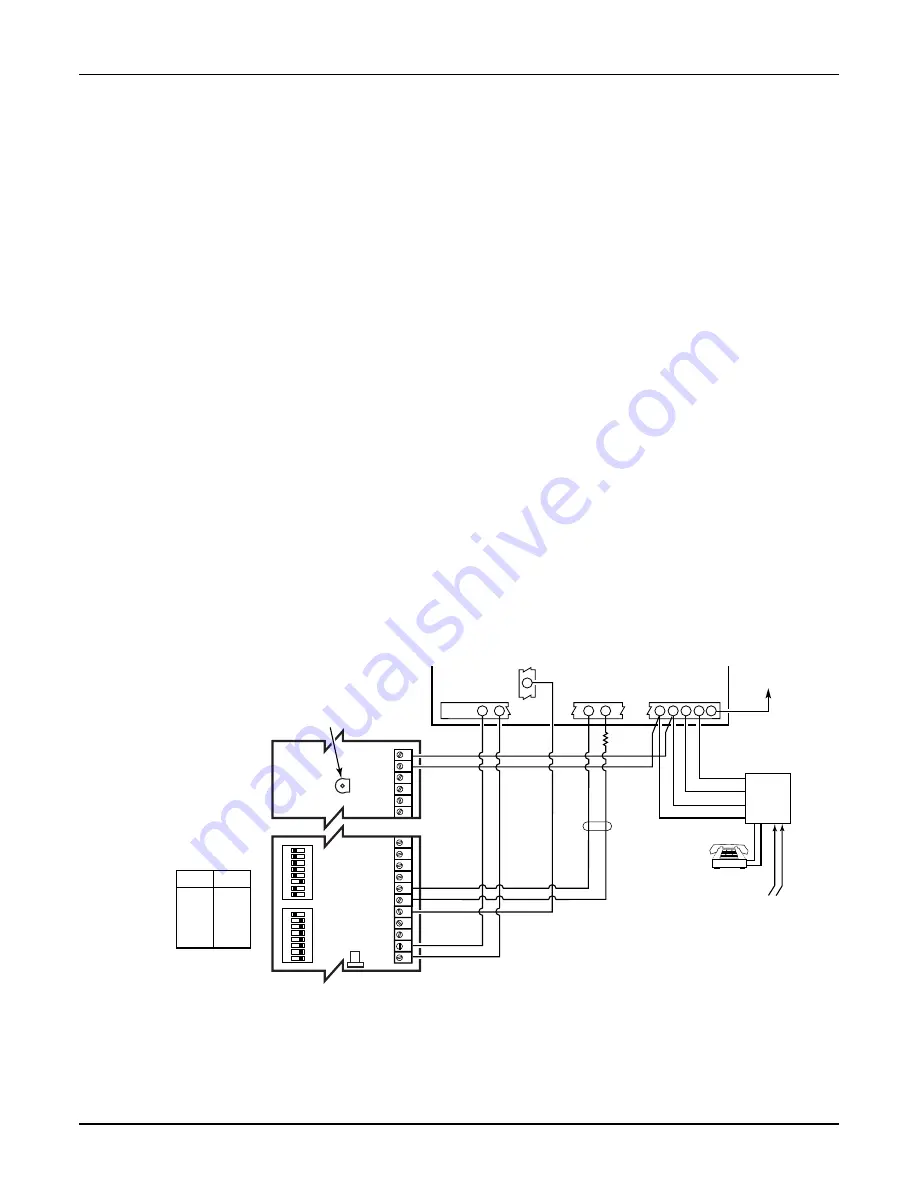
Audio Alarm Verification Connections
(AAV, “Listen-In”)
Refer to the connection diagram below.
Connections use one of the on-board triggers.
Suggested AAV Module:
ADEMCO UVS (shown) or Eagle 1250
Notes
•
Set field *91 for AAV and program the appropriate
output (output 17 or 18) using *80 Menu mode
(select zone type “60”).
•
For voice session monitoring, connect an EOLR
zone to UVCM module terminals 6 & 7, and
program the zone as zone type 81 (*56 Menu
mode).
E.g., Using output 18 for the trigger, program an
output function in *80 Menu mode as:
ZT = 60, P = 0, Action = 1, Device = 18
1
234
5
6
7
8
9
1
0
1
1
29
30
31
32
33
34
NOTE:
REFER TO UVCM MODULE
INSTRUCTIONS FOR
CONNECTIONS TO AUDIO
SPEAKERS AND MICROPHONE.
UVCM
MODULE
CONTROL
EARTH
GROUND
RED (R)
GREEN (T)
GREY (R)
BROWN (T)
TRIGGER MODULE
"TRIG 2" TERMINAL
OUTPUT 18
RING
TIP
FALLING VOICE TRIG
GND
+12VDC IN
SWITCH
BANK 2
SWITCH
BANK 1
SWITCH BANK 2
SWITCH BANK 1
AUXILIARY
AUDIO LEVEL
ADJUSTMENT
TRIM POT
V48A-V48E-002-V0
ZONE
TERMINALS
OPTIONAL
MONITORING
ZONE
CONNECTION
(USE ZONE
TYPE 81)
23
24
25
22
21
4
5
INCOMING
PHONE LINE
TO
PREMISES
HANDSET
RJ31X
1 = ON
2 = ON
3 = OFF
4 = ON
5 = ON
6 = ON
7 = ON
8 = ON
1 = OFF
2 = OFF
3 = OFF
4 = OFF
5 = OFF
6 = OFF
7 = OFF
8 = ON
ON
ON
1
2
345
67
8
1
2
345
67
8
RING
TIP
+12VDC
GND
EOL
Figure 13. Connection of AAV Unit
Installation Instructions
2-14
Summary of Contents for ADEMCO VISTA-48A
Page 4: ......
Page 28: ...Installation Instructions 3 8 ...
Page 60: ...Installation Instructions 5 20 ...
Page 75: ... NOTES 8 5 ...


