background image


CONFIDENTIAL 


Website: 

http://www.honeywellaircoolers.com


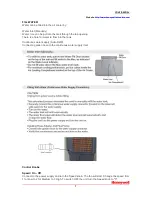
FILL WATER: 

Water can be filled into the air cooler by: 
 
Water Inlet (Manually) 
Water / Ice can be put into the tank through the top opening. 
There is a hole for water to flow into the tank. 
 
Continuous water supply (Auto Refill) 
Connect a garden hose to the continuous water supply inlet. 


Control Knobs 


Speed / On - Off 

Connect to the power supply and turn the Speed knob. The fan will start. Change the speed from 
1 for Low to 2 for Medium to 3 High. To switch OFF the unit turn the Speed knob to "0". 

Summary of Contents for CO60PM Series

Page 1: ...EVAPORATIVE AIR COOLER SERVICE MANUAL CAUTION Before servicing the unit read the Safety Precautions in this manual Only for authorized service MODEL NO CO60PM FOR INDOOR OUTDOOR USE ...

Page 2: ...e Switch 2 2 1 Switch Box 2 2 2 Switch cool speed swing 2 2 3 Wiring Color Connection 2 3 How To Change Water Pump 2 3 1 Water pump pipe and water pump clip 2 3 2 Cool Switch And Wiring Connector 2 3 3 Water Pump Wiring Connection 2 4 How To Change Main Motor 2 4 1 Speed Switch And Wiring Connector 2 4 2 Fan Blade And Fan Motor 2 4 3 Main Motor Wiring Connection 2 5 How To Change Swing Motor 2 5 1...

Page 3: ...mper lead and each exposed metallic part on the equipment at all MODES except POWER OFF 4 The value should be over 1 MΩ 1 3 Specifications MODELS ITEMS CO60PM Power Supply 120V 50Hz Input W 220W Running Current A 1 83A Fan Type 16 metal fan blade Fan Speeds 3 Operation Control Control Panel Air Direction Control Vertical Louver Right Left Auto Horizontal Louver Up Down Manual Protector Fan Motor I...

Page 4: ... servicing or removing the unit Disconnect the power supply before servicing or cleaning operation Remove the power cord from the electrical receptacle by grasping and pulling on the power cord plug end only never from the cord DO NOT use the product in areas where gasoline paint or other flammable goods and objects are stored When using the COOL setting please check the water indicator level to e...

Page 5: ...cords specifically marked for outdoor use Look for extension cords that have a GFCI Ground Fault Circuit Interrupter built in Make sure the amperage rating for the extension cord is higher than the amperage rating for the appliance Check labels and owner s manuals on the appliance and the extension cord for amperage ratings Power cords have to be contained If they must run along the ground make su...

Page 6: ...s when the humidity is low The evaporative air cooler should not be used in enclosed spaces It must be kept level and there must be water in the water tank The room should have doors and windows opened to allow free air flow The evaporative air cooler works best when placed near an open window so that outside air is drawn into the evaporative air cooler the air circulates in the room and then exit...

Page 7: ...hrough the top opening There is a hole for water to flow into the tank Continuous water supply Auto Refill Connect a garden hose to the continuous water supply inlet Control Knobs Speed On Off Connect to the power supply and turn the Speed knob The fan will start Change the speed from 1 for Low to 2 for Medium to 3 High To switch OFF the unit turn the Speed knob to 0 ...

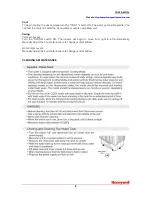
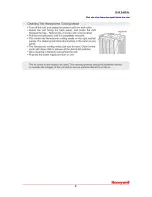
Page 8: ... can feel the cooler air after the Honeycomb media is completely wet Swing Vertical Louvers Turn the SWING switch ON The louvers will begin to move from right to left automatically Manually adjust the horizontal louvers to change vertical airflow Horizontal Louvers Manually adjust the horizontal louvers to change vertical airflow CLEANING MAINTENANCE ...

Page 9: ...CONFIDENTIAL Website http www honeywellaircoolers com 9 ...

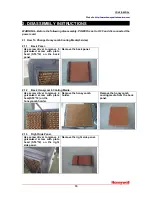
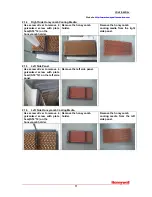
Page 10: ... driver to remove 5 galvanized screw with plate head ST4 12 on the back panel Remove the back panel 2 1 2 Back Honeycomb Cooling Media Use screw driver to remove 4 galvanized screw with plate head ST4 12 on the honeycomb holder Remove the honeycomb holder Remove the honeycomb cooling media from the back panel 2 1 3 Right Side Panel Use screw driver to remove 4 galvanized screw with plate head ST4 ...

Page 11: ...emove the honeycomb cooling media from the right side panel 2 1 5 Left Side Panel Use screw driver to remove 4 galvanized screw with plate head ST4 12 on the left side panel Remove the left side panel 2 1 6 Left Side Honeycomb Cooling Media Use screw driver to remove 4 galvanized screw with plate head ST4 12 on the honeycomb holder Remove the honeycomb holder Remove the honeycomb cooling media fro...

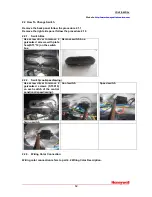
Page 12: ...1 Switch Box Use screw driver to remove 4 galvanized screws with plate head ST3 12 on the switch box Remove switch box 2 2 2 Switch cool speed swing Use screw driver to remove 2 galvanized screws ST3X10 on each switch of the control panel cool speed swing Cool switch Speed switch Swing switch 2 2 3 Wiring Color Connection Wiring color connection refers to part 4 2 Wiring Color Description ...

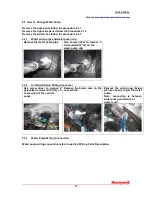
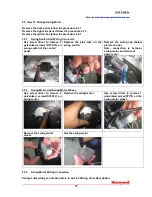
Page 13: ...e water pump pipe Use screw driver to remove 2 SS screws ST4 12 on the water pump clip 2 3 2 Cool Switch And Wiring Connector Use screw driver to remove 2 galvanized screws ST3X10 on cool switch of the control panel Remove the brown wire on the cool switch Remove the wiring cap below picture shown to get the water pump Note connection is between water pump and N wire of power cord 2 3 3 Water Pump...

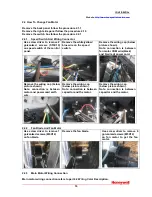
Page 14: ... connection is between fan motor COM wire black and N wire of power cord Remove the wiring cap below picture shown Note connection is between motor and power cord earth wire Remove the wiring cap below picture shown Note connection is between capacitor and the motor Remove the wiring cap below picture shown Note connection is between capacitor and the motor 2 4 2 Fan Blade And Fan Motor Use screw ...

Page 15: ... switch of the control panel Remove the pink wire on the swing switch Remove the wiring cap below picture shown Note connection is between swing motor and N wire of power cord 2 5 2 Swing Motor And Swing Motor Wheel Use screw driver to remove 2 galvanized screws ST4X12 on swing motor Remove the swing motor Use screw driver to remove 1 galvanized screw ST3 8 on the swing motor wheel Remove the swin...

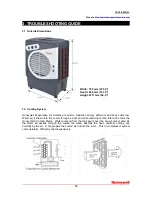
Page 16: ...the cooler through a dust and odor reducing carbon filter and enters the Honeycomb Cooling Media Water pumped from the tank pours over the honeycomb media As the warm air passes through the media the water absorbs the heat naturally cooling and humidifying the air A fan propels the cooled air out into the room This no compressor system cools naturally efficiently and inexpensively Width 700 mm 27 ...

Page 17: ...according to the procedure 2 3 Water color yellowish at initial use Color fasts from honeycomb filter This is natural After several use the water color will be clean Abnormal noise inside the product Noise of water pump when water not up to min water level Turn off the product Add water and then turn on the product again Motor or blade problem Turn off and unplug the product or change the main mot...

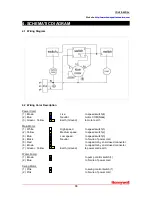
Page 18: ...n Motor 1 White High speed to speed switch 1 2 Yellow Medium speed to speed switch 2 3 Blue Low speed to speed switch 3 4 Black Neutral to N wire of power cord 5 Red to capacitor by end closed connector 6 Brown to capacitor by end closed connector 7 Green Yellow Earth Ground to power cord earth Water Pump 1 Brown to pump control switch 1 2 Blue to N wire of power cord Swing Motor 1 Pink to swing c...

Page 19: ...CONFIDENTIAL Website http www honeywellaircoolers com 19 5 EXPLODED VIEW ...

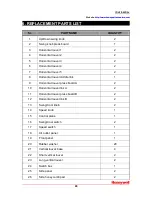
Page 20: ...uver 5 2 8 Horizontal louver middle link 1 9 Horizontal louver press board A 2 10 Horizontal louver link A 2 11 Horizontal louver press board B 2 12 Horizontal louver link B 2 13 Swing Cool knob 2 14 Speed knob 1 15 Control plane 1 16 Swing Cool switch 2 17 Speed switch 1 18 Air outlet panel 1 19 Front panel 1 20 Rubber washer 20 21 Vertical louver base 4 22 Short vertical louver 2 23 Long vertica...

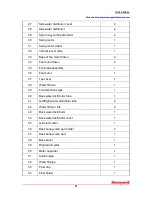
Page 21: ...5 Fan blade assembly 1 36 Fan motor 1 37 Top cover 1 38 Water fill door 1 39 Four directions pipe 1 40 Back water distributor tube 1 41 Left Right water distributor tube 2 42 Water fill door link 2 43 Back water distributor 1 44 Back water distributor cover 1 45 Left stand pillar 1 46 Back honeycomb pad holder 2 47 Back honeycomb pad 1 48 Back panel 1 49 Right stand pillar 1 50 Motor capacitor 1 5...

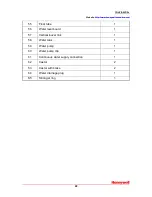
Page 22: ...rs com 22 55 Float tube 1 56 Water level board 1 57 Vertical louver link 1 58 Water tank 1 59 Water pump 1 60 Water pump clip 1 61 Continuous water supply connection 1 62 Castor 2 63 Castor with brake 2 64 Water drainage plug 1 65 Silica gel ring 1 ...

Reviews: