W-NXS AND CP-NXS
29
74-4059—01
Replacing the hard disk
In case a model with the hard drive is found to have a bad hard disk, it can be replaced in the field with a replacement
hard disk ordered from stock.
Note
Hard disks are
not interchangeable
between different NXS units, due to licensing mechanisms used in
Niagara/Niagara
AX
, as well as in the Windows XP Embedded OS.
Caution
The NXS contains electronic components that are vulnerable to static discharge. Therefore, take
precautionary measures before working with it. See
“Static Discharge Precautions,”
Procedure 10
To replace the hard disk.
Step 1
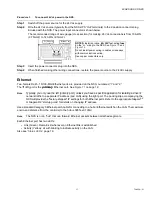
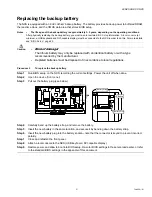
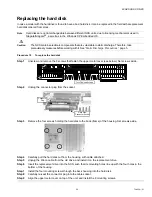
Unscrew and remove the 8 screws that fasten the upper metal cover (see below). Set screws aside.
Step 2
Unplug the connector plug from the socket.
Step 3
Remove the four screws holding the hard disk to the back (frame) of the housing. Set screws aside.
Step 4
Carefully pull the hard disk out from the housing, with cable attached.
Step 5
Unplug the ribbon cable from the old drive, and install it on the replacement drive.
Step 6
Insert the replacement drive into the NXS, such that its mounting holes line up with the four holes in the
bottom of the housing.
Step 7
Install the four mounting screws through the back housing into the hard disk.
Step 8
Carefully re-seat the connector plug into the cable socket.
Step 9
Align the upper metal cover on top of the unit, and install the 8 mounting screws.
Torx T8 Head Screws
Connector
Plug
Hard Disk
Connector Socket


