HONEYWELL 7000 SOLID STATE ALARM SYSTEM
69-1192—1
8
ON
ON
ON
ON
ON
ON
ON
ON
OFF OFF OFF
ON
ON
ON
ON
OFF OFF OFF OFF
ON
ON
ON
ON
ON
OFF OFF
ON
ON
OFF OFF
ON
ON
OFF
ON
OFF
ON
OFF OFF OFF
ON
OFF
ON
OFF
ON
1
2
3
4
5
6
7
8
9
10
11
1
2
3
4
1
2
3
4
S1
TB1
TB2
OFF
ON
S1
S1
SETS PEM ADDRESS #
S1
SHOWN SET FOR ADDRESS #1
MAXIMUM OF 11 PEMs ON A SYSTEM
PEM ADDRESS #
11
10
9
8
7
6
5
4
3
2
1
1
2
3
4
5
6
7
8
9
10
11
GND
P1
P2
P3
P4
GND
P5
P6
P7
P8–
P8+
NO
EOLR
NC
NO
EOLR
NC
ALL EOLR =
3.3K
1/4W
5%
TYP WIRING: POINT 1-7
WIRING: POINT 8
GND
GND
+13.8 VDC
HBUS–
HBUS+
RELAY 1
TO
CONTROL
PANEL
GOLDEN VALLEY, MINN.
RELAY 2
NO
NC
C
NO
NC
C
BLK
RED
GRN
YEL
M10902
RELAY:
CURRENT DRAIN
≤
40 mA
CONTACT RATING:
RESISTIVE
2A @ 30 VDC
0.4A @ 30 VAC
INDUCTIVE
1A @ 30 VDC
0.2A @ 30 VAC
LABEL 2480341 REV B
PEM
SYSTEM 7000
SEE INSTALLATION MANUAL
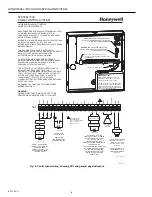
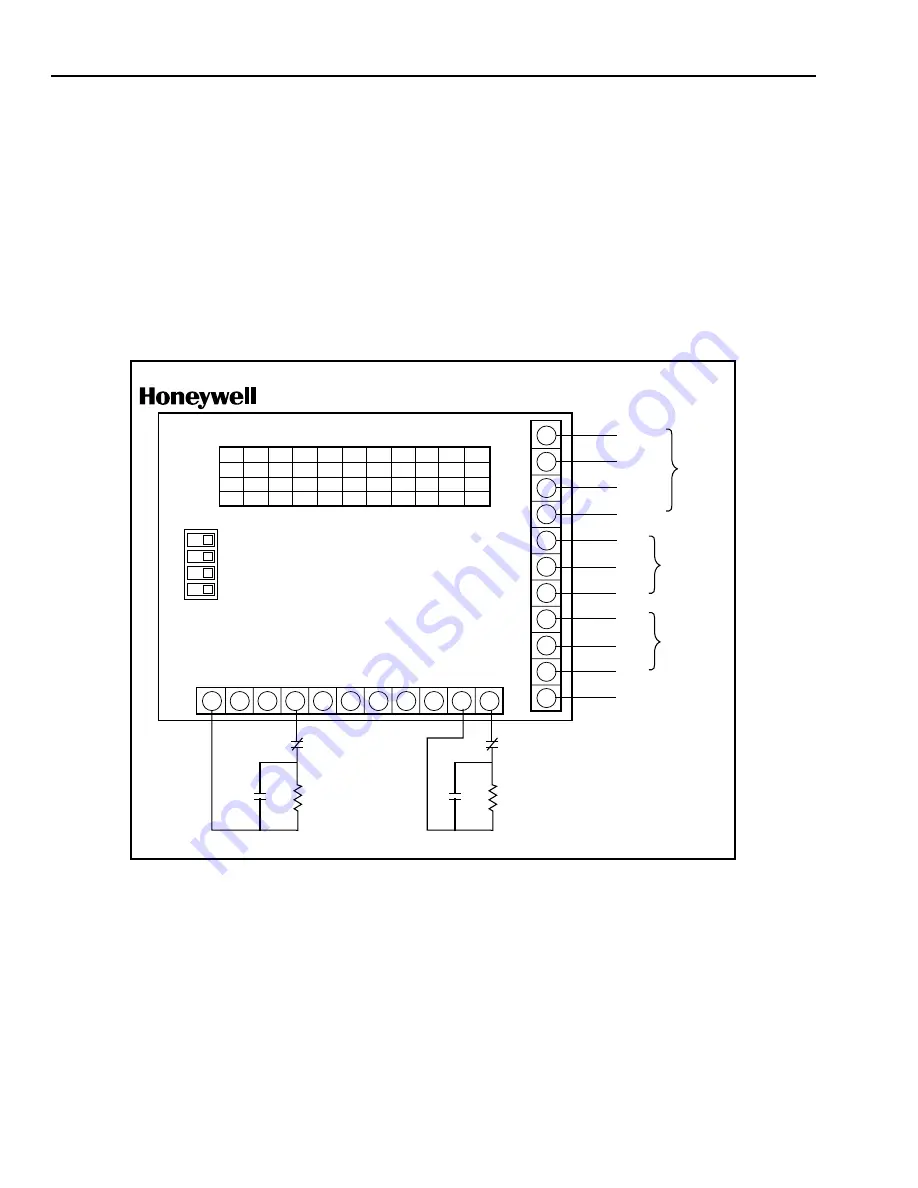
PEM Wiring
1.
Use four-conductor AK4500A cable to connect the PEM
to other HBus devices.
2.
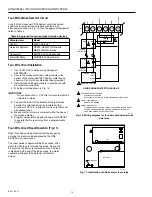
Connect the PEM wires to the control panel according
to the wiring diagram with the unit. See Fig. 6.
Each PEM has a unique, four digit, address. Fig. 6 lists the
PEM address number and switch settings. The Honeywell
7000 System can support up to 11 PEM.
RFEM Installation
The RFEM provides additional rf protection points for the
Honeywell 7000 System. Only one RFEM can be used per
system.
Mount the RFEM plastic box within 250 feet (76 meters) of
the control panel if using 22 AWG wire or 500 feet (152
meters) if using 18 AWG wire.
Remove the RFEM circuit board from the RFEM plastic box
(if installed) and use the RFEM plastic box to mark the
mounting screw locations on the wall or plywood. Use two
screws to mount the RFEM plastic box. Insert the RFEM
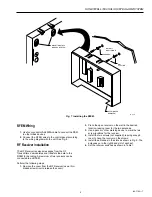
circuit board into the RFEM plastic box. See Fig. 7.
Fig. 6. PEM wiring diagram.


