WEB-300E, WEB-600E/U, CP-300E, CP-600E/U SERIES CONTROLLERS
31-00010—01
4
• If mounting inside an enclosure, that enclosure should
be designed to keep the unit within its required
operating range considering a 20-watt dissipation by
the controller, plus dissipation from any other devices
installed in the same enclosure. This is especially
important if the controller is mounted inside an
enclosure with other heat producing equipment.
• Do not mount the unit:
—
in an area with excessive moisture, corrosive
fumes, or explosive vapors.
—
where vibration or shock is likely to occur.
—
in a location subject to electrical noise. This
includes the proximity of large electrical con-
tactors, electrical machinery, welding equip-
ment, spark igniters, and variable frequency
drives.
Physical Mounting
The following information applies about physically
mounting the unit.
• You can mount the controller in any orientation. It is not
necessary to remove the cover before mounting.
• Mounting on a 35mm wide DIN rail is recommended.
The controller’s unit base has a molded DIN rail slot
and locking clip, as do the power supply modules and
both types of I/O expansion modules. Mounting on a
DIN rail ensures accurate alignment of connectors
between all modules.
• If DIN rail mounting is impractical, you can use screws
in mounting tabs on the controller, as well as any end-
connected accessory (NPB-PWR-H/U, etc.). Tab
mounting dimensions are on the last page of this
document.
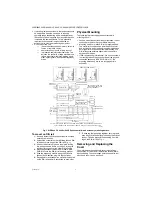
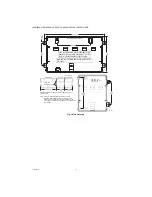
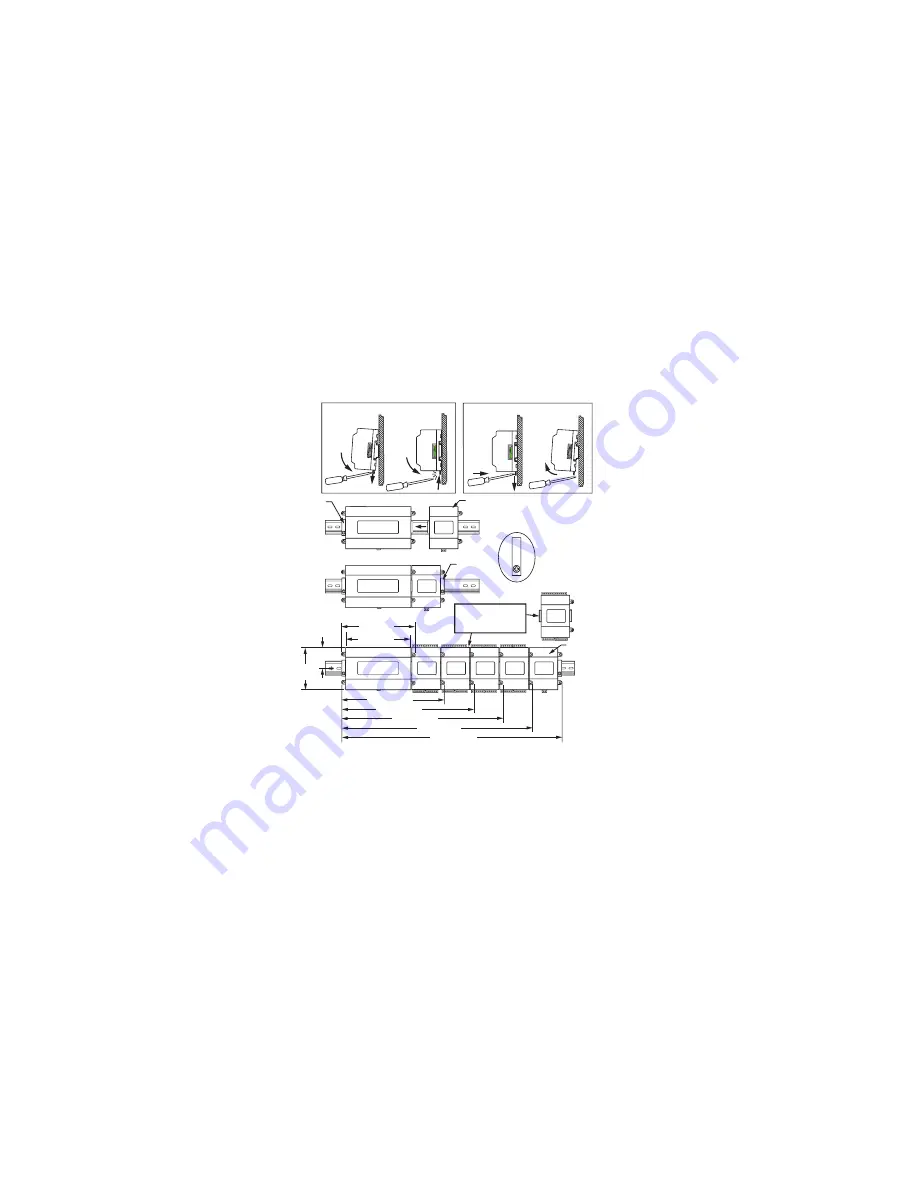
Fig. 1. WEB and CP 300E or 600E Series controller and accessory mounting details.
To mount on DIN rail
1.
Securely install the DIN rail with at least two screws,
near the two rail ends.
2.
Position the controller on the rail, tilting to hook DIN
rail tabs over one edge of the DIN rail (Fig. 1).
3.
Use a screwdriver to pry down the plastic locking
clip, and push down and in on the unit, forcing the
locking clip to snap over the other DIN rail edge.
4.
Mount any accessory module (I/O module, NPB-
PWR-H/U) onto the DIN rail in the same manner.
5.
Slide the accessory module along the DIN rail to
connect its 20-position plug into the controller.
6.
Repeat this for all accessories, until all are mounted
on the DIN rail and firmly connected to each other.
7.
To keep the final assembly together, secure at both
ends with DIN rail end-clips provided by the DIN rail
vendor. This also prevents the assembly from slid-
ing on the DIN rail. See Fig. 1.
Removing and Replacing the
Cover
You must remove the controller’s cover to install any
option cards, or to install (or replace) the optional NiMH
backup battery. The cover snaps onto the base with four
plastic end tabs—two on each end.
REMOVING FROM DIN RAIL
M34983
CONTROLLER
23-17/64 (591)
INSTALL DIN RAIL END CLIP
(STOP CLIP) AT BOTH ENDS
OF FINAL ASSEMBLY.
NPB-PWR-H/U OR
NPB-PWR-UN-H/U
UP TO FOUR (4)
IO-16-H/U MODULES
ARE SUPPORTED
DIN RAIL
END CLIP
DIN RAIL
END CLIP
CONTROLLER
CONTROLLER
IO-16-H/U
IO-16-H/U
MOUNTING ON DIN RAIL
NPB-PWR-H/U OR
NPB-PWR-UN-H/U
NOTE: IF INSTALLING IO MODULES AND USING THE NPB-PWR
-H/U OR NPB-PWR-UN-H/U POWER
SUPPLY MODULE, THE POWER SUPPLY MODULE INSTALLS AT THE END OF THE CHAIN.
7-1/8 (181)
6-3/8 (162)
2-3/64 (52)
4-7/64
(104)
10-23/64 (263)
13-37/64 (345)
16-13/16 (427)
20-3/64 (509)


