background image

120V AC 60Hz

SHOCK HAZARD

WATER LEVEL INDICATOR

5

SAFETY

READ AND SAVE THESE INSTRUCTIONS:
When using electrical appliances, basic safety precautions should always be followed:

Your cooler runs on 120 Volt AC, 60 Hz current. Check the
household voltage to ensure it matches the appliance's rate
specification.
Before operating the product remove it from its packaging
and check that it is in good condition.
DO NOT operate any product with a damaged cord or plug.
We recommend not using an extension cord with this 
appliance.
DO NOT run power cord under carpeting, or cover it with 
rugs or runners. Keep the cord away from areas where it 
may be tripped over.
Always unplug the product before refilling the water tank.
Always unplug the appliance from the power source before
cleaning, servicing or relocating the unit.
Remove the power cord from the electrical receptacle by
grasping and pulling on the power cord plug-end only, never
pull the cord.
DO NOT use the product in areas where gasoline, paint or
other flammable goods and objects are stored.
When using the COOL setting, check the water tank to
ensure that it is full. Operation of this cooler on the COOL
setting with an empty tank may result in damage to the 
water pump.
WARNING: To reduce the risk of fire or electric shock, do 
not use this appliance with any solid state speed control 
device.


Summary of Contents for CS10XE Series

Page 1: ...oolers com Portable Evaporative Air Cooler for Indoor Use Evaporativo Portátil Enfriador De Aire para uso En El Interior Portatif Évaporatif Refroidisseur D air pour Usage Intérieur OWNER S MANUAL Read and save these instructions before use MANUAL DEL PROPIETARIO Lea y guarde estas instrucciones antes de usar la unidad MANUEL DU PROPRIÉTAIRE Lire et conserver ces instructions avant utilisation Cus...

Page 2: ...open door or window Note Evaporative air cooler requires cross ventilation Turn ON and enjoy the cooling breeze Note Start with LOW speed and gradually increase to higher speed for optimum cooling performance Note Please make sure the household power voltage matches the product specifications ...

Page 3: ...trol Panel 8 9 Low Water Alarm Function 11 12 14 16 18 18 10 SERVICE AND WARRANTY 19 INDEX 1 Read all instructions carefully before setting up and operating the unit and please keep this instruction manual for future reference This manual is designed to provide you with important information needed to setup operate maintain and troubleshoot your cooler Failure to follow these instructions may dama...

Page 4: ...ead Place the cooler in front of an open door or window Ensure that there is adequate cross ventilation in the room by leaving a door or window open opposite the cooler Following these guidelines will ensure your cooler will work as effectively as possible Not an Air Conditioner Important Please Read The evaporative air cooler is not an air conditioner as it does not use a compressor or refrigeran...

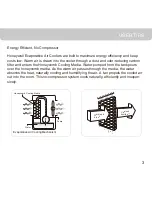
Page 5: ...ters the Honeycomb Cooling Media Water pumped from the tank pours over the honeycomb media As the warm air passes through the media the water absorbs the heat naturally cooling and humidifying the air A fan propels the cooled air out into the room This no compressor system cools naturally efficiently and inexpen sively Pump Water Honeycomb Cooling Media Evaporative Air Cooling Mechanism Warm and d...

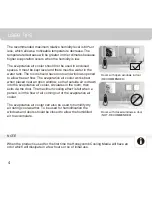
Page 6: ... placed near an open window so that outside air is drawn into the evaporative air cooler circulates in the room then exits via the door The maximum cooling effect is felt when a person is in the flow of air coming out of the evaporative air cooler The evaporative air cooler can also be used to humidify dry air during cool weather To be used for humidification the windows and doors should be closed...

Page 7: ...t with rugs or runners Keep the cord away from areas where it may be tripped over Always unplug the product before refilling the water tank Always unplug the appliance from the power source before cleaning servicing or relocating the unit Remove the power cord from the electrical receptacle by grasping and pulling on the power cord plug end only never pull the cord DO NOT use the product in areas ...

Page 8: ... DO NOT let children play with this appliance packaging or plastic bags If the unit is damaged or it malfunctions do not continue to operate it Refer to the troubleshooting section and seek professional advice Place the unit on a level floor This product is not intended for use in wet or damp locations DO NOT use in bathrooms Never locate the product where it may fall into a bathtub or other water...

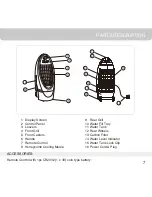
Page 9: ...Handle 7 Remote Control 8 Honeycomb Cooling Media 9 Rear Grill 10 Water Fill Tray 11 Water Tank 12 Rear Wheels 13 Carbon Filter 14 Water Level Indicator 15 Water Tank Lock Clip 16 Power Cord Plug PARTS DESCRIPTION 7 12 16 11 10 9 8 13 6 7 1 2 3 4 14 15 5 ACCESSORIES Remote Control with 1pc CR2032 1 x 3V coin type battery ...

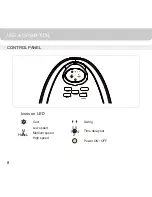
Page 10: ...CONTROL PANEL USE OPERATION Icons on LED Cool Low speed Medium speed High speed Swing Time delay set 1 2 4 0 5 H L M SWING SPEED POWER COOL TIMER Power ON OFF 1 2 4 0 5 H L M 8 ...

Page 11: ...w USE OPERATION SPEED Press the SPEED button repeatedly to change the speed between H M L The indicator light will show the selected speed High H Medium M Low L H L M 1 2 4 0 5 TIMER Press the TIMER button until the indicator light moves to your desired time setting Once the set time has passed the unit will automatically shut off The Timer function allows you to program the unit for up to 7 5 hou...

Page 12: ...G Press the SWING button The indicator light will come on and the louvers will begin to move from right to left automatically Manually adjust the horizontal louvers to change vertical airflow LOUVER MOVEMENT COOL When the COOL function is not activated while the unit is ON the unit functions as a normal fan without the evaporative cooling function 10 ...

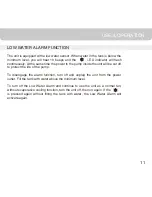
Page 13: ...inside the unit will be cut off to protect the life of the pump To disengage the alarm function turn off and unplug the unit from the power outlet Fill the tank with water above the minimum level To turn off the Low Water Alarm and continue to use the unit as a normal fan without evaporative cooling function turn the unit off then on again If the COOL is pressed again without filling the tank with...

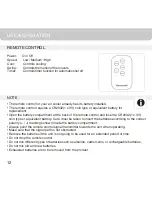
Page 14: ... and insert ta CR2032 1 x 3V coin type or equivalent battery Care must be taken to insert the batteries according to the correct polarity markings shown inside the battery compartment Always point the remote control signal transmitter towards the unit when operating Make sure that the signal path is not obstructed Remove the batteries if the unit is not going to be used for an extended period of t...

Page 15: ...nk when water level is low Do not fill water above the Max water level mark Check water level in the tank before running the COOL function Please be sure water in the tank is always above the minimum water level mark Running the unit with inadequate water may cause pump failure If ice is available you may add ice in the top compartment to enhance the cooling performance Unplug from power when refi...

Page 16: ...arts description on page 7 Once the tank is empty unlock the latches on both sides and lift off the cooler top section as shown in the figure and place it vertically on the floor Be careful not to bend the water pickup tube that hangs below the unit Refill the water tank with clean water and drain it completely Clean the water tank with detergent or a damp cloth and rinse it thoroughly Place the u...

Page 17: ...sits in the pads and help to extend the life of Honeycomb Cooling Media Do not run the unit in COOL mode with stale water in the tank You must empty the water tank and refill with fresh water especially if the tank has not been cleaned in a long time The cleaning frequency for the Honeycomb media depends on local air and water conditions In areas where the mineral content of water is high mineral ...

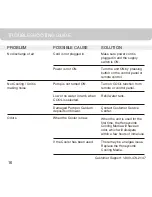
Page 18: ...rd is plugged in and the supply switch is ON Turn the unit ON by pressing button on the control panel or remote control Turn on COOL function from remote or control panel When the unit is used for the first time the Honeycomb Cooling Media will have an odor which will dissipate within a few hours of initial use There may be an algae issue Replace the Honeycomb Cooling Media Low or no water in tank...

Page 19: ...Replace if needed Try to operate using the control panel Try to activate the unit with the Remote Control If the unit responds then the Control Panel on the unit may be experiencing problems contact the Customer Service Center If neither the Remote Control or the Control Panel is working contact the Customer Service Center Customer Support 1 800 474 2147 ...

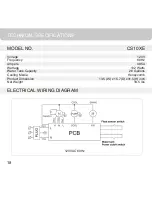
Page 20: ...atts 2 6 Gallons Honeycomb 13 5 W x 15 7 D x31 5 H inch 18 5 lbs Voltage Frequency 0 85A Ampere Wattage Water Tank Capacity Cooling Media Product Dimension Net Weight TECHNICAL SPECIFICATIONS ELECTRICAL WIRING DIAGRAM 120VAC 60Hz 18 ...

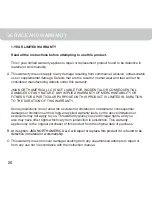
Page 21: ...ental damage Defects that are the result of normal wear and tear will not be considered manufacturing defects under this warranty JMA NORTH AMERICA LLC IS NOT LIABLE FOR INCIDENTAL OR CONSEQUENTIAL DAMAGES OF ANY NATURE ANY IMPLIED WARRANTY OF MERCHANTABILITY OR FITNESS FOR A PARTICULAR PURPOSE ON THIS PRODUCT IS LIMITED IN DURATION TO THE DURATION OF THIS WARRANTY Some jurisdictions do not allow ...

Page 22: ...ease contact our Customer Support D CUSTOMER SUPPORT JMA North America LLC Mahwah New Jersey 07495 USA Phone 1 800 474 2147 Email info jmana us Web www honeywellaircoolers com When contacting our Customer Support please have the information below along with the proof of purchase All warranty requests must be accompanied by a proof of purchase which is a copy of the original receipt Model Date of p...

Page 23: ...nismo de enfriamiento por evaporación que requiere una ventilación cruzada Encienda y disfrutar de la brisa fresca Nota Comience con velocidad baja y aumentar gradualmente a una velocidad más alta para un rendimiento óptimo de enfriamiento Nota Por favor asegúrese de que la toma de corriente esta ajustada a la configuración correcta de acuerdo con las especificaciones del producto 1 2 3 ...

Page 24: ...ción importante necesaria para la configuración operación mantenimiento y resolución de problemas de su acondicionador No seguir las instrucciones puede dañarlo y o perjudicar su funcionamiento y anular la garantía 2 RECOMENDACIONES PARA EL USUARIO 6 LIMPIEZA Y MANTENIMIENTO 7 GUÍA DE SOLUCIÓN DE PROBLEMAS 8 ESPECIFICACIONES TÉCNICAS 9 DIAGRAMA DE CABLEADO ELÉCTRICO 34 36 38 38 10 SERVICIO Y GARAN...

Page 25: ...Para uso en el interior Situe el enfriador en frente de una ventana o puerta abierta Aseguresé que hay una adecuada ventilación en la estancia dejando una puerta o ventana abierta en el otro lado del enfriador Si sigue estas instrucciones se asegurará que su enfriador trabajará de forma efectiva Importante No es un Aire Acondicionado El enfriador de aire evaporativo no es un aire acondicionado ya ...

Page 26: ...na brisa que recorre un lago Esta disminución de la temperatura de esta brisa produce un efecto refrescante y relajante en la personas El enfriador de aire evaporativo refresca el aire por medio de la evaporación del agua Cuando el agua se evapora del aire se obtiene como resultado una mezcla de moléculas de aire y agua Este intercambio químico requiere calor que es tomado de las moléculas del agu...

Page 27: ...puertas y ventanas abiertas para permitir el flujo de aire libre El enfriador de aire por evaporación funciona mejor cuando se coloca cerca de una ventana abierta de modo que el aire exterior es succionado por el enfriador el aire circula en el cuarto y luego sale a través de la puerta o ventana El efecto de enfriamiento máximo se siente cuando la persona esta ubicado directamente en el flujo de a...

Page 28: ...os Desenchufe siempre el producto antes de volver a llenar el tanque de agua Siempre desconecte el aparato de la fuente de alimentación antes limpieza mantenimiento o reubicación de la unidad Remover el cable eléctrico del toma corriente agarrar y jalar solo del enchufe nunca jalar del cable NO use el producto en areas donde se encuentren productos inflamables como gasolina o pintura Al usar el aj...

Page 29: ... unidad se daña o funciona mal no continúe haciéndola funcionar Consulte la sección de Solución de problemas y o por favor busque consejo profesional Coloque la unidad sobre un piso nivelado Este producto no se destina para uso en lugares mojados o extremadamente húmedos Nunca ubique el producto donde pudiera caer en una bañera u otros contenedores de agua No lo use en baños ni en exteriores Cuand...

Page 30: ...io de enf iamiento alveolar 9 Parrilla trasera 10 Charola de llenado de agua 11 Tanq ue de agua 12 Ruedas traseras 13 Filtro de carboón 14 Indicador del nivel del agua 15 B roche de cierre del tanq ue del agua 16 Cable y clavij a DESCRIPCIN DE LAS PARTES 27 12 16 11 10 9 8 13 6 7 1 2 3 4 14 15 5 ACCESORIOS El Control Remoto con una batería CR2032 1 x 3V tipo botón ...

Page 31: ... LED Cool Frío Low speed Velocidad baja Medium speed Velocidad media High speed Velocidad alta Swing Girar Time delay set Configurar retraso de hora 1 2 4 0 5 H L M SWING SPEED POWER COOL TIMER Power On OFF ENCENDIDO APAGADO 1 2 4 0 5 H L M 28 ...

Page 32: ...ELOCIDAD Oprima repetidamente el botón de SPEED VELOCIDAD y la velocidad cambiará La luz indicadora mostrará la velocidad seleccionada H L M 1 2 4 0 5 TIMER TEMPORIZADOR TEMPORIZADOR Oprima el botón TIMER TEMPORIZADOR hasta que la luz indicadora se mueva al horario que usted desea Una vez que ha pasado el tiempo deseado la unidad se apagará automáticamente La función del temporizador le permite pr...

Page 33: ...indicadora se enciente y las rejillas comienzan a moverse automáticamente de derecha a izquierda Ajuste manualmente las rejillas horizontales para cambiar el flujo de aire vertical 30 COOL FRÍO Para comenzar a enfriar el área deseada presione el botón COOL FRÍO Se encenderá el indicador y la bomba de agua funcionará Puede sentir el aire más frío luego de que el medio Honeycomb esté completamente m...

Page 34: ... el suministro de energía a la bomba interna de la unidad con el fin de proteger la vida de la bomba Para deshabilitar la función de alarma apague y desconecte la unidad del enchufe de energía y llene el tanque con agua por arriba del nivel mínimo Para apagar la función de la alarma y continuar usándola en modo VENTILADOR FAN apague la unidad y enciéndala de nuevo Si se presiona de nuevo el botón ...

Page 35: ...r abrir el compartimiento para la batería ubicado en la parte trasera del control remoto y instale dos batería CR2032 1 x 3V tipo botón Asegúrese de instalar las baterías de acuerdo con la polaridad correcta siguiendo las marcas ubicadas en la parte interior del compartimiento Siempre apunte el transmisor de señal de control remoto hacia la unidad cuando se opera Asegúrese de que la trayectoria de...

Page 36: ...l de agua se localiza al frente de la unidad Vuelva a llenar el tanque de agua cuando el nivel de agua esté bajo No llene de agua por arriba de la marca de nivel Máximo Revise el nivel del agua que hay en el tanque antes de iniciar la función COOL Asegúrese de que el tanque de agua siempre esté por arriba de la marca de nivel mínimo de agua Hacer funcionar la unidad con un nivel inadecuado de agua...

Page 37: ... almacenar la unidad en un área seca y fuera de la luz del sol Apagar el equipo y desconectar de la corriente eléctrica Colocar la unidad donde se pueda drenar el agua seguramente Desatornillar el tapón de drenaje para que salga el agua en su totalidad Cuando esté totalmente vacío l limpiar con un paño para remover impurezas Coloque el tapón nuevamente la unidad estará lista para llenarse nuevamen...

Page 38: ...por lo menos una vez a la semana reduce los depósitos minerales en las almohadillas y ayuda a extend er la vida del medio de enfriamiento Honeycomb No opere la unidad en el modo FRÍO si hay agua que ha estado en el tanque por mucho tiempo Debe vaciar el tanque de agua y llenarlo con agua fresca especialmente si esto no se ha hecho en mucho tiempo La frecuencia de limpieza para el medio Honeycomb d...

Page 39: ... la función COOL en el panel de control o en el control remoto Nivel de agua bajo o vacio en el tanque de agua cuando se selecciona función COOL Rellenar el tanque de agua Emisión de olor Nueva unidad Cuando la unidad es utilizada por primera vez el panal Honeycomb emite un olor que será disipado en una semana después del uso inicial Unidad usada Puede haber depósitos de algas en el panel Honeycom...

Page 40: ... del control Panel de Control dañado Intente usar el control remoto Si la unidad responde ajustar los sujetadores del Panel de Control Contacte el Centro de Servicio Si no funciona el control remoto o el panel de control el panel de Panel de Control podría estar dañado Pro favor contacte el Centro de Servicio PROBLEMA POSIBLE CAUSA SOLUCIÓN 37 GUÍA DE SOLUCIÓN DE PROBLEMAS ...

Page 41: ...tencia 0 85A Amperes Capacidad del tanque de agua Medios de enfriamiento Dimensiones Peso neto ESPECIFICACIONES TÉCNICAS DIAGRAMA DE CABLEADO ELÉCTRICO 38 120VAC 60Hz TAPÓN FRÍO Negro Interruptor de flotador del sensor Interruptor de poder cortar Tanque de agua Blanco Blanco Amarillo Azul FRÍO OSCILACIÓN BOMBA ...

Page 42: ...os causados intencionadamente Los defectos resultantes del uso normal y la rotura no se considerarán defectos de fabricación a efectos de esta garantía JMA NORTH AMERICA LLC NO ES RESPONSABLE DE LOS DAÑOS SECUNDARIOS O DERIVADOS DE NINGUNA NATURALEZA CUALQUIER GARANTÍA TÁCITA DE COMERCIABILIDAD O DE PREPARACIÓN PARA UN USO CONCRETO DE ESTE PRODUCTO QUEDA LIMITADA A LA DURACIÓN DE ESTA GARANTÍA Alg...

Page 43: ...CIÓN AL CLIENTE JMA North America LLC Mahwah New Jersey 07495 USA Phone 1 800 474 2147 Email info jmana us Web www honeywellaircoolers com Cuando contacte con nuestro Servicio de Atención al Cliente por favor tenga la siguiente información preparada como prueba de compra Todas las solicitudes de cobertura de la garantía tendrán que ir acompañadas de una prueba de compra que será una copia de la fa...

Page 44: ... avec un système de rafraîchissement qui nécessite un renouvellement de l air METTRE EN MARCHE et profiter de la fraîcheur Remarque commencer avec la faible vitesse et augmenter progressivement jusqu à la vitesse plus élevée pour obtenir une performance de rafraîchissement optimale Remarque S assurer que la prise d alimentation est compatible aux paramètres indiqués sur les spécifications du produ...

Page 45: ... Panneau de contrôle 48 49 Function alarme de niveau d eau bas 51 52 54 56 58 58 10 SERVICE ET GARANTIE 59 INDICE 41 Lisez attentivement toutes les instructions avant d installer et d utiliser l appareil et veuillez garder ce manuel pour de futures références Ce manuel est conçu pour vous fournir des informations importantes nécessaires pour configurer exploiter entretenir et dépanner votre refroi...

Page 46: ...rafraîchisseur d air en face d une porte ou d une fenêtre ouverte Vérifiez que l air circule correctement dans la pièce en laissant une porte ou une fenêtre ouverte à l opposé du rafraîchisseur Ceci n est pas un Climatiseur Important Le refroidisseur d air à évaporation n est pas un appareil de climatisation car il n utilise pas de compresseur ou de gaz frigorigène Il ne faut pas s attendre au mêm...

Page 47: ...t relaxant Le rafraîchisseur d air par évaporation refroidit l air au moyen de l évaporation de l eau Lorsque l eau s évapore dans l air le résultat est un mélange de molécules d air et d eau Ce changement chimique nécessite de la chaleur qui est prise à partir des molécules d eau ce qui fait que de l air frais est propulsé de l unité Pompe Eau Dispositif de refroidissement Honeycomb alvéolaire Mé...

Page 48: ...isseur l air circule dans la pièce puis sort par la porte L effet de refroidissement maximum se mesure lorsqu une personne se trouve dans le flux d air qui sort du rafraîchisseur d air par évaporation Le rafraîchisseur d air par évaporation peut également être utilisé pour humidifier l air sec par temps frais Pour être utilisé pour des fins d humidification les fenêtres et les portes doivent être ...

Page 49: ... escalier Gardez le cordon loin des zones où il pourrait faire trébucher Débranchez toujours l appareil avant de remplir le réservoir d eau Débranchez toujours l appareil de la source d alimentation avant le nettoyage l entretien ou le déplacement de l appareil Retirez le cordon d alimentation de la prise de courant en saisissant et en tirant uniquement sur l extrémité de la prise du cordon d alim...

Page 50: ... en plastique Si l appareil est endommagé ou est en panne cessez de le faire fonctionner Reportez vous à la section de dépannage et ou veuillez demander des conseils professionnels Placez l appareil sur une surface plane Cet appareil n est pas destiné à être utilisé dans des endroits mouillés ou humides Ne placez jamais l appareil là où il pourrait tomber dans une baignoire ou un récipient d eau N...

Page 51: ...arrière 10 Bac de remplissage d eau 11 Réservoir d eau 12 Roues arrière 13 Filtre à charbon 14 Indicateur de niveau d eau 15 Clip de verrouillage du réservoir d eau 16 Cordon et fiche d alimentation DESCRIPTION DES PIECES 47 12 16 11 10 9 8 13 6 7 1 2 3 4 14 15 5 OSCILLATION VITESSE PUISSANCE MODE MINUTEUR ACCESSOIRES Télécommande avec un piles sèches CR2032 1 x 3V ...

Page 52: ...cons on LED Cool Froid Swing Oscillation Time delay set Réglage de la minuterie 1 2 4 0 5 H L M SWING SPEED POWER COOL TIMER Power ON OFF Puissance Marche Arret 1 2 4 0 5 H L M 48 Low speed Vitesse bas Medium speed Vitesse moyen High speed Vitesse haut ...

Page 53: ...tilisation 49 UTILISATION ET FONCTIONNEMENT Appuyez sur le bouton POWER ALIMENTATION pour allumer l appareil Pour éteindre l appareil appuyez à nouveau sur la touche Le refroidisseur démarre automatiquement à vitesse moyenne Après quelques secondes la vitesse devient à faible Appuyez sur la touche SPEED VITESSE à plusieurs reprises et la vitesse changera Le voyant lumineux indique la vitesse sélec...

Page 54: ...puyez sur le bouton COOL FROID Le voyant lumineux s allume et la pompe à eau fonctionne Vous pouvez sentir le refroidissement d air après que les médias en nid d abeille soient complètement mouillés Appuyez sur la touche SWING OSCILLATION Le voyant lumineux s allume et les volets se mettent en mouvement de droite à gauche automatiquement Vous pouvez régler manuellement les volets horizontaux pour ...

Page 55: ...ance de la pompe à l intérieur de l unité sera coupée pour protéger la vie de la pompe Pour désactiver la fonction d alarme éteignez et débranchez l unité de la prise de courant et remplissez le réservoir avec de l eau au dessus du niveau minimum Pour désactiver la fonction alarme et continuez à l utiliser en mode FAN VENTILATEUR éteignez et allumez l appareil Si le bouton COOL est pressé à nouvea...

Page 56: ... équivalent Retirer le couvercle au dos de la télécommande et insérez un piles sèches CR2032 1 x 3V avec et correctement alignés Dirigez toujours le transmetteur de signaux de la télécommande vers l unité pendant le fonctionnement Assurez vous que le trajet du signal ne soit pas obstrué Retirez la pile si l unité ne va pas être utilisée pendant une longue période de temps Veillez à ne pas laisser ...

Page 57: ...a une capacité maximale de 10 litres d eau La fenêtre d affichage du niveau d eau se trouve sur la partie avant de l unité Remplissez le réservoir d eau lorsque le niveau est bas Ne remplissez pas d eau au dessus de la marque de niveau Max Vérifiez le niveau d eau dans le réservoir avant d exécuter la fonction COOL Veuillez vous assurer que l eau dans le réservoir soit toujours au dessus de la mar...

Page 58: ...étergent ou un chiffon humide et rincez le soigneusement Placez le couvercle de l appareil avec précaution sur le réservoir et fermez les loquets Remplissez le réservoir d eau avec de l eau propre jusqu au niveau maximum Le rafraîchisseur d air est main tenant prêt à être utilisé Ce processus de nettoyage doit être répété chaque semaine pour maintenir l intégrité de l unité et pour éliminer les pa...

Page 59: ...ias de refroidissement Honeycomb Ne faites pas fonctionner l appareil en mode FROID avec de l eau sale dans le réservoir Vous devez vider le réservoir d eau et le remplir d eau fraîche surtout si le réservoir n a pas été nettoyé depuis longtemps La fréquence de nettoyage pour les médias Honeycomb dépend des conditions locales de l air et de l eau Dans les régions où la teneur en minéraux de l eau ...

Page 60: ...tableau de bord ou la télécommande Peu ou pas d eau dans le réservoir en fonction COOL Remplissez le réservoir d eau Emission d odeur Appareil neuf Quand l appareil est utilisé pour la première fois le panneau refroidissant à nid d abeille peut dégager une odeur qui se dissipera au bout d une semaine d utilisation Appareil usagé Il pourrait s agir d un problème d algues Remplacer les panneaux refr...

Page 61: ...magée 57 Problème Cause possible Solution Essayer d allumer avec la télécommande Si l appareil répond les fixations de la puce ne sont peut être pas bien fixées Contacter le centre de dépannage Si ni la télécommande ni le panneau de contrôle fonctionne la puce peut être endommagée Contacter le centre de maintenance GUIDE DE DÉPANNAGE Soutien au client 1 800 474 2147 ...

Page 62: ...reil Poids Net SCHEMA DU CIRCUIT ELECTRIQUE CARACTERISTIQUES TECHNIQUES CS10XE 120V 60Hz Ampère 0 85A 102 Watts 10 Litres Honeycomb 400 L x 344 W x 800 H mm 8 4 Kg 120V AC 60Hz 58 FICHE NOIR BLANC BLANC JAUNE BLEU FROID Condensateur OSCILLATION FROID Interrupteur à flotteur du capteur Réservoir d eau Puissance avec coupure ...

Page 63: ...ICULIER DE CE PRODUIT EST LIMITÉE DANS LE TEMPS À LA DURÉE DE CETTE GARANTIE Certaines juridictions n autorisent pas l exclusion ou la limitation des dommages fortuits ou consécutifs ou de limitation sur la durée d une garantie appliquée de sorte que les limitations ou exclusions susmentionnées peuvent ne pas s appliquer à vous Cette garantie vous donne des droits légaux spécifiques vous pouvez ég...

Page 64: ...notre Service à la clientèle ASSISTANCE AU CLIENT JMA North America LLC Mahwah New Jersey 07495 USA Phone 1 800 474 2147 Email info jmana us Web www honeywellaircoolers com Lorsque vous communiquez avec notre Service à la clientèle veuillez avoir les informations ci dessous avec la preuve d achat Toutes les demandes de garantie doivent être accompag nées d une preuve d achat soit une copie de la f...

Page 65: ...e from Honeywell International Inc Honeywell International Inc makes no representations or warranties with respect to this product This product is manufactured by Airtek Int l Corp Ltd JMA North America LLC Mahwah New Jersey 07495 USA Phone 1 800 474 2147 Email info jmana us Web www honeywellaircoolers com ...

Reviews: