Chapter 9. TROUBLESHOOTING
9-11
■
Replacement procedure
• Replace with the lithium battery set (model No.: 81446431-001). The lithium
battery set can be ordered from Yamatake Corporation.
• When removing or mounting the RAM board or battery connectors, do not use
metallic tools. Doing so might short-circuit electrical circuits.
• While the battery is removed for battery replacement, the capacitor on the RAM
board backs up the contents of memory.
As this capacitor is charged, make sure that the controller is left ON for at least
1h before replacing the battery. Insert the new battery on the RAM board within
24h of turning the controller OFF.
When the BAT LED starts blinking, follow the procedure below to replace the battery.
(1) Leave the controller turned ON for at least 1h.
(2) Turn the power OFF.
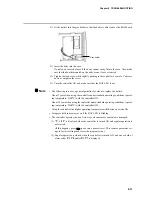
(3) Remove the key cover from the console, and fully loosen the lock screw under
ENT
with
a Phillips screwdriver.
>> The body comes out towards you.
Battery
(4) Before handling components inside the controller, touch a grounded metal part to
remove any static electricity from the body.
(5) Pull the body out towards you to remove from the case.
>> You should be able to see the button-shaped battery on the left facing the body.
Comes out towards you.
Key cover
Lock screw
Handling Precautions

