F118 IN-CEILING MEDIA AIR CLEANER
68-0209-2 Revised 11-07
4
INSTALLATION
WARNING
Explosion Hazard.
Can cause personal injury or equipment damage.
Do not install or use the F118 Air Cleaner where there
is any danger of a gas, vapor or dust explosion.
Do not install when explosion-proof electrical fixtures
are specified.
WARNING
Fire or Electric Shock Hazard.
Can cause personal injury or equipment damage.
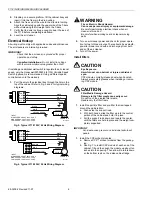
Turn off power source before installing or servicing air
cleaner.
Do not use air cleaner in the ceilings of fire-resistant
assemblies.
When Installing This Product . . .
1.
Read these instructions carefully. Failure to follow them
could damage the product or cause a hazardous condi-
tion.
2.
Check the ratings given in the instructions and on the
product to make sure the product is suitable for your
application.
3.
Installer must be a trained, experienced service techni-
cian.
4.
After installation is complete, check out product opera-
tion as provided in these instructions.
Unpack Air Cleaner
WARNING
Sharp Edges.
Can cause personal injury.
Wear protective gloves and handle air cleaner care-
fully to avoid cuts from sharp metal edges.
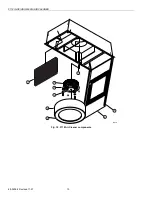
The air cleaner is shipped assembled in a packing container.
When unpacking, check that all air cleaner components are
included.
1.
Container:
•
Installation Instructions (1).
•
Support shoulders (8).
2.
Assembled cabinet; consists of a cabinet frame and
grille/door assembly:
•
Blower/motor assembly (1).
•
CPZ™ media module (2).
•
Particulate filter (1).
•
Pre-filter attachment clip (2).
•
Pre-filter (1).
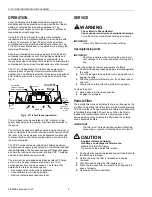
Use the following procedure to remove the grille and all
contents of the cabinet, including the CPZ modules and filters.
1.
Remove the grille:
a. Remove the bolts from the hinge that hold the grille
to the cabinet.
b. Remove the bolts and the spring-loaded plungers at
the other end of the cabinet.
c. Set aside the grille.
2.
Remove the filters:
a. Pre-filter is wrapped around the particulate filter.
Two support rods in the center bay of the cabinet
hold the particulate filter and the pre-filter in place.
Push these rods apart and lift the filters out of the
cabinet.
b. Two CPZ sorbent modules wrapped in plastic are
located at either end of the cabinet. Tilt each module
to lift it from the cabinet. Set aside both modules.
3.
Remove the cabinet from the container.
4.
Remove all shipping cardboard and containers inside
and outside of the air cleaner components.
5.
Inspect the packing material to ensure that no parts or
papers are lost.
The installer must supply the following additional items
required for the installation:
1.
Any external hardware such as extra nuts and bolts.
2.
Wire, with a gauge strong enough to bear the weight of
the air cleaner and long enough to reach from the con-
necting points in the structural ceiling to the support
shoulders on the air cleaner.
3.
Leveling tool or method.
Make Opening (If Mounting in Drop Ceiling)
IMPORTANT
Be sure to choose an accessible position for the air
cleaner. Check that the area directly below the posi-
tion of the air cleaner is open and free and clear of
obstructions.
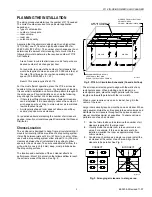
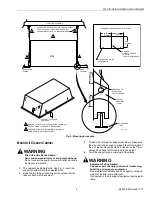
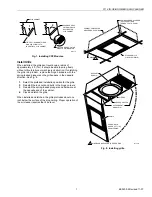
See Fig. 4 and use these instructions to mount the F118 as
part of a drop ceiling:
1.
Remove the tile(s) from the drop ceiling to open a space
of approximately 24 x 48 in. (610 x 1220 mm). The area
between the drop ceiling and the structural ceiling must
be at least 12 in. (345 mm) and clear of ducts, pipes,
and other obstacles.
2.
Size and frame the opening to fit the air cleaner cabinet
as closely as possible. The cabinet must fit snugly in the
opening; allow no more than 1/4 in. (6 mm) from the
opening to each side of the cabinet.
3.
Cover the framing and any unused portion of the open-
ing with wallboard, plywood, or other material. Finish to
match the ceiling.

