56
ES-200X Series Manual —
P/N LS10131-000FL-E:C 7/25/2018
Programming
Master Programming Level
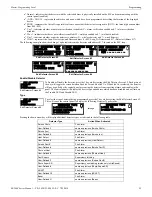
While viewing either Detector Type screen, select the type of detector being programmed by pressing the corresponding keyboard num-
ber key. The display will return to Edit Detector Screen #2 and indicate the selection next to the Type option.
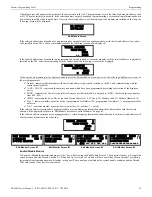
If the selected detector is a multi-criteria Fire/CO detector, select
1
for
Fire CO
on the last screen and the following will display:
In this screen, select the action performed by the detector when it is activated. Press
1
to change the response for the
Photo
element of the
detector,
2
for the
Heat
element, and
3
for the
CO
element. The detector response will toggle between
Alarm
(sends an Alarm signal to
the FACP),
Supervisory
(sends a Supervisory signal to the FACP, and
None
(no signal sent to the FACP).
Verification
Alarm verification is used to confirm that a smoke detector activation is a true alarm condition and not a
false alarm. This feature is selected by pressing
3
while viewing the Edit Detector Screen #2 so that the dis-
play reads
Verification On
. Each time the
3
key is pressed, the display will toggle between
Verification On
and
Verification Off
. For a detailed description, refer to “Alarm Verification (None or One Minute)” on
Walktest
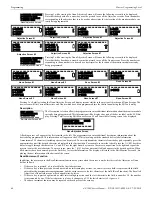
The Walktest feature allows one person to test the system devices without the necessity of manually reset-
ting the control panel after each device activation. To enable a device for the Walktest feature, press
1
while
viewing the Edit Detector Screen #3 until the display reads
Walktest Yes
. Each press of the
1
key will cause
the display to toggle between
Walktest Yes
and
Walktest No
. Refer to “Walktest” on page 114.
PAS
The PAS (Positive Alarm Sequence) option will program an automatic, addressable detector to delay panel activation (including alarm
relay and communicator) for a period of 15 seconds plus a programmable time of up to 3 minutes. Zone 97, however, will activate imme-
diately and may be used to connect a signaling device to indicate PAS activation
(do not use a Notification Appliance Circuit for this
purpose)
. To enable the PAS feature, press
2
while viewing the Edit Detector Screen #3 until the display reads
PAS Yes
. Each press of the
2
key will cause the display to toggle between
PAS Yes
and
PAS No
. Refer to “Positive Alarm Sequence” on page 112.
For example, if a detector with address 005 is to be configured for PAS operation:
Select
PAS Yes
when editing the detector set to address 005
Program the desired zone or zones to be activated by this detector, in this example Z001
Program an output, such as a control module that is to be activated by detector 005 by assigning the same zone to it; in this
example Z001
Program an output, such as a control module, for PAS activation by assigning zone Z97 to it. This control module may be
connected to a signaling device used to indicate a PAS condition
(do not use a Notification Appliance Circuit for this purpose)
Enable zones Z001 and Special Purpose Zone PAS 97 and set the PAS delay timer to some value
With the preceding program settings, when the detector with address 005 is activated, zone Z97 will cause its associated control module
to activate immediately, sounding the connected PAS signaling device. Following the PAS delay time, zone Z001 will cause its associ-
ated control module to activate and the control panel will initiate an alarm condition.
Note that a detector can be enabled for either PAS or Pre-signal but not both.
Pre-signal
The Pre-signal option programs the detector to delay panel activation for a preprogrammed time delay of up
to three minutes while allowing for visual verification by a person. Note that the alarm relay and communi-
cator will respond to the initial alarm immediately. In addition, Zone 98 will activate. This zone can be pro-
grammed to a control module which may be used to activate a sounder or indicator which the installer
designates as a Presignal indication
(do not use a Notification Appliance Circuit for this purpose)
. To enable
the Pre-signal feature, press
3
while viewing Edit Detector Screen #3 until the display reads
Pre-signal Yes
. Each press of the
3
key will
cause the display to toggle between
Pre-signal Yes
and
Pre-signal No
. Refer to “Presignal” on page 112.
For example, if a detector with address 005 is to be configured for Pre-Signal operation:
Select
Pre-signal Yes
when editing the detector set to address 005
Program the desired zone or zones to be activated by this detector, in this example Z001
Program an output, such as a control module that is to be activated by detector 005 by assigning the same zone to it; in this
example Z001
Program an output, such as a control module, for Pre-signal activation by assigning zone Z98 to it. This control module may be
connected to a signaling device used to indicate a Pre-signal condition
(do not use a Notification Appliance Circuit for this
purpose)
Fire/CO
response is programmable (Alarm, Supv, or None)
User-Defined-12
same as previous (Fire/CO)
NOTE:
If a detector is selected to be a DUCT SUPERV type, it will function like a supervisory point not a fire alarm point. The supervisory
LED and supervisory relay will activate, not the fire alarm LED or alarm relay, if the detector senses smoke.
DETECTOR RESPONSE
1=CO ALARM
2=HEAT ALARM
3=PHOTO ALARM
EDIT DETECTOR
1=ENABLED
2=TYPE
3=VERIFICATION
Edit Detector Screen #2
EDIT DETECTOR
1=WALKTEST
2=PAS
3=PRE-SIGNAL
Edit Detector Screen #3
EDIT DETECTOR
1=WALKTEST
2=PAS
3=PRE-SIGNAL
Edit Detector Screen #3


