background image

GW-1000-WE / GW-1000-NWE GATEWAY

5

31-00425 | Rev.10-20

Part Number: 32348979-001

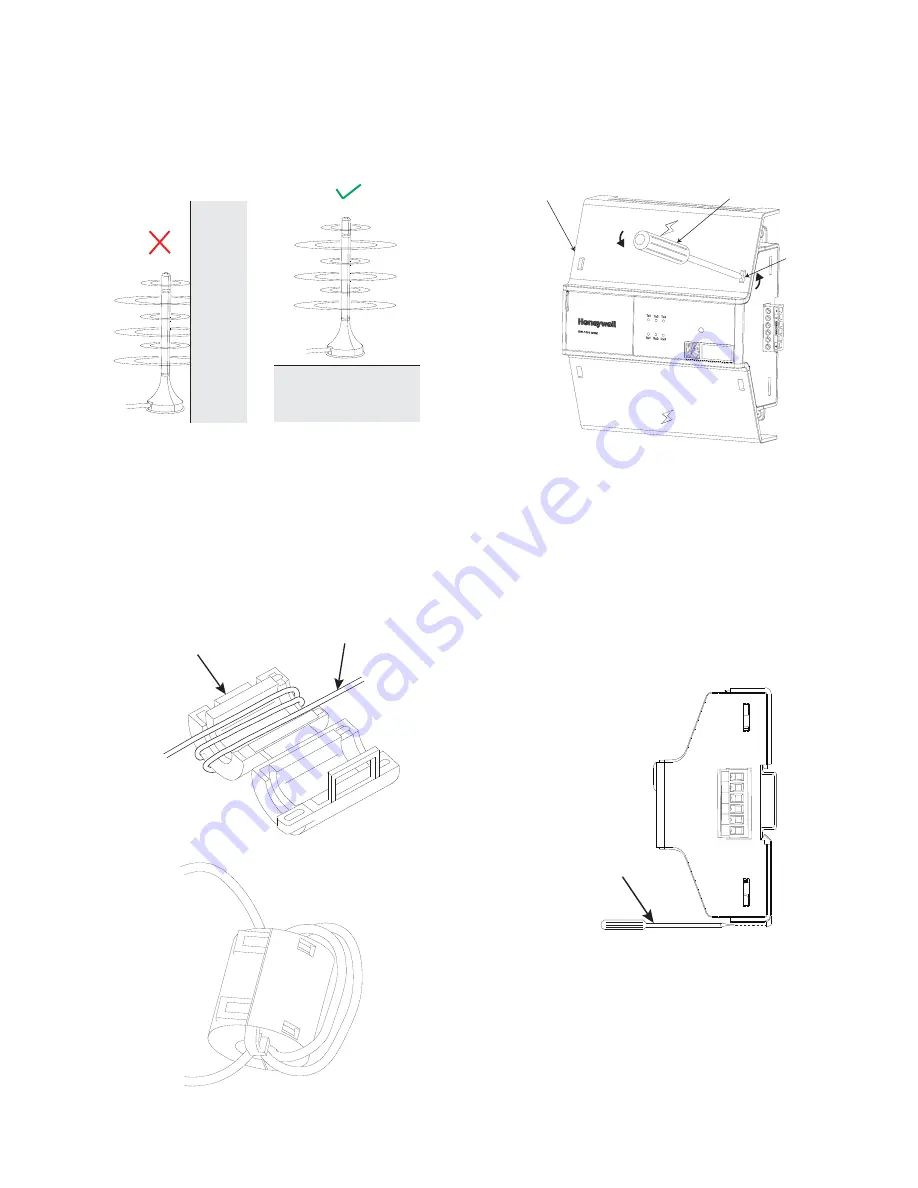
• Keep the antenna away from devices that cause wireless 

interference such as other Wi-Fi network and 

telecommunications equipment.

• Make sure that the antenna is installed perpendicular to 

the surface for a good Wi-Fi signal.

• Do not install the antenna close to the floor.

• The Local antenna can be used when the Gateway is 

installed in a plastic cabinet/enclosure.

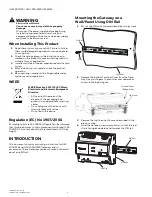
Installing Ferrite Ring

Ferrite ring is supplied with the kit. It must be installed on 

the antenna wire somewhere between 10 to 30 cm from the 

Gateway.

1.

Lift the two locking tabs to open the ferrite ring.

2.

Wind the wire three times as shown in the below fig

-

ure.

3.

Lock the Ferrite ring.

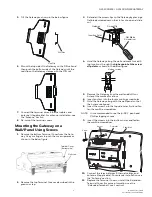
Removing the Extended Terminal 

Covers

1.

Insert a flat blade screwdriver into the rectangular 

slot as shown in the below figure.

2.

Use the flat blade screwdriver as a leaver, pull out the 

top Extended Terminal Cover.

3.

Repeat the steps above to remove the bottom 

Extended Terminal Cover.

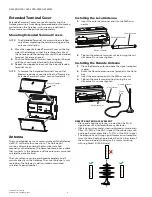
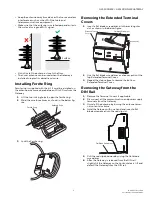
Removing the Gateway from the 

DIN Rail

1.

Remove the Terminal Covers if applicable. 

2.

Disconnect all the communication and power supply 

terminals from the Gateway. 

3.

Uninstall the antenna by turning the antenna termi

-

nal nut anticlockwise.

4.

Hold the Gateway with one hand and insert a flat 

blade screwdriver into the red clip slot.

5.

Pull the red clip downward by using the flat blade 

screwdriver.

6.

After the Gateway is released from the DIN rail, 

slightly tilt the Gateway on the horizontal axis, lift and 

detach the Gateway from the DIN rail.

Sur

fac

e

Surface

Ferrite Ring

Antenna Wire

Insertion slot

Extended Terminal 
Cover

Flat Blade Screwdriver

-

FGND

0

~

GND

-

+

Flat Blade Screwdriver

Summary of Contents for GW-1000-WE

Page 1: ...en Elektrisk anslutning med 230 VAC får endast utföras av behörig personal DK Opbevar denne vejledning sammen med regler eller med anlægsdokumentationen Elektrisk tilslutning for 230 VAC bør kun foretages af autoriserede personer N Denne veiledningen skal oppbevares sammen med regler eller anleggsdokumentasjonen Elektrisk tilkopling med 230 VAC må kun utføres av fagfolk FI Tätä ohjetta tulee säily...

Page 2: ...this product may contain components with lead CAS 7439 92 1 content above the threshold level of 0 1 by weight INTRODUCTION This document contains mounting instructions for GW 1000 WE and GW 1000 NWE Gateways and its accessories These Gateways can be mounted on the wall panel and DIN rail Mounting the Gateway on a Wall Panel Using DIN Rail 1 Mount the DIN rail on the wall panel by using screws 2 R...

Page 3: ...mark four drill ing locations through the higher point of the screw clip slots as shown in the below figure 5 Remove the Gateway from the wall and drill four holes at the marked locations 6 Insert anchors into the four mounting screw holes 7 Hold the Gateway along with the wall panel so that the holes are aligned 8 Insert the screws into the topside holes first and fas ten them with a screwdriver ...

Page 4: ...the Gateway and the antenna is mounted outside the panel cabinet The Local antenna can be purchased separately and it mounts directly on the Gateway The Local Antenna is only used when the Gateway is wall mounted or mounted outside of a panel cabinet Installing the Local Antenna 1 Insert the antenna terminal end into the SMA con nector 2 Tighten the antenna terminal nut by turning the nut clockwis...

Page 5: ...ded Terminal Covers 1 Insert a flat blade screwdriver into the rectangular slot as shown in the below figure 2 Use the flat blade screwdriver as a leaver pull out the top Extended Terminal Cover 3 Repeat the steps above to remove the bottom Extended Terminal Cover Removing the Gateway from the DIN Rail 1 Remove the Terminal Covers if applicable 2 Disconnect all the communication and power supply t...

Page 6: ... the Extended Terminal Covers if applicable see the Removing the Extended Terminal Cover section 2 Disconnect all the communication and power supply terminals from the Gateway 3 Disconnect the antenna by turning the antenna terminal nut anticlockwise 4 Unscrew the bottom side screws first by using a screwdriver 5 Hold the Gateway with one hand and unscrew the top side screws by using a screwdriver...

Reviews: