


7.5.1 Programming
Privacy
Zones, 18x Color and True/Day Night, 23x Color, and 25x
True/Day Night Cameras, Continued
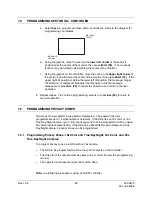
b. Using the joystick move the scan so the upper right corner of the privacy zone is
positioned at the upper right corner of the monitor, then press Enter. If the
upper right tilt position is below the lower left tilt position, the message “Illegal
Tilt Direction” is displayed. Readjust the tilt position until the message
disappears or press
Esc (F6)
to cancel the operation and return to manual
operation.
10. The privacy zone is programmed for all points between the selected coordinates.
When the camera is viewing any area within these coordinates, the video is blanked.
11. Program another privacy zone or press
Esc (F6)
to exit programming.
7.5.2 Programming
Privacy
Zones, 23x Wide Dynamic Range/True Day/Night Camera
To program privacy zones in a HD6 with a 23x Wide Dynamic Range and True Day/Night
camera:
•
The HD6 to be programmed must be the control camera on the controller.
•
The video from the camera must be viewed on a monitor (to view the programming
menus).
•
The operator must have manual control of the Scan.
Note:
the following procedure is using an HJZTP controller.
1. Press
and
hold lock
and press
F6
(menu). The LCD displays the menu selections
available. Setup will be flashing to indicate that Setup is the currently selected
option.
2. Move the joystick left or right, press F3 (
W
) or F4 (
X
), or camera (left) or preset
(right) keys until
SECT
is flashing, and then press the
aux
key.
Factory set
password
3. Move the joystick left or right until
PRG
is flashing and press the
aux
key.
4. Press
camera
or
preset
until the character
P
is flashing on the LCD and press the
aux
key.
5. Enter
the
password
. (The factory set password is blank. Press
Enter (F5)
to submit
a blank password.)
a.
Press
the
camera
and
preset
keys to scroll through all available characters.
When the
desired character is flashing
on the LCD, press the
aux
key.
b. Continue step a. until the password is sent to the HD6.
c.
Press
Enter (F5).
6. Enter
a
Privacy zone number
(0-9) and press
Enter
(F5)
.
Rev. 1.02
91
900.0679
22-June-2006
Summary of Contents for HD6 Series
Page 1: ...HD6 Series PTZ Camera in a Dome User Manual 900 0679 June 2006 Rev 1 02 ...
Page 4: ...Rev 1 02 iv 900 0679 22 June 2006 ...
Page 18: ...Rev 1 02 4 900 0679 22 June 2006 Notes ...
Page 32: ...Rev 1 02 18 900 0679 22 June 2006 Notes ...
Page 38: ...Rev 1 02 24 900 0679 22 June 2006 Notes ...
Page 96: ...Rev 1 02 82 900 0679 22 June 2006 Notes ...
Page 122: ...Rev 1 02 108 900 0679 22 June 2006 Notes ...
Page 130: ...Rev 1 02 116 900 0679 22 June 2006 Notes ...
Page 134: ...Rev 1 02 120 900 0679 22 June 2006 Notes ...
Page 143: ...14 9 HD6 SCAN CONTINUED Rev 1 02 129 900 0679 22 June 2006 ...
Page 148: ...Rev 1 02 134 900 0679 22 June 2006 Notes ...
Page 149: ...Rev 1 02 135 900 0679 22 June 2006 Notes ...
Page 150: ...Rev 1 02 136 900 0679 22 June 2006 Notes ...


