background image

518750-2960 25 HEMU001007 
Rev. F 


10/15/04 


3.5  CONFIG MODE, CONTINUED 

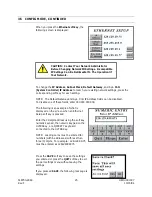
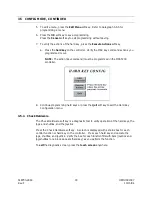
When you press the Ethernet soft key, the 
following screen is displayed: 


CAUTION:  Contact Your Network Administrator 
Before Changing Network ID Settings.  Incompatible 
IP Settings Can Be Detrimental To The Operation Of 
Your Network.


To change the IP AddressSubnet MaskDefault Gateway, and Sys. Cntl.  
(System Controller) IP Address
 to match your existing network settings, press the 
corresponding soft key for each setting.   

NOTE:   The Default Gateway and Sys. Cntl. IP Address fields can be disabled.  
To disable one of these fields, enter 000.000.000.000. 

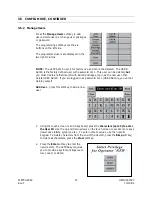
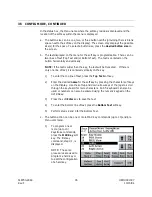
The following is an example of what is 
displayed on the screen when an Ethernet 
Setup soft key is pressed. 

Enter the 12-digit address using the soft key 
numeric keypad, the numeric keypad on the 
ULTRAKey, or a QWERTY keyboard 

connected to the ULTRAKey. 

NOTE:  Leading zeros must be entered for 
numbers (within addresses) with less than 
three (3) digits.  For example:  128.129.39.75 
must be entered as 128129039075   


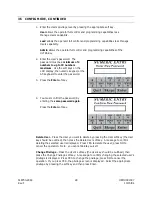
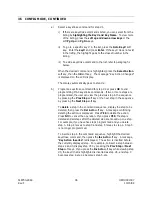
Press the SAVE soft key to save the settings 
you entered or press the QUIT soft key to exit 
the port settings menu without saving the 
settings.  

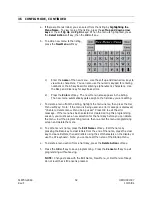
If you pressed SAVE, the following message is 
displayed. 

Summary of Contents for HEGSA002

Page 1: ...518750 2960 October 2004 Rev F HEMU001007 HEGSA002 ULTRAKey Controller User Manual User Manual User Manual User Manual ...

Page 2: ...dded Ethernet port setup added LCD B L intensity adjustment menu corrected screen display for configuring a soft key added Icons for the button names added selecting a camera selecting a monitor programming a view and recalling a view added alphanumeric entry capability for MX14 or MXSYS04 subrack with an MX128E controller card added Appendix A Rev D February 2002 Added Var Freq Buzzer Configurati...

Page 3: ...tion of this equipment in a residential area is likely to cause harmful interference in which case the user will be required to correct the interference at his own expense CAUTION Changes or modifications not expressly approved by the party responsible for compliance could void the user s authority to operate the equipment This Class A digital apparatus complies with Canadian ICES 003 Cet appareil...

Page 4: ... with the following standards EMC directive 89 336 EEC EN 61000 6 4 2001 Emissions standard and EN50130 4 1995 A1 1998 Immunity standard EN 55022 Radiated Class A EN 55022 Conducted Class A EN 610000 4 2 ESD EN 61000 4 3 RF fields EN 61000 4 4 EFT burst EN 61000 4 5 Surge EN 61000 4 6 RF conducted EN 610004 11 Dips interruptions variations Safety directive 73 23 EEC EN 60065 1998 Safety requiremen...

Page 5: ...kit approved by the manufacturer 9 A product and cart combination should be moved with care Quick stops excessive force and uneven surfaces may cause the product and cart combination to overturn 10 VENTILATION Slots and openings in the cabinet and the back or bottom are provided for ventilation and to ensure reliable operation of the equipment and to protect it from overheating These openings must...

Page 6: ...re covered by the operating instructions as an improper adjustment of other controls may result in damage and will often require extensive work by a qualified technician to restore the unit to its normal operation e If the unit has been dropped or the enclosure has been damaged f When the unit exhibits a distinct change in performance this indicates a need for service 18 REPLACEMENT PARTS When rep...

Page 7: ...518750 2960 vii HEMU001007 Rev F 10 15 04 IMPORTANT SAFEGUARDS CONTINUED 23 WALL OR CEILING MOUNTING The product should be mounted to a wall or ceiling only as recommended by the manufacturer ...

Page 8: ...ion in the literature accompanying the product CAUTION CAUTION TO REDUCE THE RISK OF ELECTRIC SHOCK DO NOT REMOVE COVER OR BACK NO USER SERVICEABLE PARTS INSIDE REFER SERVICING TO QUALIFIED SERVICE PERSONNEL C A U T I O N RISK OF ELECTRIC SHOCK DO NOT OPEN WARNING WARNING TO REDUCE THE RISK OF FIRE OR ELECTRIC SHOCK DO NOT EXPOSE THIS PRODUCT TO RAIN OR MOISTURE WARNING DO NOT INSERT ANY METALLIC ...

Page 9: ...ey identifier to be sent to the MAX 1000 MXAT200X controller Range 1 to 999 Start up menu The home menu on the ULTRAKey LCD touch screen Keyboard address The identifying address assigned to an ULTRAKey keyboard Range 1 99 PreShot View Preset A PreShot View Preset is a camera lens position including pan tilt zoom and focus that can be given a title and stored in a smart pan and tilt unit Up to 100 ...

Page 10: ...518750 2960 x HEMU001007 Rev F 10 15 04 NOTES ...

Page 11: ...View 20 3 4 6 Sending a Camera to a View PreShot 20 3 5 CONFIG MODE 21 3 5 1 Hardware Configuration 22 3 5 2 Manage Users 27 3 5 3 Config Hard Keys 29 3 5 4 Check Hardware 33 3 5 5 Config User Menus 34 3 5 6 Select Language 39 3 5 7 Load Defaults 39 3 5 8 Download Firmware 40 3 5 9 Uploading Downloading Data Files and Custom Settings 44 3 5 9 1 Upload Data Send File from ULTRAKey 47 3 5 9 2 Downlo...

Page 12: ...View 1 Figure 2 Rear View 3 Figure 3 Interface Box for Extending Distance Between ULTRAKey and MAX 1000 MXAT200 4 Figure 4 Interface Box for Connecting to MXAT200 with DB 15 Connector 4 LIST OF TABLES Table 1 Index For MAX 1000 Key Codes 10 Table 2 Default MAX 1000 Key Code Commands 11 Table 3 ULTRAKey Hard Key Functions 13 Table 4 COM Port Available Settings 24 Table 5 COM Port Default Settings 2...

Page 13: ...518750 2960 xiii HEMU001007 Rev F 10 15 04 PURCHASE INFORMATION Date Purchased Serial Number Location Installed ...

Page 14: ...518750 2960 xiv HEMU001007 Rev F 10 15 04 NOTES ...

Page 15: ... FEATURES Figure 1 Front View The ULTRAKey uses a 1 4 VGA LCD display that provides soft touch descriptive keys Soft keys are displayed in menus on the LCD screen The menus are accessible either from other soft keys or by pressing a hard key mechanical key on the keyboard Status messages from the MAX 1000 controller are displayed in a message box at the top of the LCD display A joystick is provide...

Page 16: ...sending keystroke commands to the MXAT200 controller or selecting menus on the LCD display The function keys can be programmed using the touch screen Numeric Keypad the numeric keypad is used to enter numbers in programming screens and entering camera numbers monitor numbers and other device numbers ...

Page 17: ...RAKey connects to the MAX 1000 MXAT200 controller to exchange commands and data The RS232 port on the back of the ULTRAKey is aligned with the center of the VCR pause and record keys A 6 foot 2 meter coiled cable for connection between the ULTRAKey and the MXAT200 is provided Plug one end of the coiled cable into COM2 and the other end into any of the ports on the MXAT200 configured for an RD530 k...

Page 18: ...lug one end of the coiled cable into COM2 RS232 on the ULTRAKey and the other end into one of the RJ 11 jacks on the interface box A flipped cable with bare leads on one end and a DB 15 connector on the other end is required Connect the DB 15 connector to the MAX 1000 RDAT200 controller and the bare leads to the terminals on the interface box Refer to the following table for the terminal pin outs ...

Page 19: ...S 232 Port connects to a PC serial port for downloading and uploading the ULTRAKey firmware and databases The cable part number 849518 0401 for connection between the ULTRAKey and a PC is provided Refer to paragraphs 3 5 8 and 3 5 9 Ethernet This RJ45 jack is for connection to a network ...

Page 20: ...518750 2960 6 HEMU001007 Rev F 10 15 04 NOTES ...

Page 21: ...r the RD530 keyboard The ULTRAKey sends key press and release information to the MAX 1000 controller To use the capabilities of the ULTRAKey the SETMAX program must be version 4 30B or higher which recognizes up to 999 key commands The keyboard must then be programmed to send command strings containing one or more key numbers when the soft key or hard key is pressed The ULTRAKey also contains jog ...

Page 22: ...nnected to a MX14 controller or a MXSYS04 subrack with MX128E controller card and communication is lost between the two devices The left or right side of the status box can be pressed to cause the MAX1000 controller to send different lines of status display The status messages are programmable in the SETMAX program For complete operator information on how to select and control devices refer to the...

Page 23: ...soft keys in the startup menus Soft Key User macro Soft Key Menu The Menu soft key displays four menus for setting up peripheral equipment The menus for the MAX 1000 Setup and Dome Setup are shown below The soft keys in the default menus send MAX1000 key code commands or call up another menu depending on how they are programmed Refer to Table 1 for a listing of the key code commands ...

Page 24: ...Soft Key MAX 1000 Setup Soft Key Dome Setup Tables 1 and 2 show the default MAX 1000 key code commands Table 1 is a general index Table 2 is a listing of the defined key code commands Table 1 Index For MAX 1000 Key Codes 1 199 MAX 200 299 ASSIGNABLE 300 999 RESERVED ...

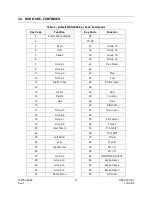
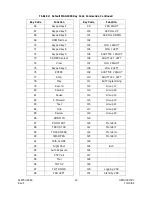
Page 25: ...Group 3 43 Mux 10 Group 4 44 Full 11 Alarm Clear 45 Multi screen 12 46 13 Insert 47 VCR 14 Delete 48 Function 15 Set 49 Undo 16 50 Alternate 17 Group 5 51 Door open 18 Group 6 52 19 Group 7 53 Print select 20 Group 8 54 Freeze 21 User Macro 55 Print color 22 56 Print B W 23 Left Arrow 57 Mon A 24 Lock 58 Mon B 25 Right Arrow 59 Mon C 26 60 Mon D 27 Group 9 61 MONITOR SELECT 28 Group 10 62 Keypad k...

Page 26: ...View 107 JOG 2 RIGHT 75 Keypad key 0 108 JOG 2 LEFT 76 ENTER 109 SHUTTLE 2 RIGHT 77 Stop 110 SHUTTLE 2 LEFT 78 Play 111 Exit Programming 79 Record 112 Group 17 80 Rewind 113 Group 18 81 Pause 114 Group 19 82 F Forward 115 Group 20 83 Text 116 Group 21 84 Dub 117 Group 22 85 Review 118 Group 23 86 ZOOM IN 119 87 ZOOM OUT 120 Monitor E 88 FOCUS FAR 121 Monitor F 89 FOCUS NEAR 122 Monitor G 90 IRIS O...

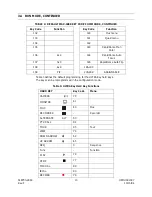
Page 27: ...us 137 3x3 145 RapidDome Auto Flip 138 4x4 146 199 139 PIP 200 299 ASSIGNABLE Table 3 defines the default programming for the ULTRAKey hard keys The keys can be reprogrammed in the configuration mode Table 3 ULTRAKey Hard Key Functions HARD KEY Key Code Menu CAMERA 73 MONITOR 61 MUX 43 Mux RECORDER Recorder ALTERNATE ALT 50 PTZ CALL 94 TOUR 95 Tour VIEW 74 DOWN ARROW 69 UP ARROW 65 SEQ 3 Sequence ...

Page 28: ...NUED TABLE 3 ULTRAKEY HARD KEY FUNCTIONS CONTINUED HARD KEY Key Code Menu PAUSE 81 REVIEW 85 Review FOCUS 88 IRIS 91 PRINT 53 Print DUB 84 Dub ALARM ACK 1 Alarm RIGHT ARROW 25 SET 15 LEFT ARROW 23 ENTER 76 1 62 2 63 3 64 4 66 5 67 6 68 7 70 8 71 9 72 0 75 CLEAR ...

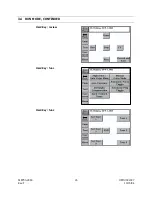
Page 29: ...Rev F 10 15 04 3 4 RUN MODE CONTINUED The following default menus are programmed for the ULTRAKey hard keys The menus for the hard keys can be reprogrammed in the configuration mode Hard Key alarm ack Hard key dub Hard key print ...

Page 30: ...518750 2960 16 HEMU001007 Rev F 10 15 04 3 4 RUN MODE CONTINUED Hard Key review Hard Key func Hard Key func ...

Page 31: ... the camera number must be entered on the numeric keypad If the maximum camera number used in the system for example is Camera 20 the CCTV system would always expect a 2 digit camera number to be entered when selecting any camera To select camera 19 the operator must enter 19 as a 1 followed by a 9 If the operator wishes to select camera 1 the operator can enter the camera number two ways 1 Enter ...

Page 32: ...ed to execute key code 61 Monitor Select 3 4 3 Selecting a Camera NOTE A monitor must be selected first Press the Camera key followed by the desired camera number then Enter if required 1 5 Enter OR 0 1 5 NOTE This example assumes the camera icon button is programmed to execute the default key code 73 Camera Select To scroll through the available cameras press the key to select the next camera Pre...

Page 33: ... tilt down function NOTE The tilt up and down functions may be reversed depending on your system s configuration If the PTZ camera is equipped with manual iris and or a zoom lens the following PTZ functions apply IRIS Press and hold the iris button to open the lens iris until the desired iris setting is achieved then release the button IRIS Press and hold the iris button to close the lens iris unt...

Page 34: ...ra with VIEW preset capability Using the camera PTZ functions move to the desired position of the new view Perform the following procedure to save the desired position Press VIEW then SET Press the view number 00 99 NOTE Usually only the first ten 00 09 views are available to the keyboard operator 3 4 6 Sending a Camera to a View PreShot To send a camera to a view the following criteria must be me...

Page 35: ...iguration mode Press the Configure soft key to access the configuration menu To enter the configuration mode the user must first enter a valid password and press Enter The factory set password is 1111 After a valid password is entered the Configuration menu is displayed Press a soft key to access the menus for each configuration function or press QUIT to exit the Configuration menu ...

Page 36: ...ings 1 2 3 4 with 1 being the lowest intensity and 4 being the highest intensity Note this adjustment only applies to board 470502 1030 Rev A or later Calibrate TouchScrn press this soft key to calibrate the touchscreen Touch the screen using a small diameter soft blunt instrument such as a pencil eraser as stated in the message to calibrate the screen Press the QUIT soft key to exit the calibrati...

Page 37: ...ess menu without changing the address After entering a new keyboard address press the SAVE soft key in the Hardware Config menu A message Save to Flash is displayed Press YES to save the new keyboard address press NO to exit without saving the new address to flash memory Port Settings press this soft key to define the communication settings for COM1 COM2 COM3 or Ethernet Press the desired soft key...

Page 38: ...ty Even Odd None Even Odd None Baud Rate 9600 19200 38400 9600 19200 38400 Data Bits 5 6 7 8 8 Stop Bits 2 1 1 The settings required for the MAX 1000 ULTRAKey are even parity 19 200 baud rate 7 data bits and 1 stop bit Table 5 COM Port Default Settings Soft Key COM1 COM2 COM3 DB 9 RS 232 Port Type None RD530 Debug Parity NA Even None Baud Rate NA 19 2K 9600 Data Bits NA 7 8 Stop Bits NA 1 1 NA Not...

Page 39: ...way and Sys Cntl IP Address fields can be disabled To disable one of these fields enter 000 000 000 000 The following is an example of what is displayed on the screen when an Ethernet Setup soft key is pressed Enter the 12 digit address using the soft key numeric keypad the numeric keypad on the ULTRAKey or a QWERTY keyboard connected to the ULTRAKey NOTE Leading zeros must be entered for numbers ...

Page 40: ...s soft key to zero the joystick This function electronically centers the pan tilt and zoom positions of the joystick This function should be executed with the joystick in its neutral position This function is executed automatically on power up KeyClick HIGH press this soft key to change the sound the ULTRAKey makes when you press any soft key programmed hard key move the joystick or jog shuttles T...

Page 41: ...er ID with Admin privileges log in as the new user then delete USER Admin If you are logged in as password 1111 USER Admin you cannot delete yourself Add User press this soft key to add a new user 1 Using the touch screen or an AT keyboard press the characters up to 4 to enter the User ID Use the up and down arrows on the touch screen to access more keys lower case letters symbols etc To enter num...

Page 42: ...ord 3 Press the Enter soft key 4 You must confirm the password by entering the same password again Press the Enter soft key Delete User Press the User you want to delete by pressing the User soft key the User key should be outlined then press the Delete User soft key A message to confirm deleting the selected user is displayed Press YES to delete the user press NO to cancel the operation Note you ...

Page 43: ...oft key to exit the Manage Users menu CAUTION Save new entries and user changes prior to quitting 3 5 3 Config Hard Keys Press the Config Hard Keys soft key from the CONFIGURATION menu to program the response for the function hard keys 1 Press the Edit Properties soft key 2 Press the hard key you want to configure or change the current configuration For example if you pressed the VCR hard key the ...

Page 44: ...t step in the sequence by pressing the Next Step soft key If two or more steps are programmed the user can view the previous step in the sequence by pressing the Prev Step soft key or the next step in the sequence by pressing the Next Step soft key To delete a step in the command sequence display the step to be deleted then press the Del Actn soft key A message confirming deleting the action is di...

Page 45: ...ght the key and name then press the Del Key soft key Note if the key is being used an error message is displayed Unable to delete key code Key being used Press OK to exit the error message If the key code has been selected or created during this programming session you must save a new selection for the hard key before you can delete the key action Exit the programming menus then re enter the hard ...

Page 46: ...ing highlight the menu name then press the Del Menu soft key Note if the menu is being used an error message is displayed Unable to delete menu Menu being used Press OK to exit the error message If the menu has been selected or created during this programming session you must save a new selection for the hard key before you can delete the menu Exit the programming menus then re enter the menu prog...

Page 47: ...be programmed in the MXAT200 controller 8 Continue programming hard keys or press the Quit soft key to exit the Hard Key Configuration menu 3 5 4 Check Hardware The Check Hardware soft key is a diagnostic tool to verify operation of the hard keys the jogs and shuttles and the joystick Press the Check Hardware soft key A screen is displayed with a status box for each control function or hard key on...

Page 48: ...an edit an existing key by holding alt then pressing the soft key you wish to edit You can send the key command to the MAX 1000 controller associated with a soft key by holding the func key and then pressing the soft key The first row Home and Status Box and the first key Back in the second row are not programmable All other areas of the screen are programmable 1 To edit an existing soft key press...

Page 49: ...runcated If there is only one line of text it is centered vertically on the key 1 To enter the top line of text press the Top Text soft key 2 Enter the desired name for the soft key by pressing the character soft keys on the display Use the soft up and down arrow keys or the jogs to scroll through the keyboard for more characters An AT keyboard can also be used or numbers can also be entered using...

Page 50: ...the user can view the previous step in the sequence by pressing the Prev Step soft key or the next step in the sequence by pressing the Next Step soft key To delete a step in the command sequence display the step to be deleted then press the Del Actn soft key A message confirming deleting the action is displayed Press YES to delete the action Press NO to cancel the operation If you press YES the s...

Page 51: ...OK to exit the error message If the key code has been selected or created during this programming session you must save a new selection for the hard key before you can delete the key action Exit the programming menus then re enter the hard key programming screen and delete the key action e To change the name of a keystroke command press the Edit Name soft key enter a new name and press OK The new ...

Page 52: ... Bksp to delete letters from the end of the name or use the Clear key to delete all letters Note The Alphanumeric Entry and StartupMenu menus cannot be renamed or edited The new name appears in the listing e To delete a menu action from a soft key press the Delete Action soft key A message confirming the deletion is displayed Press YES to delete the menu action press NO to cancel the deletion f Pr...

Page 53: ...y functional configuration that is hard coded in the ULTRAKey firmware When you press the Load Defaults soft key the following message is displayed Press Done after reading the screen You will be asked if you want to load default menu and hard key configuration Press NO to exit restoring defaults Press YES to restore the default configuration If you select YES the system asks if you want to save t...

Page 54: ...and Table 2 Power down the ULTRAKey and power it back up NOTE If COM3 is already set to File Trans you do not need to power the unit down 2 Run the file transfer software on your PC The software is stored on the 3 1 2 floppy disk provided in the zip lock bag with the manual The file name for the transfer software is filexfer exe There are two files rom vxWorks bin and rom appl bin on the floppy fo...

Page 55: ...Port field to the port on the PC connected to the ULTRAKey Click on the down arrow beside the Port field to display the available settings b Set the Baud field to 38400 recommended This can be set to any of the available settings as long as COM3 on the ULTRAKey is set at the same rate c Set the Parity Data Bits and Stop Bits Again these settings must match the settings of COM3 on the ULTRAKey The ...

Page 56: ... Alt S on the PC keyboard Left click on Select Path a Select the Disk where the firmware files are located for example a if you are using the floppy or c if you copied the files to your hard drive The disk must be highlighted in the window b Select the Directory if applicable where the firmware files are located on the disk Note If you download from the floppy the files are stored in the root dire...

Page 57: ...r Is Removed Before Both Files Are Downloaded Download one file at a time Left click on the file to select it The file is selected when it is highlighted as shown below The file being downloaded is displayed in the Path field 9 Press the Upload Download soft key in the CONFIGURATION MENU on the ULTRAKey The SEND and RECEIVE Menu is displayed a Press the Receive Any File soft key The message You ha...

Page 58: ... Memory May Become Corrupted If Power Is Removed Too Soon After Downloading Firmware Note If the configuration file is corrupted and the ULTRAKey does not come back online refer to paragraph 4 2 1 for booting the ULTRAKey using the factory default configuration and erasing the configuration data 3 5 9 Uploading Downloading Data Files and Custom Settings The user custom settings and data files can ...

Page 59: ... provided with the unit The file name is filexfer exe NOTE The software can be run from the floppy disk or the files can be copied to your hard drive and run from the hard drive If you chose to copy the files to your hard drive the file filexfer exe can be copied to the disk and directory of your choice The filexfer ini file must be copied to your Windows directory Windows 95 98 or your Winnt dire...

Page 60: ...ULTRAKey a Set the Port field to the port on the PC where the ULTRAKey is connected Click on the down arrow beside the Port field to display the available settings b Set the Baud field to 38400 recommended This can be set to any of the available settings as long as COM3 on the ULTRAKey is set at the same rate c Set the Parity Data Bits and Stop Bits Again these settings must match the settings of ...

Page 61: ...paragraph 3 5 9 2 Left click on Settings then left click on Select Path a Select the Disk where you want to store the data files for example a if you are copying to a floppy or d if you are copying to your hard drive The disk must be highlighted in the window b Select the Directory if applicable where you want to store the files Note If you are copying to a floppy the files can be stored in the ro...

Page 62: ...irectory you chose If you chose All Data the software also creates individual files for the specific settings and data The following is a list of the files the software creates The All Data file or the individual files the software created can be downloaded to the ULTRAKey File Name Description alldata dat All Custom Settings and Data Files includes all the files below hkey dat Hard Key Actions MA...

Page 63: ...ctory you selected in step 2 above is displayed Select the file you want to download send to the ULTRAKey by highlighting it The location of the file and the file name is displayed in the Path field 4 Press the Receive Any File soft key on the ULTRAKey LCD display The message You have chosen to receive data is displayed NOTE You have approximately one 1 minute to begin downloading a file after pre...

Page 64: ...are number and revision level the Appl flash bank and the firmware number and revision level This screen is for information only and cannot be edited The following illustration is an example of the General Info display The RTOS Firmware and Application Firmware revision level and date on your display may be different Touch the screen anywhere to return to the CONFIGURATION menu ...

Page 65: ...o a soft key Select the Alphanumeric Entry menu from the available menu listing To activate the alphanumeric entry mode press the soft key on the LCD display that is assigned to the menu When this menu is activated the LCD screen displays the available alphanumeric characters Either jog on the ULTRAKey can be used to scroll through the available characters Press any alphanumeric soft key to send i...

Page 66: ...518750 2960 52 HEMU001007 Rev F 10 15 04 NOTES ...

Page 67: ...this manual Because this unit is just one part of an overall system it may be necessary to verify that the other equipment types have been installed and are operating correctly before assuming the problem exists at the ULTRAKey If problems still exist after verifying correct installation and the problem has been isolated to the controller then it must be removed for servicing THERE ARE NO USER SER...

Page 68: ...urned to Honeywell for warranty or service repair must have an Authorization to Return Material RMA number prior to its return for repair The RMA must appear on all shipping containers and enclosed paperwork Contact Honeywell Video Systems Service Department 12220 Rojas Suite A El Paso TX 79936 1 915 858 4595 ...

Page 69: ... 331 Sequence Start 0 31 340 371 Sequence Stop 0 31 400 499 Preshot Recall 0 99 500 599 Macro Invoke 0 99 600 649 VCR command strings 650 682 VCR Select strings 800 927 ASCII codes of keys in alpha mode of ULTRAKey The following table defines the alphanumeric entry mode key codes ULTRAKey Alphanumeric Entry Mode Key Codes ULTRAKey Alphanumeric Entry Mode Key Codes Key code Character Key code Chara...

Page 70: ...de Key Codes Key code Character Key code Character 832 SPACE 865 A 833 866 B 834 867 C 835 868 D 836 869 E 837 870 F 838 871 G 839 872 H 840 873 I 841 874 J 842 875 K 843 876 L 844 877 M 845 878 N 846 879 O 847 880 P 848 0 881 Q 849 1 882 R 850 2 883 S 851 3 884 T 852 4 885 U 853 5 886 V 854 6 887 W 855 7 888 X 856 8 889 Y 857 9 890 Z 858 891 859 892 860 893 861 894 862 895 _ 863 896 864 897 a ...

Page 71: ...ode Character 898 b 932 899 c 933 900 d 934 901 e 935 902 f 936 903 g 937 904 h 938 905 i 939 906 j 940 907 k 941 908 l 942 909 m 943 910 n 944 911 o 945 912 p 946 913 q 947 914 r 948 915 s 949 916 t 950 Up Arrow 917 u 951 Down Arrow 918 v 952 Left Arrow 919 w 953 Right Arrow 920 x 954 End 921 y 955 Home 922 z 956 Insert 923 957 Delete 924 958 Pg Down 925 959 Pg Up 926 960 F1 927 961 F2 928 962 F3...

Page 72: ...hanumeric Entry Mode Key Codes ULTRAKey Alphanumeric Entry Mode Key Codes Key code Character Key code Character 966 F7 983 SF12 967 F8 984 968 F9 985 969 F10 986 970 F11 987 971 F12 988 972 SF1 989 973 SF2 990 974 SF3 991 975 SF4 992 976 SF5 993 977 SF6 994 978 SF7 995 979 SF8 996 980 SF9 997 981 SF10 998 982 SF11 999 Exit Programming ...

Page 73: ...518750 2960 59 HEMU001007 Rev F 10 15 04 Notes ...

Page 74: ...59 20090 Buccinasco Milan Italy www ademco it TEL 39 02 457 1791 Honeywell Security Poland Chmielewskiego 22a 70 028 Szczecin Polska www ultrak pl TEL 48 91 485 40 60 Honeywell Security Espana Calle Vivero 5 28040 Madrid Spain www ademco es TEL 34 91 533 4706 Honeywell Security Czech Republic Havránkova 33 Brno Dolní Heršpice 619 00 Czech Republic www olympo cz TEL 420 543 558 111 Honeywell Securi...

Reviews: